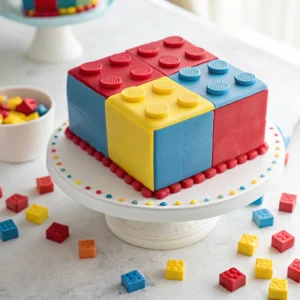
Show-Stopping Lego Brick Fondant Cake
Create an incredible edible masterpiece with this show-stopping Lego brick cake covered in smooth, colorful fondant. Perfect for any Lego themed birthday celebration, this cake features realistic brick details and the iconic circular studs that will wow your guests and delight the birthday child. Although it requires some patience and intermediate decorating skills, the results are well worth the effort!
Equipment
- 1 9x13 inch baking pan Or two 8-inch round pans for different designs
- 1 Electric Mixer Stand or handheld
- Several mixing bowls Various sizes
- 1 Offset Spatula Highly recommended for frosting
- 1 Bench Scraper For achieving smooth buttercream sides
- 1 Large rolling pin Non-stick preferred for fondant work
- 1-2 Fondant smoothers For creating smooth fondant surfaces
- 1 Sharp knife or pizza cutter For clean fondant cuts
- 1 Ruler or measuring tape Precision is key for bricks
- Various Small round cutters or piping tips For creating the Lego studs
- 1 Cake board Slightly larger than your cake
- 1 Turntable Optional, but extremely helpful for decorating
- 1 pair Food-safe gloves For coloring fondant
- 1 Small food-safe brush For applying water/edible glue
Ingredients
For the Cake Base
- 1 9x13 inch cake Baked and completely cooled (chocolate, vanilla, or funfetti recommended)
For the Buttercream
- 1-2 cups unsalted butter Room temperature
- 4-8 cups powdered sugar Sifted
- 1-2 teaspoons vanilla extract
- 2-3 tablespoons milk or cream For consistency adjustment
For the Fondant Decoration
- 3-4 pounds ready-to-use fondant White for base, plus primary Lego colors (red, blue, yellow, green)
- gel food coloring In Lego colors (red, blue, yellow, green)
- vegetable shortening For hands/surface to prevent sticking
- powdered sugar or cornstarch For dusting rolling surface
- water or edible glue Small amount for assembly
Instructions
- Ensure your cake is completely cool before beginning decoration. Level the top(s) of the cake for a flat surface using a serrated knife.1 9x13 inch cake
- Place the cake on the cake board, securing with a dab of buttercream if needed.1 9x13 inch cake, 1-2 cups unsalted butter, 4-8 cups powdered sugar, 1-2 teaspoons vanilla extract, 2-3 tablespoons milk or cream
- Using your offset spatula, apply a thin, even layer of buttercream over the entire cake (top and sides). This is your crumb coat, which seals in loose crumbs.1-2 cups unsalted butter, 4-8 cups powdered sugar, 1-2 teaspoons vanilla extract, 2-3 tablespoons milk or cream
- Chill the cake in the refrigerator for at least 30 minutes until the buttercream is firm to the touch.
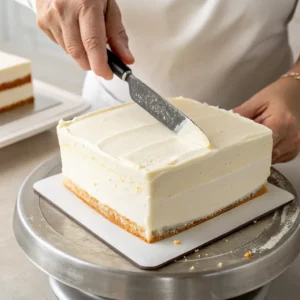
- Apply a second, more generous layer of buttercream. Use the offset spatula and bench scraper to get the sides and top as smooth and straight as possible. Sharp corners are ideal for a brick cake.1-2 cups unsalted butter, 4-8 cups powdered sugar, 1-2 teaspoons vanilla extract, 2-3 tablespoons milk or cream
- Chill again for at least 30-60 minutes until very firm. This prevents the cake from bulging under the fondant and helps maintain crisp edges.
- If coloring white fondant, put on gloves to prevent staining your hands. Knead a small amount of gel color into portions of fondant until desired Lego shades (red, blue, yellow, green) are achieved. Knead thoroughly for even color distribution without streaks.3-4 pounds ready-to-use fondant, gel food coloring
- Keep all fondant tightly wrapped in plastic wrap when not actively working with it to prevent drying. Decide on your cake's base color (often white, grey, or a primary color).3-4 pounds ready-to-use fondant
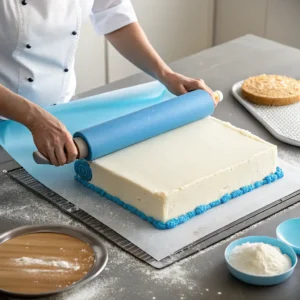
- Lightly dust your clean work surface with powdered sugar or cornstarch. Roll out the main fondant color evenly into a large rectangle, about 1/8 inch thick. Ensure it's large enough to cover the top and sides of the cake with some excess.3-4 pounds ready-to-use fondant, powdered sugar or cornstarch
- Carefully lift the fondant using the rolling pin to help support it and drape it over the chilled, buttercream-covered cake. Start by smoothing the fondant on the top surface with your hand or a fondant smoother, working outwards to eliminate air bubbles.3-4 pounds ready-to-use fondant
- Gently smooth the fondant down the sides, easing out any pleats or folds. Use the fondant smoother for a crisp finish. Trim the excess fondant around the base using a sharp knife or pizza cutter, leaving a clean edge.3-4 pounds ready-to-use fondant
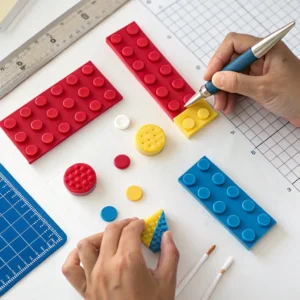
- Roll out colored fondant portions to about 1/4 inch thickness. Using your ruler and sharp knife/pizza cutter, cut out precise rectangular brick shapes (e.g., 1x2 inches, 2x2 inches). Aim for consistency in size.3-4 pounds ready-to-use fondant, gel food coloring
- For the 'lego studs,' use a small round cutter or the end of a piping tip to punch out small circles from the same colored fondant.3-4 pounds ready-to-use fondant, gel food coloring
- Attach the studs to the top of the brick rectangles using a tiny dab of water or edible glue applied with the brush. Arrange studs accurately (e.g., 6 studs for a 2x3 brick shape).3-4 pounds ready-to-use fondant, water or edible glue
- Let the assembled bricks sit for a few minutes to firm up slightly before placing them on your cake.
- Decide on your brick pattern or arrangement for the main cake. Apply a tiny dab of water/edible glue to the back of each fondant brick, then gently press the bricks onto the fondant-covered cake in your desired pattern.3-4 pounds ready-to-use fondant, water or edible glue
- Gently wipe away any stray powdered sugar with a soft, dry brush. Ensure all bricks are securely attached. Add any other desired details like fondant minifigures or a personalized message.3-4 pounds ready-to-use fondant, powdered sugar or cornstarch
Notes
- For the best experience when serving your Lego cake, let it come to room temperature if refrigerated. Cut with a sharp knife, wiping the blade between cuts for clean slices.
- Store any leftover cake in an airtight container. If you've used buttercream under the fondant, refrigeration is recommended for food safety. Let cake portions come to room temperature before serving for the best taste and texture.
- If you need to prepare further in advance, the cake layers can be baked and frozen separately (without decoration) for up to a month. Thaw completely before decorating with buttercream and fondant.
- Common troubleshooting tips:
- Fondant tearing? It might be too thin or drying out. Knead in a tiny bit of shortening if dry.
- Air bubbles? Prick with a fine pin at an angle and gently smooth the air out toward the hole.
- Getting sharp edges: Use two fondant smoothers simultaneously on edges and corners.