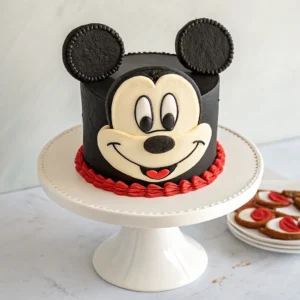
Classic Mickey Mouse Cake
Bring the most iconic smile in the world right to your celebration table! This delicious and achievable Mickey Mouse cake uses fluffy buttercream to create Mickey's cheerful face. Perfect for any Disney-themed birthday party, this guide walks you through every step, from baking the perfect cake layers to piping Mickey's iconic face.
Equipment
- 1 8-inch round cake pan For Mickey's face
- 2 4-inch round cake pans For Mickey's ears
- 1 Electric Mixer Stand mixer or powerful hand mixer recommended
- 1 Offset Spatula For smooth frosting application
- 3-4 Piping bags For decorating
- 1 set Piping tips Small round tip (#3 or #4) and medium round or star tip (#12 or #21)
- 1 Cake board or serving platter Large enough for head and ears
Ingredients
For the Vanilla Cake Layers
- 2 1/2 cups all-purpose flour
- 1 3/4 cups granulated sugar
- 1 1/2 teaspoons baking powder
- 1/2 teaspoon baking soda
- 3/4 teaspoon salt
- 1 cup unsalted butter 2 sticks, softened
- 3 large eggs at room temperature
- 2 teaspoons pure vanilla extract
- 1 1/4 cups buttermilk or whole milk at room temperature
For the Classic Vanilla Buttercream
- 2 cups unsalted butter 4 sticks, very soft
- 6-8 cups powdered sugar sifted
- 1 tablespoon pure vanilla extract
- 3-6 tablespoons milk or heavy cream
- 1 pinch salt
For Decoration
- 1 bottle black gel food coloring High quality recommended for deep color
- 1 bottle red gel food coloring Optional, for shorts/tongue detail
- 1 bottle ivory or light brown gel food coloring Optional, for face
- 2 tablespoons cocoa powder Optional, can help deepen black frosting
Instructions
Bake the Cake Layers
- Preheat oven to 350°F (175°C).
- Grease and flour the 8-inch pan and the two smaller ear pans. Line the bottoms with parchment paper circles.
- Whisk flour, sugar, baking powder, baking soda, and salt in a large mixing bowl.2 1/2 cups all-purpose flour, 1 3/4 cups granulated sugar, 1 1/2 teaspoons baking powder, 1/2 teaspoon baking soda, 3/4 teaspoon salt
- In a separate bowl or measuring cup, whisk milk and vanilla extract.2 teaspoons pure vanilla extract, 1 1/4 cups buttermilk or whole milk
- Beat softened butter in the stand mixer (or with hand mixer) until creamy. Gradually add sugar, beating until light and fluffy (3-5 minutes).1 3/4 cups granulated sugar, 1 cup unsalted butter
- Beat in eggs one at a time, mixing well after each addition. Scrape down the bowl.3 large eggs
- Add dry ingredients in three parts, alternating with the wet ingredients (milk mixture) in two parts, beginning and ending with dry. Mix on low speed just until combined – do not overmix.2 1/2 cups all-purpose flour, 1 3/4 cups granulated sugar, 1 1/2 teaspoons baking powder, 1/2 teaspoon baking soda, 3/4 teaspoon salt, 2 teaspoons pure vanilla extract, 1 1/4 cups buttermilk or whole milk
- Divide batter between pans. Fill the 8-inch pan about 2/3 full. Divide remaining batter evenly between the two smaller pans.
- Place pans in the preheated oven. Bake the smaller cakes for approximately 20-25 minutes, and the larger cake for approximately 30-40 minutes, or until a toothpick inserted into the center comes out clean.
- Let cakes cool in pans for 10-15 minutes before inverting onto wire cooling racks to cool completely. Remove parchment paper.
Whip Up the Buttercream
- Beat the very soft butter in a clean mixer bowl until smooth and pale (3-5 minutes).2 cups unsalted butter
- Gradually add sifted powdered sugar, about 1-2 cups at a time, mixing on low speed until incorporated, then increasing speed.6-8 cups powdered sugar
- Add vanilla extract and salt. Add milk/cream 1 tablespoon at a time, beating well until the frosting reaches a smooth, spreadable/pipeable consistency. Beat on medium-high for a few minutes until light and fluffy.1 tablespoon pure vanilla extract, 3-6 tablespoons milk or heavy cream, 1 pinch salt
Color Your Canvas (Frosting)
- Separate frosting into bowls based on needed colors: Largest portion for Black (head outline, ears, eyes, nose, mouth), Medium portion for White/Face Color (main face area), Optional: Small portion for Red (shorts/tongue).
- Add black gel coloring gradually to the largest portion. Tip: Add a tablespoon of dark cocoa powder first to help achieve a deep black without using excessive coloring. Mix well.1 bottle black gel food coloring, 2 tablespoons cocoa powder
- Tint white portion with ivory/brown if desired for face. Tint red if using. Leave some white if using pure white for the face.1 bottle red gel food coloring, 1 bottle ivory or light brown gel food coloring

Assemble Your Mickey!
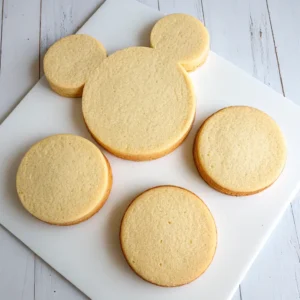
- If cakes have domes, carefully level them with a serrated knife or cake leveler for a flat surface.
- Place the large 8-inch cake in the center of your cake board/platter. Position the two smaller cakes touching the top sides of the large cake to form the ears.
- Use a dab of buttercream underneath the ear cakes to "glue" them to the board and the main cake.
- Apply a thin layer of white (or any light color) buttercream over the entire assembled cake shape (head and ears). This locks in crumbs. Smooth roughly with the offset spatula.
- Refrigerate the crumb-coated cake for at least 20-30 minutes to firm up.
Decorate Mickey's Face (The Grand Finale!)
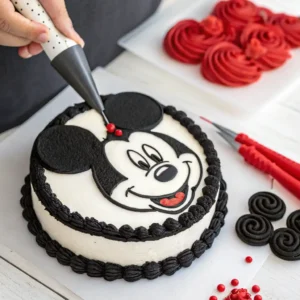
- Using black frosting in a piping bag with the small round tip, carefully pipe the outline of the entire head and ear shape.1 bottle black gel food coloring
- Lightly trace Mickey's face shape (the classic heart-like shape) onto the crumb coat with a toothpick as a guide. Pipe over this line with black frosting.1 bottle black gel food coloring
- Fill in the ears and the outer part of the head (outside the face line) with black frosting. You can use the medium round tip to cover the area and then smooth it with the offset spatula OR use a star tip to fill it with texture.1 bottle black gel food coloring
- Fill the traced face section with the white or ivory/skin-toned frosting. Smooth carefully with the offset spatula.1 bottle ivory or light brown gel food coloring
- Using black frosting and the small round tip: Pipe two large oval shapes for the eyes onto the white face area, pipe a rounded oval shape for the nose below the eyes, and pipe Mickey's classic curved smile below the nose.1 bottle black gel food coloring
- Optional: Use red frosting with a small tip to add shorts along the bottom edge or a small tongue.1 bottle red gel food coloring
- Chill the cake briefly for the frosting to set before serving.
Notes
- Room Temperature Ingredients: Ensure eggs, butter, and milk are at room temperature for the best cake texture.
- Don't Overmix: Mix cake batter just until combined to keep it tender.
- Cool Completely: Frosting will melt on warm cakes! Patience is key.
- Gel Colors: Use gel paste food coloring for deep black and red without thinning the frosting.
- Make-Ahead: Bake cakes a day ahead, wrap well, and store at room temperature. Make frosting ahead and store in the fridge (bring to room temperature and re-whip before use).
- Storage: Store leftover cake in an airtight container in the refrigerator for up to 3-4 days. Let the cake sit at room temperature for about 20-30 minutes before serving for the best frosting texture.