
Ready to Bake Some Magic? Let’s Make the Perfect Mickey Mouse Cake!
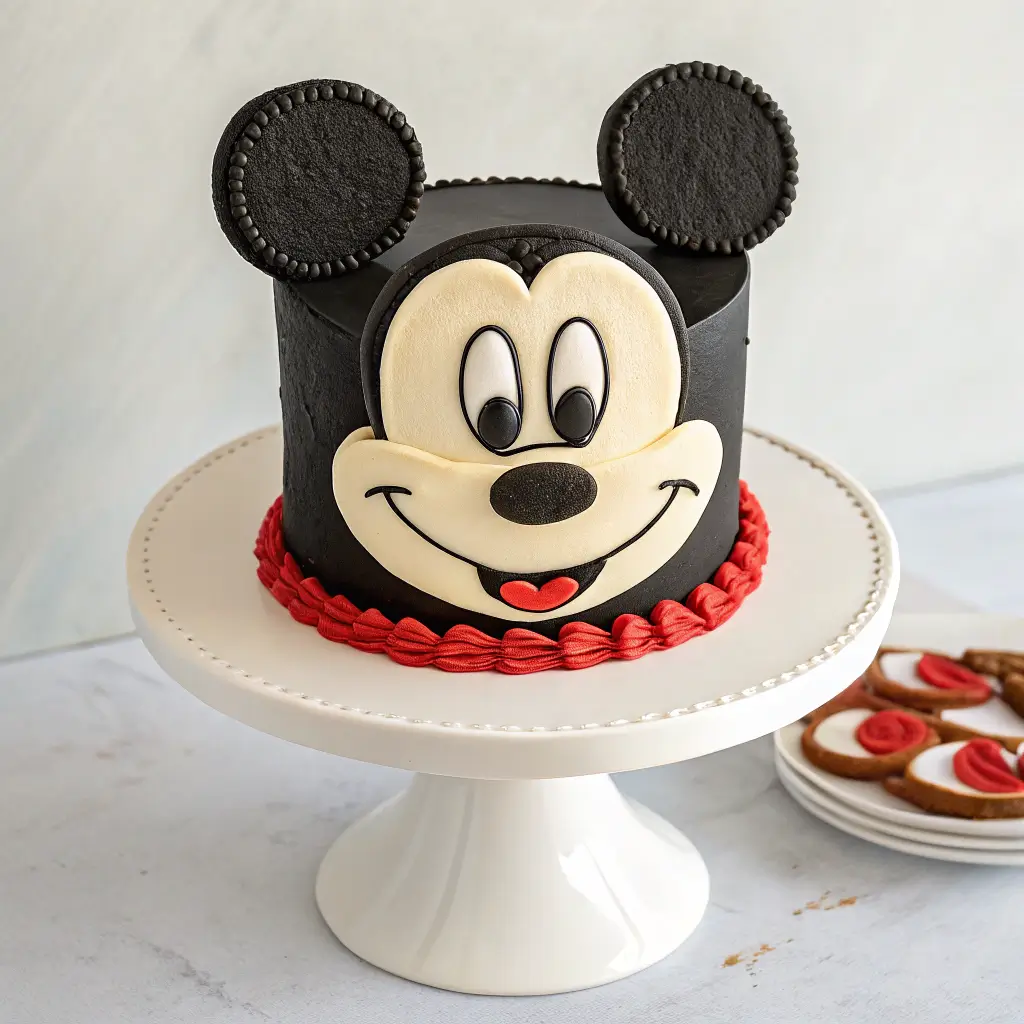
Bring the most iconic smile in the world right to your celebration table! Forget complicated fondant (unless you want it!), this guide focuses on a delicious and achievable classic Mickey Mouse cake using fluffy buttercream. Baking this mickey mouse cake is a joy in itself, and seeing the delight on everyone’s faces is pure Disney magic. We’ll walk you through every step, from baking the perfect cake layers to piping Mickey’s cheerful face. Let’s get started!
Quick Glance: Creating Your Magical Mickey Mouse Birthday Masterpiece
Creating a mickey mouse cake doesn’t have to be intimidating. This recipe guides you through creating a classic Mickey Mouse head shape using one larger round cake and two smaller round cakes for the ears, decorated with homemade vanilla buttercream frosting. Perfect for any disney mickey mouse themed birthday party!
- Yields: Approximately 12-16 servings (using an 8-inch main cake)
- Prep time: Approximately 45-60 minutes (excluding chilling time)
- Bake time: Approximately 30-40 minutes (depending on pan size and oven)
- Total time: Approximately 2.5 – 3 hours (including cooling and basic decoration)
Essential Ingredients for the Perfect Mickey Mouse Cake Recipe
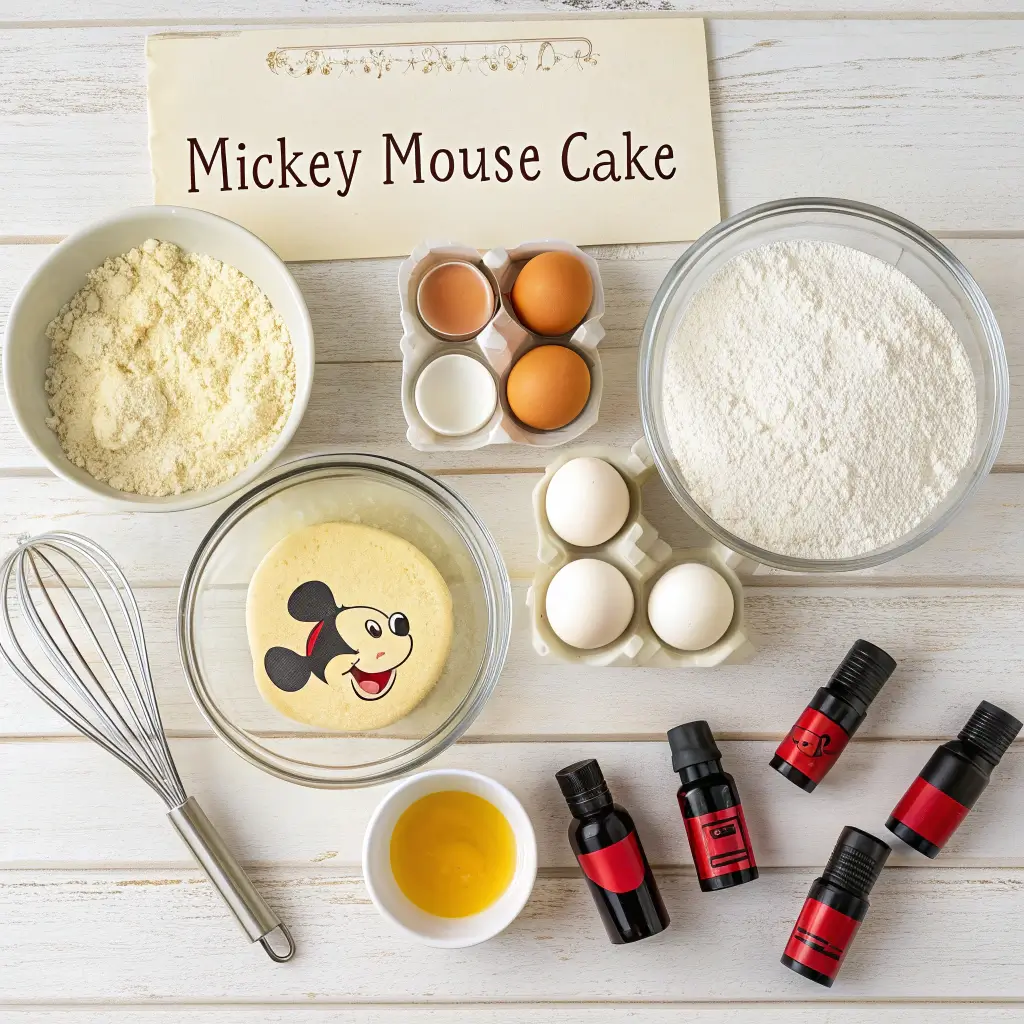
For the Vanilla Cake Layers:
Before you start baking your mickey mouse cake, gather these ingredients to create the perfect foundation for your decorative masterpiece. These ingredients will help you bake a moist, flavorful cake that will be the highlight of any birthday celebration.
- 2½ cups all-purpose flour
- 1¾ cups granulated sugar
- 1½ teaspoons baking powder
- ½ teaspoon baking soda
- ¾ teaspoon salt
- 1 cup (2 sticks) unsalted butter, softened
- 3 large eggs, room temperature
- 2 teaspoons pure vanilla extract
- 1¼ cups buttermilk or whole milk, room temperature
For the Classic Vanilla Buttercream:
The secret to a beautiful mickey mouse cake is in the frost! This creamy buttercream recipe creates the perfect canvas for your mickey mouse cake ideas.
- 2 cups (4 sticks) unsalted butter, very soft
- 6-8 cups powdered sugar, sifted
- 1 tablespoon pure vanilla extract
- 3-6 tablespoons milk or heavy cream
- Pinch of salt
For Decoration:
Transform your simple cake into an amazing mickey mouse party centerpiece with these decoration essentials:
- Black gel food coloring (High quality recommended for deep color)
- Red gel food coloring (Optional, if adding shorts/tongue detail)
- Optional: Ivory or light brown gel food coloring for face
- Optional: Cocoa powder (can help deepen black frosting)
Essential Tools & Equipment for Mickey Mouse Cake Decoration
To successfully create your mickey mouse cake, you’ll need these essential tools. Having the right equipment on hand will make the decorative process much easier and more enjoyable.
- One 8-inch round cake pan (for the main face)
- Two 4-inch OR 6-inch round cake pans (for the ears)
- Large mixing bowls
- Electric mixer (Stand mixer or powerful hand mixer recommended)
- Rubber spatula / wooden spoon
- Measuring cups & spoons
- Wire cooling racks
- Parchment paper
- Offset spatula (highly recommended for smooth frosting)
- Piping bags
- Piping tips:
- Small round tip (e.g., Wilton #3 or #4 for outlines)
- Medium round tip OR medium star tip (e.g., Wilton #12 or #21 for filling areas)
- Toothpicks
- Cake board or serving platter (Large enough for head and ears)
- Optional: Cake leveler, turntable
Step-by-Step Mickey Mouse Cake Tutorial: Baking the Perfect Base
Step 1: Bake the Cake Layers
Let’s start by baking the perfect cake layers for your mickey mouse cake. Following these steps carefully will ensure your cake has the ideal texture and shape.
- Preheat Oven: Set to 350°F (175°C).
- Prepare Pans: Grease and flour the 8-inch pan and the two smaller ear pans. Line the bottoms with parchment paper circles.
- Mix Dry Ingredients: Whisk flour, sugar, baking powder, baking soda, and salt in a large mixing bowl.
- Combine Wet Ingredients: In a separate bowl or measuring cup, whisk milk and vanilla extract.
- Cream Butter & Sugar: Beat softened butter in the stand mixer (or with hand mixer) until creamy. Gradually add sugar, beating until light and fluffy (3-5 minutes).
- Add Eggs: Beat in eggs one at a time, mixing well after each addition. Scrape down the bowl.
- Alternate Dry & Wet: Add dry ingredients in three parts, alternating with the wet ingredients (milk mixture) in two parts, beginning and ending with dry. Mix on low speed just until combined – do not overmix.
- Fill Pans: Divide batter between pans. Fill the 8-inch pan about 2/3 full. Divide remaining batter evenly between the two smaller pans.
- Bake: Place pans in the preheated oven. Bake the smaller cakes for approximately 20-25 minutes, and the larger cake for approximately 30-40 minutes, or until a toothpick inserted into the center comes out clean.
- Cool: Let cakes cool in pans for 10-15 minutes before inverting onto wire cooling racks to cool completely. Remove parchment paper.
Creating the Perfect Buttercream for Your Mickey Mouse Party Cake
Step 2: Whip Up the Buttercream
A great mickey mouse cake needs perfect buttercream! This frosting will be used to frost the entire cake and create all the decorative elements that make Mickey recognizable.
- Beat Butter: Beat the very soft butter in a clean mixer bowl until smooth and pale (3-5 minutes).
- Add Sugar: Gradually add sifted powdered sugar, about 1-2 cups at a time, mixing on low speed until incorporated, then increasing speed.
- Add Flavor & Liquid: Add vanilla extract and salt. Add milk/cream 1 tablespoon at a time, beating well until the frosting reaches a smooth, spreadable/pipeable consistency. Beat on medium-high for a few minutes until light and fluffy.
Step 3: Color Your Canvas (Frosting)
Now it’s time to prepare the colors for your mickey mouse cake decoration. Getting the right shades is crucial for capturing Mickey’s iconic look.
- Divide Frosting: Separate frosting into bowls based on needed colors:
- Largest portion for Black (head outline, ears, eyes, nose, mouth)
- Medium portion for White/Face Color (main face area)
- Optional: Small portion for Red (shorts/tongue)
- Tint Black: Add black gel coloring gradually to the largest portion. Tip: Add a tablespoon of dark cocoa powder first to help achieve a deep black without using excessive coloring. Mix well.
- Tint Other Colors: Tint white portion with ivory/brown if desired for face. Tint red if using. Leave some white if using pure white for the face.
Assembling Your Mickey Mouse Cake: From Layers to Magical Creation
Step 4: Assemble Your Mickey!
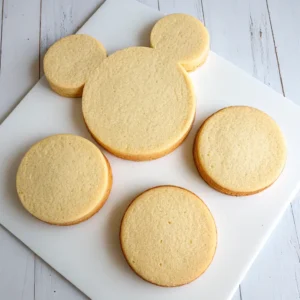
Building the iconic mickey mouse shape is easier than you might think! Follow these steps to assemble your cake properly.
- Level Cakes (Optional): If cakes have domes, carefully level them with a serrated knife or cake leveler for a flat surface.
- Position Cakes: Place the large 8-inch cake in the center of your cake board/platter. Position the two smaller cakes touching the top sides of the large cake to form the ears.
- Secure Ears (Optional but Recommended): Use a dab of buttercream underneath the ear cakes to “glue” them to the board and the main cake.
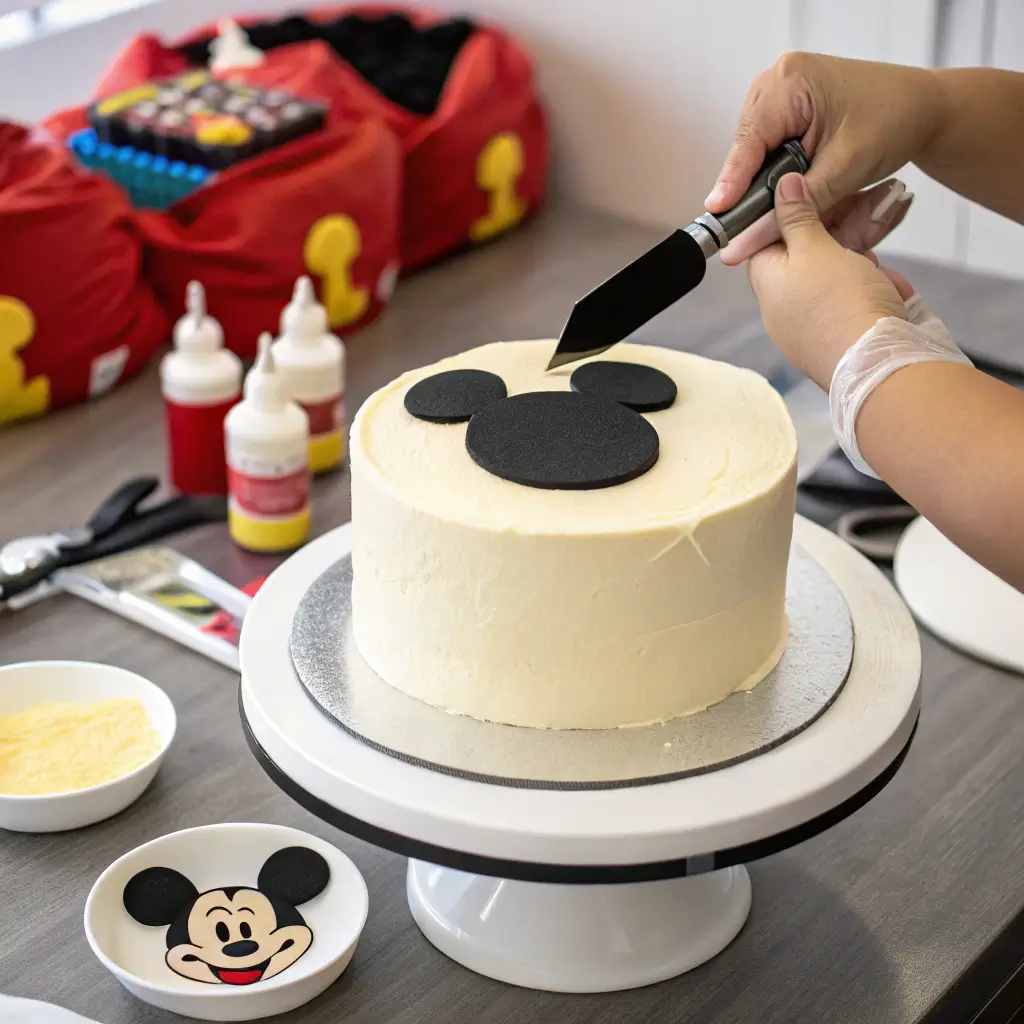
- Crumb Coat: Apply a thin layer of white (or any light color) buttercream over the entire assembled cake shape (head and ears). This locks in crumbs. Smooth roughly with the offset spatula.
- Chill: Refrigerate the crumb-coated cake for at least 20-30 minutes to firm up.
Decorative Mickey Mouse Cake Ideas: Creating Mickey’s Classic Face

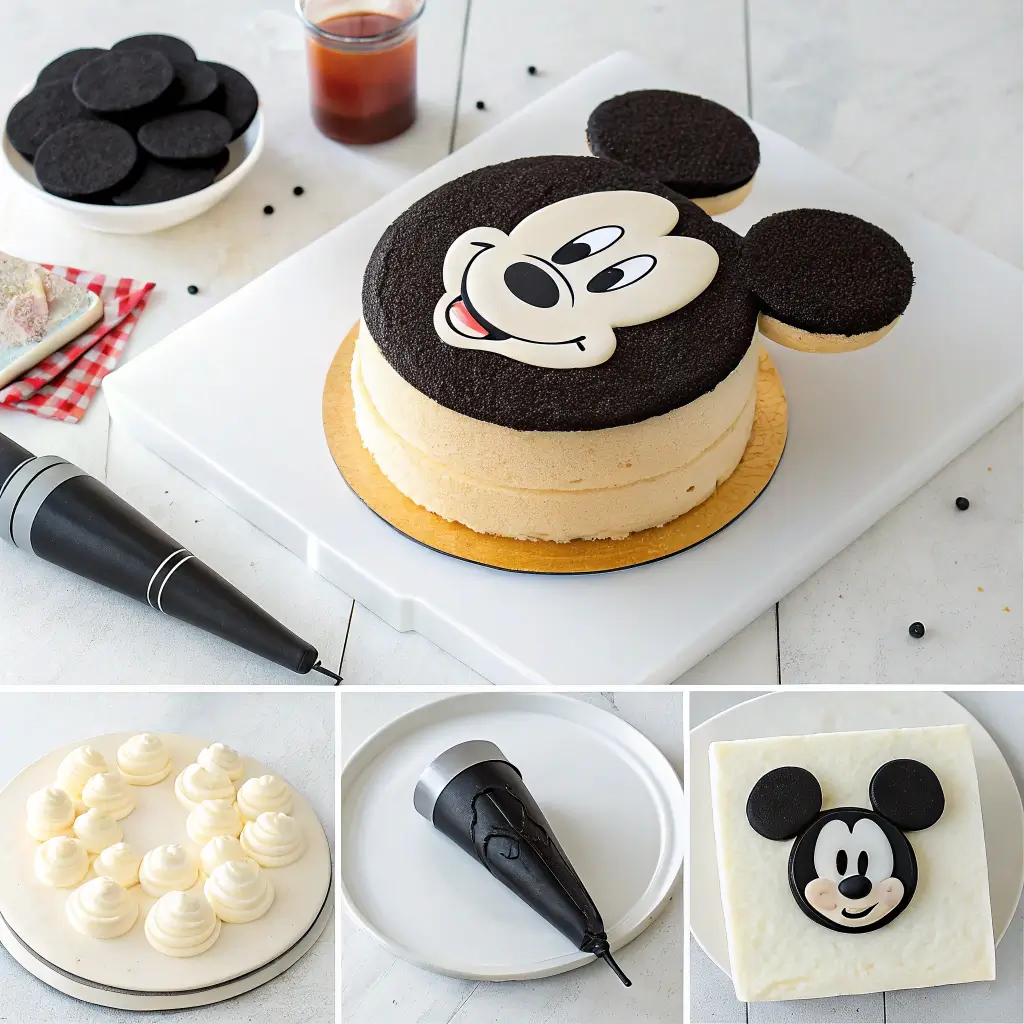
Step 5: Decorate Mickey’s Face (The Grand Finale!)
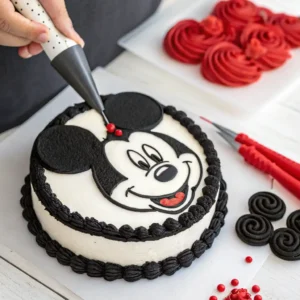
This is where your mickey mouse cake truly comes to life! Creating Mickey’s iconic face is the most exciting part of the process.
- Outline Head/Ears: Using black frosting in a piping bag with the small round tip, carefully pipe the outline of the entire head and ear shape.
- Outline Face Area: Lightly trace Mickey’s face shape (the classic heart-like shape) onto the crumb coat with a toothpick as a guide. Pipe over this line with black frosting.
- Fill Black Areas: Fill in the ears and the outer part of the head (outside the face line) with black frosting. You can use the medium round tip to cover the area and then smooth it with the offset spatula OR use a star tip to fill it with texture.
- Fill Face Area: Fill the traced face section with the white or ivory/skin-toned frosting. Smooth carefully with the offset spatula.
- Pipe Features: Using black frosting and the small round tip:
- Pipe two large oval shapes for the eyes onto the white face area.
- Pipe a rounded oval shape for the nose below the eyes.
- Pipe Mickey’s classic curved smile below the nose.
- Optional Red Details: Use red frosting with a small tip to add shorts along the bottom edge or a small tongue.
- Final Chill (Optional): Chill the cake briefly for the frosting to set before serving.
Creative Mickey Mouse Cake Ideas for Beginners and Experts
Want to try something different? Here are some alternative mickey mouse cake ideas you can explore:
- Mini Mickey Mouse Cupcakes: For a smaller celebration or party desserts, create mickey mouse mini cupcakes by adding chocolate cookies as ears to frosted cupcakes.
- Mickey Mouse Clubhouse Cake: Expand your cake design to include other Mickey Mouse Clubhouse characters like Minnie, Donald, and Goofy for a complete birthday theme.
- Fondant Mickey Mouse Decoration: For a smoother finish, try covering your cake with fondant instead of buttercream. Wilton fondant works well for creating Mickey’s iconic ears and facial features.
- Blue Mickey Mouse Cake: Create a stylish variation with blue frosting for a boy’s birthday party instead of the traditional black and red.
- Pink Mickey Mouse Cake: Alternatively, make a minnie mouse cake by using pink frosting and adding a decorative bow between the ears.
| Mickey Mouse Cake Variation | Best For | Main Ingredients | Decoration Tips |
|---|---|---|---|
| Classic Mickey Mouse Cake | All Ages | Vanilla/Chocolate Cake, Buttercream | Black and Red Frosting |
| Minnie Mouse Cake | Girls’ Parties | Vanilla Cake, Pink Buttercream | Add Bow, Eyelashes |
| Mickey Mouse Cupcakes | School Parties | Cupcake Mix, Buttercream | Mini Ears, Simple Faces |
| Mickey Mouse Clubhouse Cake | Themed Parties | Layer Cake, Multiple Frostings | Character Additions |
| Mickey Mouse Birthday Cake | Milestone Birthdays | Chocolate Cake, Ganache | Personalized Message, Balloon Decorations |
Baker’s Tips for Mickey Mouse Cake Success
Follow these professional tips to ensure your mickey mouse cake turns out perfectly:
- Room Temp Rules: Ensure eggs, butter, and milk are at room temperature for the best cake texture.
- Don’t Overmix: Mix cake batter just until combined to keep it tender.
- Cool Completely: Frosting will melt on warm cakes! Therefore, patience is key.
- Crumb Coat is Crucial: Don’t skip this step for a cleaner final look.
- Gel Colors for Vibrancy: Use gel paste food coloring for deep black and red without thinning the frosting too much.
- Use a Visual Guide: Keep a picture of Mickey Mouse nearby while decorating for reference.
- Make-Ahead Strategy: Bake cakes a day ahead, wrap well, and store at room temp. Make frosting ahead and store in the fridge (bring to room temp and re-whip before use).
- Ingredient Quality Matters: For the best tasting mickey mouse cake, use high-quality vanilla extract and fresh ingredients.
- Create a Fun and Easy Process: Involve children in decorating their own mini mickey mouse cupcakes for a memorable birthday party activity.
- Perfect Black Frosting: To create truly black frosting without using excessive food coloring, start with chocolate buttercream as your base before adding black gel color.
How to Make Chocolate Mickey Mouse Ears for Decoration
Looking for an easier alternative to cake ears? Here’s how to make chocolate mickey mouse ears:
- Melt Chocolate: Melt dark chocolate or candy melts in a microwave-safe bowl.
- Create Templates: Draw circles on parchment paper (or use round cutters as templates).
- Pipe Ears: Pipe melted chocolate onto the templates to create mickey’s ears.
- Chill: Place in refrigerator until completely set.
- Attach: Carefully insert chocolate ears into your frosted cake for a delicious decorative element.
These chocolate mickey ears make a wonderful addition to any mickey mouse cake recipe and can be made several days in advance.
Storing Your Mickey Mouse Birthday Cake Masterpiece
Proper storage ensures your mickey mouse cake stays fresh and delicious:
- Store leftover cake in an airtight container in the refrigerator for up to 3-4 days due to the buttercream.
- Let the cake sit at room temperature for about 20-30 minutes before serving for the best frosting texture.
- For longer storage, you can freeze unfrosted cake layers for up to a month. Just wrap them well in plastic wrap and then aluminum foil.
- Buttercream can be frozen separately for up to 3 months. Thaw in the refrigerator overnight, then bring to room temperature and re-whip before decorating.
If you’re looking for more creative cake ideas, check out our Round SpongeBob Cake for another fun character-themed dessert option!
Mickey Mouse Cake Ideas for Different Celebrations and Skill Levels
Whether you’re preparing for a mickey mouse birthday party or just want to create a special dessert, here are some ideas for different occasions:
For First Birthday Celebrations
Create a memorable mickey mouse first birthday cake by:
- Using a smaller 6-inch cake for the main face
- Adding a “1” candle or topper
- Creating a matching mickey mouse mini smash cake
For Disney-Themed Parties
Enhance your disney mickey mouse cake with:
- Additional disney characters made from fondant
- Disney-themed party supplies surrounding the cake
- A cake board decorated to match the mickey mouse clubhouse theme
For Advanced Bakers
Take your mickey mouse cake decoration to the next level:
- Create a 3D mickey mouse using carved cake layers
- Make mickey mouse ears from rice krispy treats covered in fondant for structural stability
- Use chocolate ganache for a smoother finish before decorating
If you’re looking for another magical cake idea, our Harry Potter Cake tutorial offers fantastic inspiration for themed celebration cakes!
Creative Mickey Mouse Cupcake Topper Ideas
For a simpler alternative, try these mickey mouse cupcake designs:
- Classic Mickey: Pipe a round circle of chocolate buttercream frosting on each cupcake, then add two mini oreos as mickey’s ears.
- Fondant Toppers: Create simple mickey mouse-shaped fondant cutters to make uniform toppers.
- Chocolate Decorations: Use melted chocolate to pipe mickey ear shapes onto wax paper, let harden, then place on buttercream-frosted cupcakes.
- Candy Mickey: Use large chocolate buttons for the face and smaller ones for the ears.
- Mickey Mouse Party Cup Designs: For a fun presentation, serve cupcakes in decorative mickey mouse party cups with coordinating toppers.
Explore More Cake Decorating Inspiration
Looking for more cake ideas? Check out these related resources:
- Better Homes & Gardens Disney Cake Ideas
- Wilton Character Cake Pans and Tutorials
- Disney Family Official Cake Recipes
For fans of fashion-themed cakes, our Barbie Cake tutorial provides step-by-step instructions for creating another iconic character cake!
Frequently Asked Questions About Mickey Mouse Cakes
Which cake is in trend now?
Character-themed cakes remain extremely popular, with mickey mouse cake designs being timeless classics. However, the latest cake craze includes semi-naked cakes with minimal frosting, geode designs, and cakes with fresh flower decorations. Mickey Mouse cakes with modern twists like drip effects or metallic accents are particularly trendy for children’s parties.
How to make chocolate Mickey Mouse ears?
To make chocolate mickey mouse ears:
- Melt 1 cup of dark chocolate chips or candy melts
- Draw 2-inch circles on parchment paper for templates
- Pipe or spoon melted chocolate onto the templates
- Add a small chocolate stem to connect to your cake
- Refrigerate until completely firm (about 30 minutes)
- Carefully peel from parchment and insert into your frosted cake
How to celebrate Mickey Mouse’s birthday?
Mickey Mouse’s birthday is November 18th! Celebrate by:
- Baking a mickey mouse birthday cake as the centerpiece
- Decorating with mickey mouse party supplies like balloons and banners
- Playing classic Disney cartoons
- Creating mickey-shaped foods (sandwiches, cookies, fruit platters)
- Having a mickey mouse clubhouse marathon
- Setting up mickey-themed craft stations for making mickey ears
What foods does Mickey Mouse eat?
In Disney cartoons, Mickey Mouse is often seen enjoying:
- Cheese (his favorite!)
- Hot dogs
- Pancakes
- Ice cream
- Cookies and other baked treats
- Fruits, especially apples
These foods make great themed snacks for a mickey mouse party alongside your mickey mouse cake!
How do you make Mickey Mouse ears?
For edible mickey’s ears on cakes:
- Use round mini cakes or cupcakes
- Cut circles from cake layers
- Use oreos or chocolate cookies
- Create fondant ear circles
- Make chocolate mickey mouse ears
For wearable Mickey ears:
- Use black headbands with attached black felt circles
- Create with foam craft sheets
- Use a pre-made mickey mouse ears mold or cutter
Is it legal to sell Mickey ears?
No, it’s not legal to sell mickey mouse ears or cakes featuring Mickey’s likeness for profit without proper licensing from Disney. Mickey Mouse is a protected trademark and copyright of The Walt Disney Company. While you can make mickey mouse cakes at home for personal use and celebrations, selling them commercially requires official licensing from Disney. The same applies to other Disney characters like Minnie.
What are the 3 most popular cake flavors?
The three most popular cake flavors for mickey mouse cakes are:
- Chocolate cake (rich and universally loved)
- Vanilla cake (versatile and crowd-pleasing)
- Marble cake (offering both chocolate and vanilla in one)
For mickey mouse birthday cakes, these classic flavors pair perfectly with buttercream frosting decorations.
What is the world’s number one cake?
Chocolate cake consistently ranks as the world’s number one cake flavor. Its rich flavor makes it perfect for a mickey mouse cake, especially when paired with creamy buttercream frosting. Chocolate cake provides an excellent contrast when decorated with black, red, and white mickey mouse decorations.
What is the latest cake craze?
The latest cake craze includes:
- Character number cakes (shaped like numbers for birthdays)
- Pull-apart cupcake cakes (arranged in character shapes)
- Fault line cakes (with decorative “cracks” revealing designs)
- Mirror glaze cakes (with shiny, reflective surfaces)
- Drip cakes (with colorful ganache dripping down sides)
Many people now combine these trends with classic character designs to create modern mickey mouse cake ideas.
What is Mickey Mouse’s full name?
Mickey Mouse’s full name is Michael Theodore Mouse. This fun fact makes a great addition to a mickey mouse birthday card accompanying your mickey mouse cake!
What are Mickey Mouse favorite colors?
Mickey Mouse’s favorite colors are traditionally red, yellow, and black—the colors of his iconic outfit. These colors make perfect decorative choices for your mickey mouse cake and party supplies.
What is 28 for Mickey Mouse?
The number 28 is significant because Mickey Mouse made his debut in the animated short “Steamboat Willie” on November 18, 1928. This was Mickey’s first appearance with synchronized sound and is considered his official birthday.
How to dress up as Mickey Mouse?
To dress up as Mickey Mouse:
- Wear black pants and a red or black shirt
- Add white gloves (Mickey’s iconic feature)
- Create or purchase mickey mouse ears
- Add a bow tie for classic Mickey
- Consider yellow shoes for the complete look
- For facial features, use face paint or wear a mickey mouse mask
This makes a perfect costume for the person cutting the mickey mouse cake at a themed birthday party!
What size are Mickey’s ears?
For a proportional mickey mouse cake:
- If your main cake is 8 inches, the ears should be about 4 inches in diameter
- The ears should be positioned so they touch the top sides of the head
- Mickey’s ears are perfectly round and equal in size
- They should be about half the diameter of the main face cake
How to make Mickey ears ornaments?
To make Mickey ears ornaments:
- Purchase clear plastic or glass ball ornaments
- Attach two smaller black ornaments or black foam circles as ears
- Decorate with paint, glitter, or disney mickey mouse stickers
- Add ribbons or bows for hanging
- Personalize with names or dates
These make wonderful party favors to accompany your mickey mouse cake at a birthday celebration!

Classic Mickey Mouse Cake
Equipment
- 1 8-inch round cake pan For Mickey’s face
- 2 4-inch round cake pans For Mickey’s ears
- 1 Electric Mixer Stand mixer or powerful hand mixer recommended
- 1 Offset Spatula For smooth frosting application
- 3-4 Piping bags For decorating
- 1 set Piping tips Small round tip (#3 or #4) and medium round or star tip (#12 or #21)
- 1 Cake board or serving platter Large enough for head and ears
Ingredients
For the Vanilla Cake Layers
- 2 1/2 cups all-purpose flour
- 1 3/4 cups granulated sugar
- 1 1/2 teaspoons baking powder
- 1/2 teaspoon baking soda
- 3/4 teaspoon salt
- 1 cup unsalted butter 2 sticks, softened
- 3 large eggs at room temperature
- 2 teaspoons pure vanilla extract
- 1 1/4 cups buttermilk or whole milk at room temperature
For the Classic Vanilla Buttercream
- 2 cups unsalted butter 4 sticks, very soft
- 6-8 cups powdered sugar sifted
- 1 tablespoon pure vanilla extract
- 3-6 tablespoons milk or heavy cream
- 1 pinch salt
For Decoration
- 1 bottle black gel food coloring High quality recommended for deep color
- 1 bottle red gel food coloring Optional, for shorts/tongue detail
- 1 bottle ivory or light brown gel food coloring Optional, for face
- 2 tablespoons cocoa powder Optional, can help deepen black frosting
Instructions
Bake the Cake Layers
- Preheat oven to 350°F (175°C).
- Grease and flour the 8-inch pan and the two smaller ear pans. Line the bottoms with parchment paper circles.
- Whisk flour, sugar, baking powder, baking soda, and salt in a large mixing bowl.2 1/2 cups all-purpose flour, 1 3/4 cups granulated sugar, 1 1/2 teaspoons baking powder, 1/2 teaspoon baking soda, 3/4 teaspoon salt
- In a separate bowl or measuring cup, whisk milk and vanilla extract.2 teaspoons pure vanilla extract, 1 1/4 cups buttermilk or whole milk
- Beat softened butter in the stand mixer (or with hand mixer) until creamy. Gradually add sugar, beating until light and fluffy (3-5 minutes).1 3/4 cups granulated sugar, 1 cup unsalted butter
- Beat in eggs one at a time, mixing well after each addition. Scrape down the bowl.3 large eggs
- Add dry ingredients in three parts, alternating with the wet ingredients (milk mixture) in two parts, beginning and ending with dry. Mix on low speed just until combined – do not overmix.2 1/2 cups all-purpose flour, 1 3/4 cups granulated sugar, 1 1/2 teaspoons baking powder, 1/2 teaspoon baking soda, 3/4 teaspoon salt, 2 teaspoons pure vanilla extract, 1 1/4 cups buttermilk or whole milk
- Divide batter between pans. Fill the 8-inch pan about 2/3 full. Divide remaining batter evenly between the two smaller pans.
- Place pans in the preheated oven. Bake the smaller cakes for approximately 20-25 minutes, and the larger cake for approximately 30-40 minutes, or until a toothpick inserted into the center comes out clean.
- Let cakes cool in pans for 10-15 minutes before inverting onto wire cooling racks to cool completely. Remove parchment paper.
Whip Up the Buttercream
- Beat the very soft butter in a clean mixer bowl until smooth and pale (3-5 minutes).2 cups unsalted butter
- Gradually add sifted powdered sugar, about 1-2 cups at a time, mixing on low speed until incorporated, then increasing speed.6-8 cups powdered sugar
- Add vanilla extract and salt. Add milk/cream 1 tablespoon at a time, beating well until the frosting reaches a smooth, spreadable/pipeable consistency. Beat on medium-high for a few minutes until light and fluffy.1 tablespoon pure vanilla extract, 3-6 tablespoons milk or heavy cream, 1 pinch salt
Color Your Canvas (Frosting)
- Separate frosting into bowls based on needed colors: Largest portion for Black (head outline, ears, eyes, nose, mouth), Medium portion for White/Face Color (main face area), Optional: Small portion for Red (shorts/tongue).
- Add black gel coloring gradually to the largest portion. Tip: Add a tablespoon of dark cocoa powder first to help achieve a deep black without using excessive coloring. Mix well.1 bottle black gel food coloring, 2 tablespoons cocoa powder
- Tint white portion with ivory/brown if desired for face. Tint red if using. Leave some white if using pure white for the face.1 bottle red gel food coloring, 1 bottle ivory or light brown gel food coloring

Assemble Your Mickey!
- If cakes have domes, carefully level them with a serrated knife or cake leveler for a flat surface.
- Place the large 8-inch cake in the center of your cake board/platter. Position the two smaller cakes touching the top sides of the large cake to form the ears.
- Use a dab of buttercream underneath the ear cakes to “glue” them to the board and the main cake.
- Apply a thin layer of white (or any light color) buttercream over the entire assembled cake shape (head and ears). This locks in crumbs. Smooth roughly with the offset spatula.
- Refrigerate the crumb-coated cake for at least 20-30 minutes to firm up.
Decorate Mickey’s Face (The Grand Finale!)
- Using black frosting in a piping bag with the small round tip, carefully pipe the outline of the entire head and ear shape.1 bottle black gel food coloring
- Lightly trace Mickey’s face shape (the classic heart-like shape) onto the crumb coat with a toothpick as a guide. Pipe over this line with black frosting.1 bottle black gel food coloring
- Fill in the ears and the outer part of the head (outside the face line) with black frosting. You can use the medium round tip to cover the area and then smooth it with the offset spatula OR use a star tip to fill it with texture.1 bottle black gel food coloring
- Fill the traced face section with the white or ivory/skin-toned frosting. Smooth carefully with the offset spatula.1 bottle ivory or light brown gel food coloring
- Using black frosting and the small round tip: Pipe two large oval shapes for the eyes onto the white face area, pipe a rounded oval shape for the nose below the eyes, and pipe Mickey’s classic curved smile below the nose.1 bottle black gel food coloring
- Optional: Use red frosting with a small tip to add shorts along the bottom edge or a small tongue.1 bottle red gel food coloring
- Chill the cake briefly for the frosting to set before serving.
Notes
- Room Temperature Ingredients: Ensure eggs, butter, and milk are at room temperature for the best cake texture.
- Don’t Overmix: Mix cake batter just until combined to keep it tender.
- Cool Completely: Frosting will melt on warm cakes! Patience is key.
- Gel Colors: Use gel paste food coloring for deep black and red without thinning the frosting.
- Make-Ahead: Bake cakes a day ahead, wrap well, and store at room temperature. Make frosting ahead and store in the fridge (bring to room temperature and re-whip before use).
- Storage: Store leftover cake in an airtight container in the refrigerator for up to 3-4 days. Let the cake sit at room temperature for about 20-30 minutes before serving for the best frosting texture.