

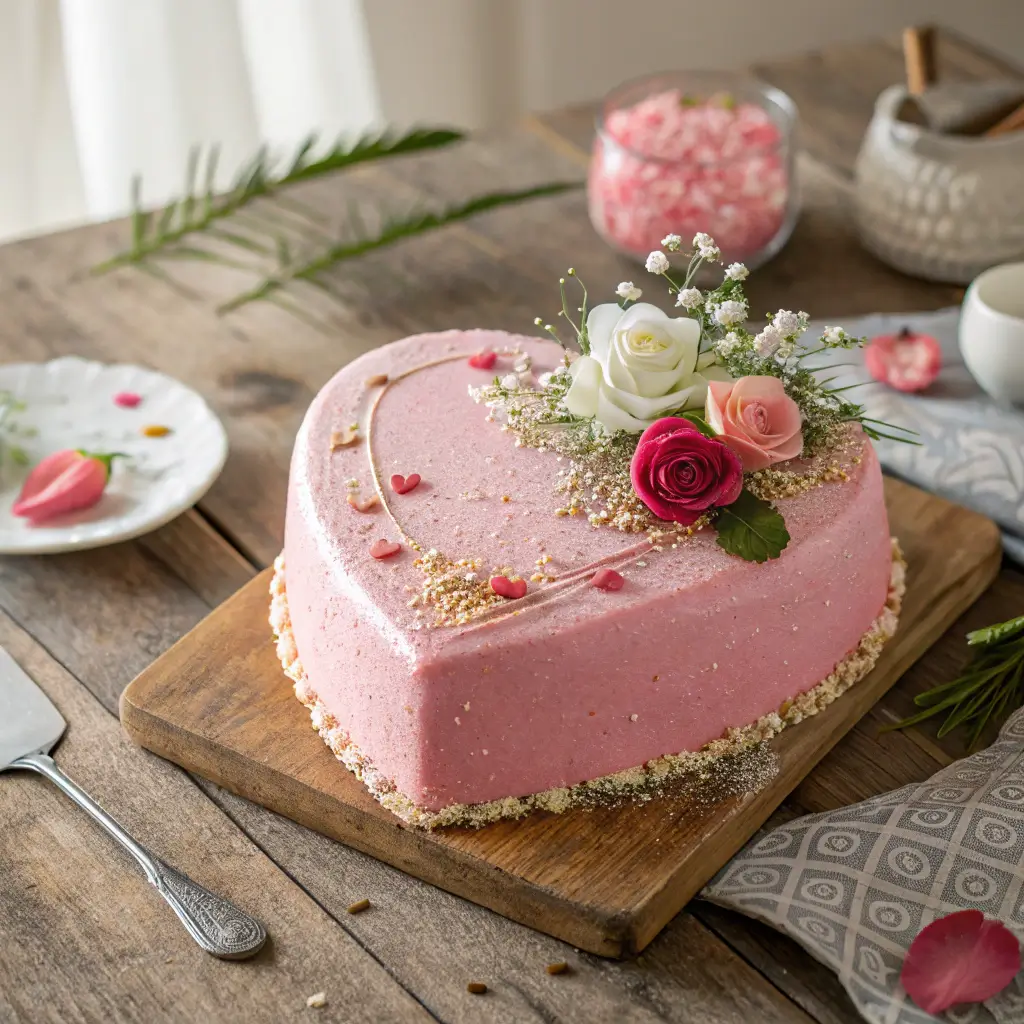
This gorgeous pink heart shaped cake is the ideal centerpiece for any celebration. In this comprehensive guide, you’ll learn how to make a cake that not only tastes divine but also boasts a stunning aesthetic. Moreover, this recipe transforms an ordinary dessert into a memorable treat with a beautiful heart shape that exudes both charm and elegance. Whether you’re planning a heart shape birthday cake for a girl or looking for a cake that doubles as a statement piece for bridal showers, this recipe has you covered. In addition, the recipe’s foolproof techniques guarantee a moist, light, and fluffy cake every time, with a vibrant pink hue enhanced by a touch of glitter—a true pink heart shaped cake with Glitter masterpiece.
Pink Heart Cake Recipe Overview
This article is a complete guide to creating your very own pink heart shaped cake. We will walk you through every step, from preparing the cake batter to frosting and decorating the final product. Furthermore, you’ll discover expert tips that ensure the best texture and flavor, making this heart-shaped cake perfect for special occasions like birthdays and Valentine’s Day. In addition, we provide insights into ingredient quality and equipment essentials, so even if you’re a beginner baker, you can create a vintage heart cake that looks professionally decorated.
Cake Ingredients and Preparation Tips
Below is a detailed list of ingredients for both the cake and the frosting. Before you begin, click the Jump to Recipe button for quick access!
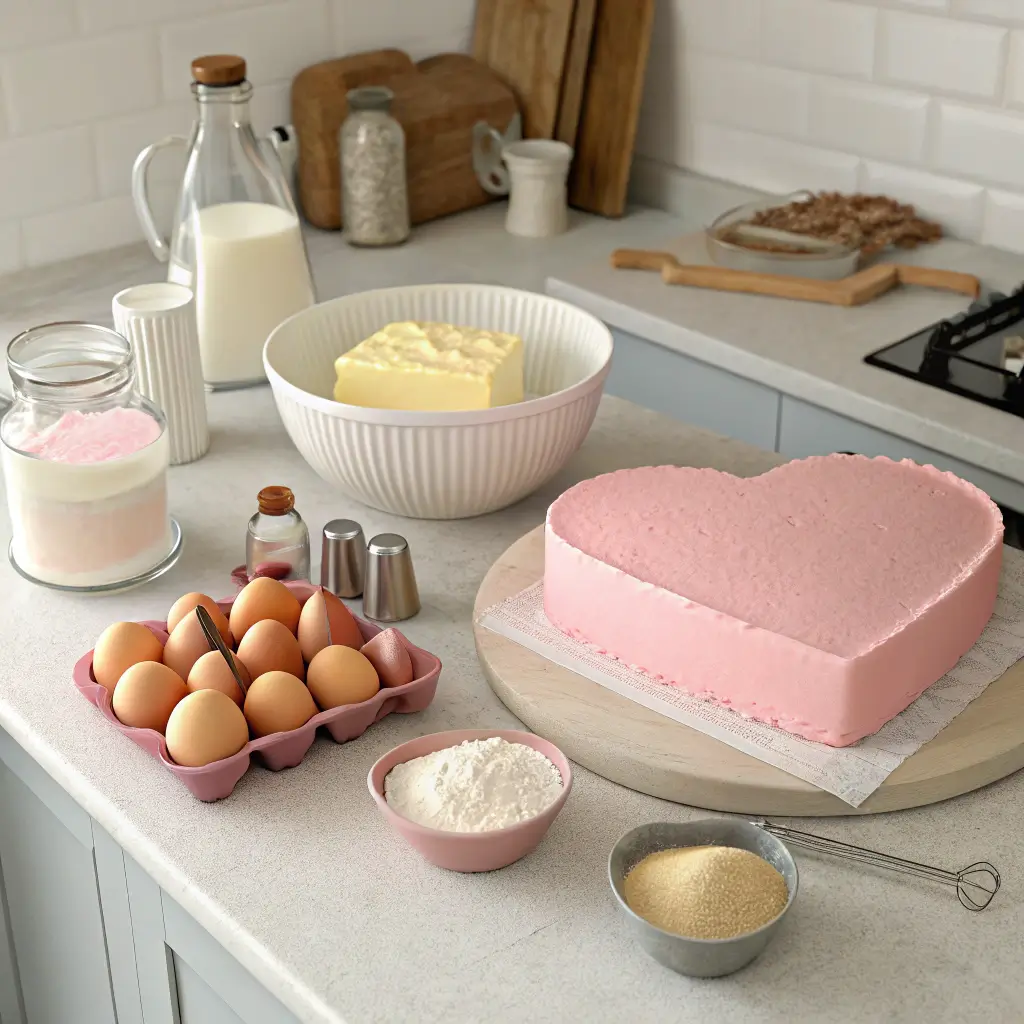
Cake Ingredients
- All-purpose flour, sifted – 2 ½ cups (300g)
Note: Sifting the flour is crucial to remove lumps and achieve a light cake texture. - Granulated sugar – 1 ¾ cups (350g)
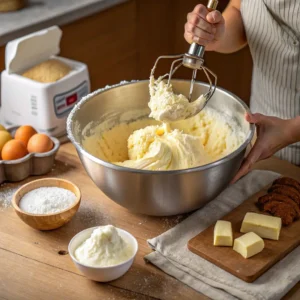
This ingredient not only sweetens the cake but also helps with the structure. - Unsalted butter, softened – 1 cup (225g)
Softened butter is essential for a smooth cake batter. - Eggs – 4 large, at room temperature
Eggs bind the ingredients together and contribute to the cake’s fluffiness. - Buttermilk – 1 cup (240ml)
It provides a tender crumb and moist texture. - Baking powder – 2 ½ teaspoons
This helps the cake rise evenly. - Baking soda – ½ teaspoon
Enhances the leavening process, working in tandem with the buttermilk. - Pure vanilla extract – 2 teaspoons
Pure extracts give a richer flavor compared to imitation versions. - Pink food coloring (gel preferred) – As needed
We recommend using a high-quality gel food color for a vibrant pink hue. For example, Wilton brand works wonderfully. - Salt – ½ teaspoon
A pinch of salt enhances the overall flavor profile.
Frosting Ingredients
- Powdered sugar, sifted – 4 cups (500g)
Sifting is crucial here to ensure a lump-free, smooth frosting. - Full-fat cream cheese – 8 oz (225g), softened
Using full-fat cream cheese creates a rich and tangy frosting. - Unsalted butter, softened – ½ cup (115g)
This adds creaminess and helps blend the flavors. - Pure vanilla extract – 1 teaspoon
For an additional flavor boost that complements the cake. - Pink food coloring (optional) – A few drops
For a deeper pink tint that matches the cake’s body perfectly.
Decoration Ingredients (Optional)
- Edible glitter – For that extra sparkle
Enhance the design by sprinkling edible glitter on top of the cake. - Fresh berries – For garnish
Strawberries or raspberries add a burst of flavor and color contrast. - Sprinkles – To add texture and extra visual appeal
Notably, these ingredients are selected to ensure that each bite of your cake is delicious and visually appealing. In addition, the combination of ingredients provides a balanced flavor profile that works well with a wide range of celebratory themes, including a pink heart shaped cake with Glitter and a Heart shape Birthday Cake for Girl.
For expert tips on achieving the perfect cake texture and consistency, check out this article on BBC Good Food.
Heart Shape Cake Equipment Essentials
Before you start, ensure you have all the necessary equipment. This list is designed to streamline your baking process and guarantee perfect results every time.
- Heart-shaped cake pan (preferably 8-inch)
- Mixing bowls of various sizes
- Electric mixer (handheld or stand mixer)
- Measuring cups and spoons
- Spatula and offset spatula (for smoothing the frosting)
- Parchment paper
- Wire rack
- Piping bag and piping tip (for detailed decoration work)
Moreover, having these tools at hand not only speeds up the process but also ensures that your cake layers come out even and beautifully formed. Consequently, the final product will have a professional finish that is pleasing both to the eye and the palate.
Cake Baking Instructions and Techniques
Print Recipe
For convenience, click the Print Recipe button at the top of the page to print these instructions.
Cake Instructions
- Preheat and Prepare:
Preheat your oven to 350°F (175°C). Grease your heart-shaped cake pan with butter and line the bottom with parchment paper. Meanwhile, sift together the flour, baking powder, baking soda, and salt in a large bowl.
Moreover, preheating ensures even baking. - Cream Butter and Sugar:
In a separate bowl, beat the softened butter and granulated sugar until light and fluffy using an electric mixer. Next, add the eggs one at a time, beating well after each addition.
Furthermore, ensure that the eggs are at room temperature to avoid curdling the mixture. - Combine Dry and Wet Ingredients:
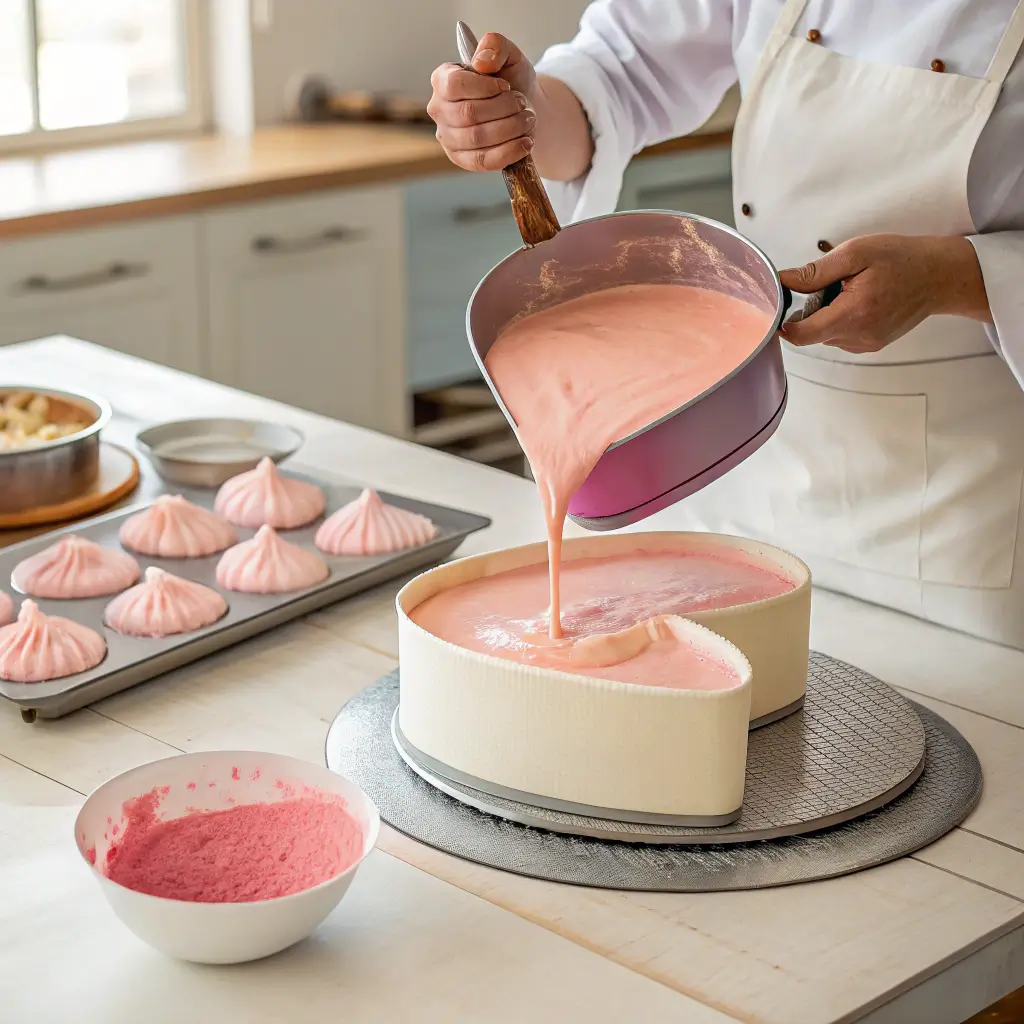
Gradually add the sifted dry ingredients to the butter mixture, alternating with buttermilk. Stir in the pure vanilla extract and pink food coloring until the mixture achieves an even pink hue.
For example, add the dry ingredients in three parts, starting and ending with them. - Batter Consistency:
Mix until the cake batter is smooth and free of lumps. Avoid overmixing, as this may lead to a denser cake.
Also, check that the cake batter flows evenly from the spatula. - Bake the Cake:
Pour the batter into your prepared heart-shaped cake pan. Tap the pan gently to release any air bubbles. Bake for 30–35 minutes, or until a toothpick inserted into the center comes out clean.
In addition, rotating the pan halfway through baking can help with even cooking. - Cooling Process:
Once baked, remove the cake from the oven and let it cool in the pan for 10 minutes. Then, transfer it to a wire rack to cool completely.
Therefore, ensuring the cake is completely cool is crucial for smooth frosting application.
Discover innovative cake recipes and expert baking tips on Epicurious for even more inspiration.
Frosting Instructions
- Prepare the Frosting:
In a large bowl of a stand mixer, beat the softened cream cheese and butter until well combined. Gradually add sifted powdered sugar and vanilla extract while mixing at low speed. Increase the speed once all ingredients are added and beat until the mixture is light and fluffy.
Consequently, achieving a smooth texture is essential for a delectable finish. - Adjust Consistency:
If the frosting seems too thick, add a teaspoon of milk at a time until you achieve the desired consistency.
Moreover, the perfect consistency ensures that you can easily spread and pipe the frosting.
Assembly Instructions
- Leveling the Cake:
Using a serrated knife, level the top of the cake if needed. This will create a flat surface for frosting and decoration.
Additionally, ensure that your cake layers are even to facilitate uniform frosting. - Crumb Coat:
Apply a thin layer of frosting to the entire cake to trap crumbs, known as a crumb coat. Refrigerate the cake for 15–20 minutes to set this layer.
Afterwards, add a final layer of frosting for a smooth finish. - Decorating the Cake:
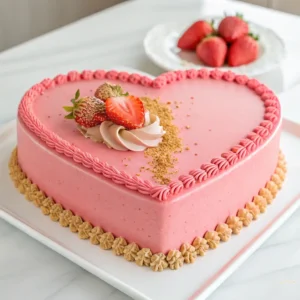
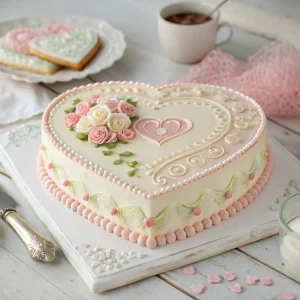
With a piping bag fitted with a decorative tip, pipe additional frosting along the top and side of the cake. For a fun twist, gently press edible glitter on top to create a pink heart shaped cake with Glitter effect. Finally, garnish with fresh berries or sprinkles.
Furthermore, consider using vintage piping techniques for a unique and elegant finish.
Vintage Heart Cake Notes and Variations
Tips and Tricks
- Make-Ahead Options:
You can prepare the cake layers in advance. Store them in an airtight container at room temperature for up to 2 days, or freeze for up to a month. Moreover, the frosting can be made ahead and stored in the refrigerator for up to 3 days. - Storage Suggestions:
Wrap leftover cake tightly in plastic wrap and store in the refrigerator. For longer storage, freeze the cake and thaw at room temperature before serving. - Flavor Variations:
Consider adding a teaspoon of almond extract for a subtle twist. Alternatively, mix in finely chopped fresh strawberries to the batter for a fruity variant. - Troubleshooting:
If your cake sinks in the middle, it might be due to overmixing or opening the oven too early. Next time, mix gently and avoid disturbing the cake during the early baking stages.
Scaling the Recipe
- Adjusting Quantities:
To make a larger cake, simply increase the ingredients by 1.5 or 2 times, and adjust the baking time accordingly. However, remember that thicker cakes might require a slightly lower temperature for even baking.
Notably, these additional tips and tricks ensure that every baker, whether a novice or an experienced chef, can achieve success with this recipe. Furthermore, these variations allow you to experiment with flavors while keeping the overall structure and appearance of the heart shaped cake intact.
Explore our Heart Cake Vintage Heart Shaped Cake recipe for a classic twist on this timeless dessert.
Nutritional Information (Optional)
Although the nutritional values may vary based on exact ingredient brands and serving sizes, here is a rough estimate per serving (assuming 12 servings per cake):
- Calories: 320–380 per slice
- Total Fat: 18–22g
- Carbohydrates: 35–40g
- Protein: 4–6g
These values provide a general idea for those monitoring their dietary intake. Moreover, you can adjust ingredients (for instance, using low-fat cream cheese) to better suit your nutritional goals.
Serving and Presentation Ideas for Cake

Serving Suggestions
- Elegant Plating:
Serve a slice of cake on a decorative cake board. In addition, garnish with fresh berries and a dusting of powdered sugar for a refined presentation. - Pairing Options:
Complement your cake with a cup of coffee or a light dessert wine. Furthermore, a scoop of vanilla ice cream can elevate the dessert experience. - Occasion Tips:
Whether it’s a heart shape birthday cake for a girl or a charming centerpiece for a bridal shower, this cake is versatile enough for any celebration. Moreover, its vibrant color and elegant decoration make it a conversation starter.
Presentation Tips
- Creative Garnishing:
Utilize edible glitter to give your cake that extra sparkle, reminiscent of a pink heart shaped cake Cake with Glitter. In addition, consider piping delicate designs on the cake’s top using a piping bag and vintage piping tips. - Layering Effects:
When serving, consider slicing the cake to reveal its distinct cake layers. Also, a serrated knife works best to ensure clean cuts without disturbing the cake layer structure. - Serving Size:
Depending on the occasion, you might want to serve smaller slices for larger gatherings. In summary, proper portioning enhances the dining experience and allows more guests to enjoy your beautiful cake.
These serving and presentation ideas ensure that your cake not only tastes exquisite but also impresses visually, making every slice a delightful experience.
For more detailed instructions on achieving the perfect buttercream finish, check out our Pink Heart Cake Recipe with Perfect Buttercream.
For Cake Lovers
If you try this recipe, please leave a review on our blog and share your beautiful creations on social media. Moreover, tag us in your posts to show off your baking skills. We’d love to see your versions of this gorgeous pink heart shaped cake! Additionally, explore more of our cake recipes for other unique and creative dessert ideas. By sharing your experiences, you help fellow bakers discover new techniques and variations, and you might even earn a small commission from qualifying affiliate links featured on our site.
Frequently Asked Questions (FAQs) on Heart Shaped Cake
How to make a heart-shaped cake easy?
To make a heart-shaped cake easy, follow a well-structured recipe and use a proper heart-shaped cake pan. Moreover, ensure that all ingredients are at room temperature and measured accurately. Additionally, using a serrated knife to level the cake before frosting can help you achieve a symmetrical shape.
Does Dairy Queen do heart-shaped cakes?
While Dairy Queen occasionally offers themed cakes during seasonal promotions, they are primarily known for their soft-serve ice cream. Therefore, if you’re looking for a dedicated heart-shaped cake, it is best to bake your own or inquire with local bakeries that specialize in custom designs.
How much should I charge for a heart-shaped cake?
Pricing a heart-shaped cake depends on factors such as ingredient cost, decoration complexity, and your local market. Furthermore, consider the time invested and additional costs for special decorations like edible glitter. In general, many bakers set prices that reflect the uniqueness and quality of their heart cake.
Explore creative cake decorating ideas and techniques at Food52 to elevate your cake design
How much batter do I need for a heart-shaped pan?
The amount of batter required varies by the size of the pan. For an 8-inch heart-shaped cake pan, you typically need enough batter to fill it about 2/3 full. Consequently, follow the recipe guidelines and adjust based on your pan’s dimensions.
How many boxes of cake mix for 9×13 pan?
For a standard 9×13 pan, you usually require two boxes of cake mix, depending on the recipe instructions and desired cake thickness. However, homemade recipes often call for specific measurements rather than boxes, so always follow the recipe you’re using.
How to make a heart-shaped cake without a circle pan?
If you do not have a circle pan, you can still achieve a heart shape by using a heart-shaped cake pan or by carving a heart shape from a round cake after baking. Moreover, careful planning and precise cutting with a serrated knife can help create the desired shape.
How to line a heart-shaped cake tin?
Lining your heart-shaped cake tin is simple. First, grease the pan with butter, then place a piece of parchment paper cut to fit the curves of the pan. Additionally, dust lightly with flour to ensure the cake releases easily after baking.
How do you pipe hearts on a cake?
To pipe hearts on your cake, fill a piping bag fitted with a small round piping tip. Next, practice by piping small heart shapes on a parchment sheet until you’re comfortable with the technique. Finally, apply the design gently on the frosted cake for an elegant touch.
How do you cut a heart-shaped cake equally?
Cutting a heart-shaped cake equally can be challenging. However, use a serrated knife and make guide marks along the cake’s natural curves. Furthermore, a toothpick can help you gauge equal portions before making the final cuts.
In conclusion, this detailed guide provides everything you need to create a stunning pink heart shaped cake that is both visually appealing and delectably tasty. Moreover, whether you are celebrating a birthday, a bridal shower, or simply indulging in a sweet treat, this recipe offers clear insights and actionable tips for success. Ultimately, by following these expert techniques and incorporating creative decorations like edible glitter, you can achieve a cake that not only meets but exceeds your expectations.
Enjoy your baking journey, and remember: every cake is a chance to express creativity and love. Happy baking!
Pink Heart Shaped Cake
Equipment
- 1 x Heart-shaped cake pan
- 1 x Mixing bowl
- 1 x Electric mixer
- 1 x Piping bag with star tip
- 1 x Offset spatula
Ingredients
Cake Batter
- 1 ½ cups All-purpose flour
- 1 ½ tsp Baking powder
- ¼ tsp Salt
- ½ cup Unsalted butter Softened
- ¾ cup Granulated sugar
- 2 Large eggs Room temperature
- 1 tsp Vanilla extract
- ½ cup Buttermilk Room temperature
- 2-3 drops Pink food coloring
Buttercream Frosting:
- 1 cup Unsalted butter Softened
- 3 cups Powdered sugar Sifted
- 2 tbsp Heavy cream
- 1 tsp Vanilla extract
- 1-2 drops Pink food coloring
Instructions
- Preheat the oven to 350°F (175°C) and prepare the heart-shaped cake pan by greasing and flouring it.
- In a mixing bowl, whisk together flour, baking powder, and salt. Set aside.1 ½ cups All-purpose flour, 1 ½ tsp Baking powder, ¼ tsp Salt
- In a separate large bowl, cream butter and sugar until light and fluffy.½ cup Unsalted butter Softened, ¾ cup Granulated sugar
- Add eggs one at a time, beating well after each addition. Mix in vanilla extract.2 Large eggs Room temperature, 1 tsp Vanilla extract
- Alternately add dry ingredients and buttermilk to the batter, starting and ending with dry ingredients. Mix until just combined.½ cup Buttermilk Room temperature
- Stir in pink food coloring until evenly incorporated.2-3 drops Pink food coloring
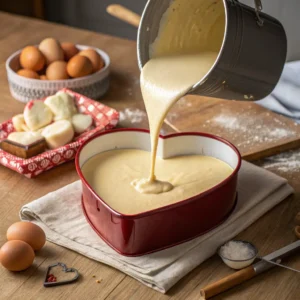
- Pour batter into the prepared heart-shaped pan and smooth the top.
- Bake for 30 minutes or until a toothpick inserted in the center comes out clean.
- Let the cake cool in the pan for 10 minutes, then transfer to a wire rack to cool completely.
- In a bowl, beat butter until creamy, then gradually add powdered sugar, heavy cream, vanilla, and pink food coloring. Beat until smooth and fluffy.1 cup Unsalted butter Softened, 3 cups Powdered sugar Sifted, 2 tbsp Heavy cream, 1 tsp Vanilla extract, 1-2 drops Pink food coloring

- Apply a crumb coat to the cooled cake, then frost evenly with buttercream using an offset spatula.
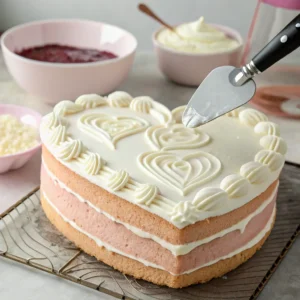
- Fill a piping bag with frosting and decorate the edges with vintage-style piping.
- Serve the cake on a decorative cake stand and garnish with optional edible glitter or fresh berries.
Notes
- Ensure all ingredients are at room temperature for a smoother batter.
- If you don’t have a heart-shaped pan, create the shape by combining a round and square cake.
- Use gel food coloring for a more vibrant pink shade without altering the batter consistency.
- Store leftover cake in an airtight container at room temperature for up to 2 days.
Did you love this recipe? Rate it and share your experience!
There are no reviews yet. Be the first one to write one.