

Heart Birthday Cake: A Complete Guide to Creating a Stunning Vintage Heart Cake for Any Birthday Celebration
Looking for a show-stopping cake for your loved one’s birthday? A heart birthday cake is the perfect way to say “I love you!” Whether you’re celebrating a milestone birthday, Valentine’s Day, or simply want to show someone special how much they mean to you, a beautiful heart shaped cake is guaranteed to make their day memorable. In this comprehensive guide, I’ll walk you through everything you need to know about creating a stunning vintage heart cake that will impress everyone at the party.
Creating a heart cake might seem intimidating at first, but with the right techniques and a bit of patience, you’ll be amazed at what you can achieve. Throughout this post, I’ll share my favorite heart cake recipe, decoration ideas, and professional tips to help you create a beautiful heart birthday cake that looks as good as it tastes. Moreover, I’ll cover different options for cake flavors, frosting techniques, and decoration styles to suit any skill level or occasion.
Essential Equipment and Ingredients for Your Perfect Heart Birthday Cake Creation
Before diving into the baking process, it’s important to gather all the necessary equipment and ingredients. Having everything prepared beforehand will make the cake-making process much smoother and more enjoyable. Furthermore, proper preparation ensures that your heart shaped cake turns out perfectly on the first try.
Equipment You’ll Need for Baking and Decorating Your Heart Cake
- Two 8-inch round cake pans (or one heart shaped pan if you have it)
- Parchment paper for lining pans
- Stand mixer or hand mixer
- Mixing bowls (various sizes)
- Measuring cups and spoons
- Serrated knife for leveling and shaping
- Offset spatula for frosting
- Straight spatula for smoothing sides
- Cake board or serving plate
- Piping bags and various tips (especially Wilton tip 3 for details)
- Bench scraper for smooth frosting
- Cooling racks
- Ruler or measuring tape (for shaping the heart)
- Toothpicks (for marking the heart shape)
- Optional: cake turntable for easier decorating
For inspiration on vintage piping techniques, the Cake Blog’s Vintage Cake Design Tutorial offers excellent step-by-step instructions with photos.
Ingredients for a Delicious Heart Birthday Cake

For the cake layers (makes one 8-inch heart cake):
- 2¼ cups all-purpose flour
- 2 cups granulated sugar
- ¾ cup unsweetened cocoa powder (for chocolate cake)
- 1½ teaspoons baking powder
- 1½ teaspoons baking soda
- 1 teaspoon salt
- 2 large eggs
- 1 cup buttermilk
- ½ cup vegetable oil
- 2 teaspoons vanilla extract
- 1 cup hot coffee or hot water
For the buttercream frosting:
- 1½ cups (3 sticks) unsalted butter, softened
- 5-6 cups powdered sugar
- 1-2 tablespoons heavy cream
- 2 teaspoons vanilla extract
- ¼ teaspoon salt
- Gel food coloring (pink, red, or colors of your choice)
Step-by-Step Heart Cake Recipe: From Mixing to Baking the Perfect Cake Layers
Now that you have all your equipment and ingredients ready, let’s dive into the heart cake recipe. This recipe makes a delicious chocolate cake, but you can substitute with your favorite cake flavor if desired. Additionally, I’ll provide instructions for both using a heart shaped pan and creating a heart shape from round cakes.
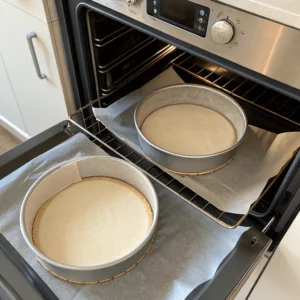
Preparing Your Cake Pans and Batter
- First, preheat the oven to 350°F (175°C). Consequently, prepare your cake pans by greasing them and lining with parchment paper.
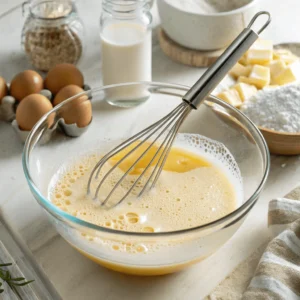
- In a large mixing bowl, whisk together the dry ingredients: flour, granulated sugar, cocoa powder, baking powder, baking soda, and salt until well combined.
- In another bowl, beat the eggs slightly, then add buttermilk, vegetable oil, and vanilla extract. Mix well.
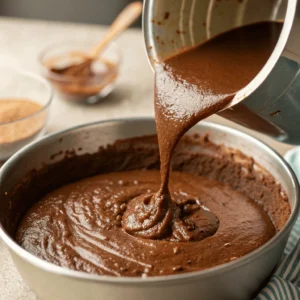
- Gradually add the wet ingredients to the dry ingredients, mixing on medium speed until just combined. Be careful not to overmix.
- Slowly add the hot coffee or water to the batter, mixing on low speed until fully incorporated. The batter will be quite thin, but don’t worry—this is normal and will produce a moist cake.
- Pour the batter evenly into your prepared pans with parchment paper. If using a heart shaped pan, fill it about 2/3 full. If using two 8-inch round pans, divide the batter equally between them.
Baking the Cake Layers
- Bake in the preheated oven for 30-35 minutes, or until a toothpick inserted into the center comes out clean with a few moist crumbs.
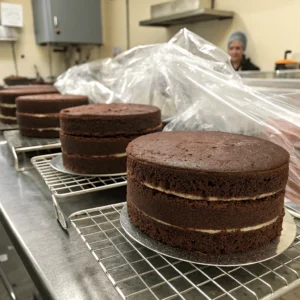
- Remove from the oven and allow the cakes to cool in the pans for about 10 minutes. Subsequently, turn them out onto cooling racks to cool completely before frosting.
- Once cooled, wrap the cake layers in plastic wrap and chill in the refrigerator for at least an hour. As a result, this will make the cake easier to cut and shape.
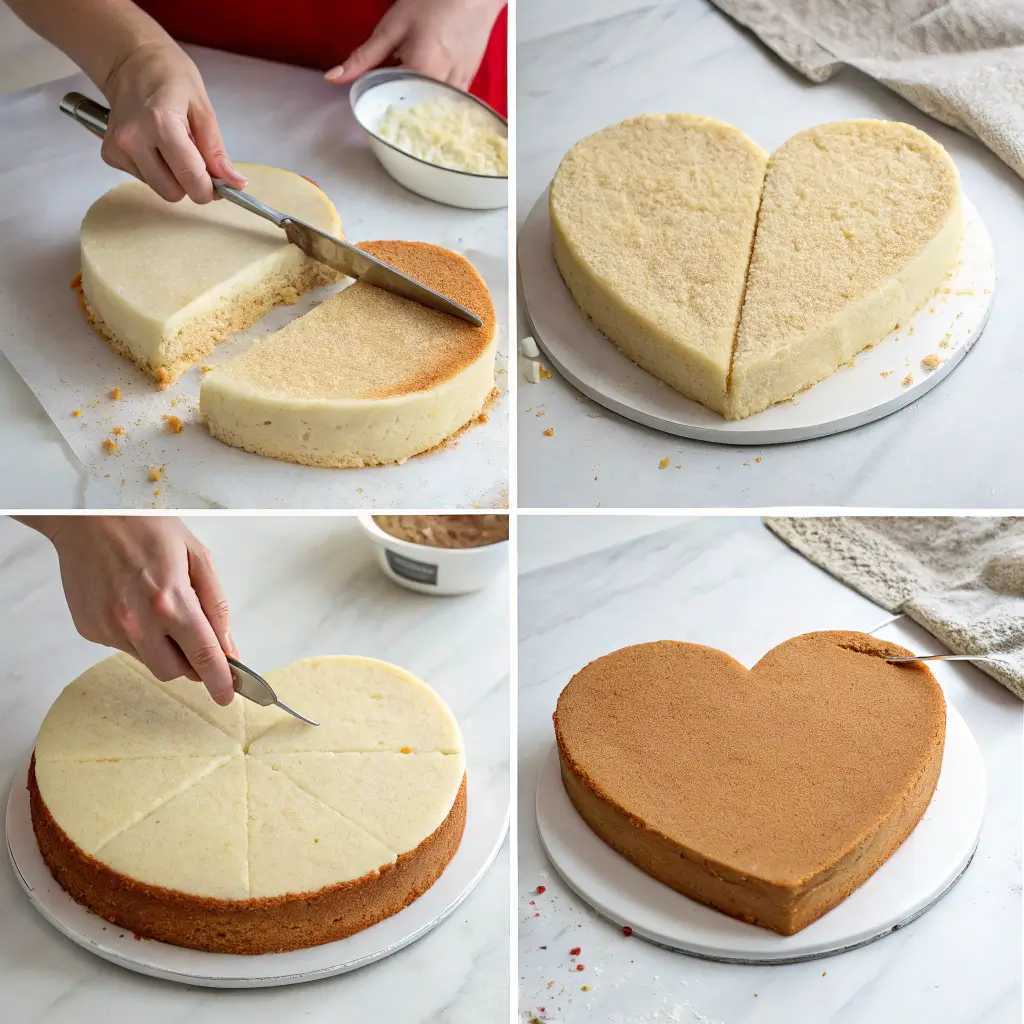
Transforming Round Cakes into a Beautiful Heart Shape: Detailed Cutting Instructions
If you don’t have a heart shaped pan, don’t worry! You can easily make a heart shaped cake from round cakes. In fact, this method often gives you more control over the final shape and size of your heart cake.
How to Make a Heart Shaped Cake from Round Cakes
- Start with two 8-inch round cakes that have been completely cooled and chilled.
- Place one round cake on your work surface. Using a ruler and toothpicks, mark the center of the cake.
- Use a serrated knife to cut the first round cake in half straight across the middle.
- Place the second round cake on your work surface. Draw a line from the center to the edge to mark where you’ll cut. Then, cut the cake in half diagonally.
- Now, arrange the cake pieces to form a heart shape: Place the two halves from the first cake side by side on your cake board to form the top of the heart. Next, position the two diagonal halves from the second cake to form the bottom of the heart, with the pointed ends facing outward.
- Use a serrated knife to trim any uneven edges and perfect the heart shape. However, be careful not to remove too much cake at once.
- Once you’re satisfied with the shape, apply a thin layer of frosting between the pieces to help them stick together.
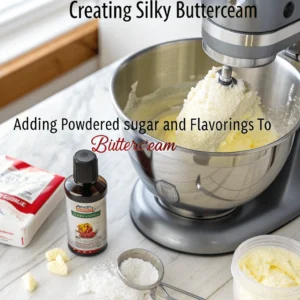
Creating Silky Smooth Buttercream Frosting for Your Heart Birthday Cake
A delicious buttercream frosting is essential for a beautiful heart birthday cake. This recipe makes enough to frost and decorate an 8-inch heart cake with plenty of decorative elements.
American Buttercream Frosting Recipe
- In a stand mixer fitted with the paddle attachment, beat the softened butter until creamy and pale in color, about 3-5 minutes.
- Gradually add the powdered sugar, 1 cup at a time, mixing well after each addition. Add the heavy cream, vanilla extract, and salt, then beat on medium-high speed until light and fluffy, about 5-7 minutes.
- If you plan to color your frosting, divide it into separate bowls and add gel food coloring as desired. For a vintage heart cake, light pink and darker pink shades work beautifully.
- Make sure the buttercream is at room temperature when you’re ready to frost the cake. This will make the frosting process a lot easier and give you a smoother finish.
For the best results with chocolate cakes, the Hershey’s Perfect Chocolate Cake Recipe has been a trusted foundation that can be adapted for heart-shaped pans.Troubleshooting
Professional Frosting Techniques: Applying a Flawless Crumb Coat to Your Heart Cake
Before applying the final layer of frosting, it’s important to apply a crumb coat. This thin layer of frosting seals in any loose crumbs and provides a smooth base for your final coat.
How to Crumb Coat the Cake
- Place your assembled heart cake on a cake board or serving plate. If possible, put it on a cake turntable to make frosting easier.
- Using an offset spatula, apply a thin layer of buttercream all over the cake, including the top and sides. Don’t worry about making it perfect—the goal is simply to seal in the crumbs.
- Smooth the surface of the cake with a bench scraper or straight spatula, removing any excess frosting.
- Chill the cake in the refrigerator for at least 30 minutes to set the crumb coat. As a result, the final layer of frosting will go on much more smoothly.
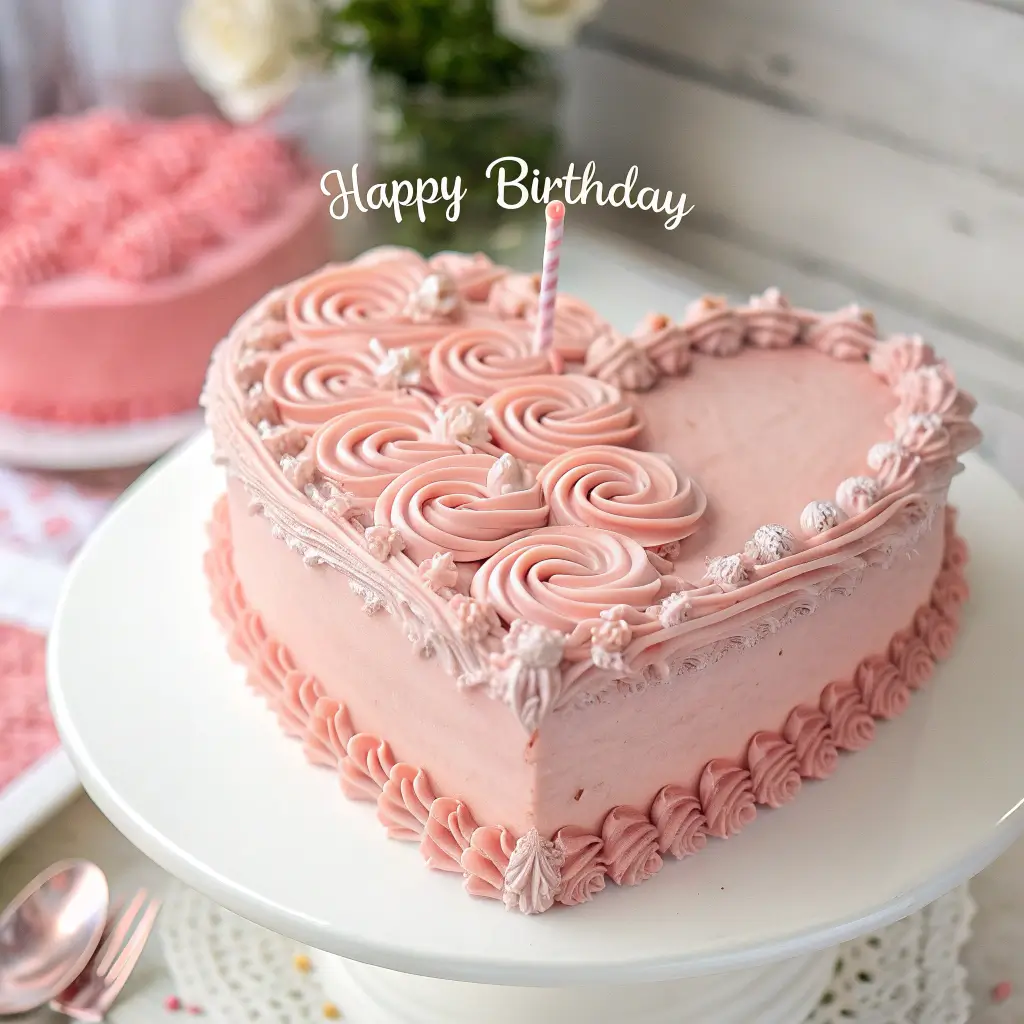
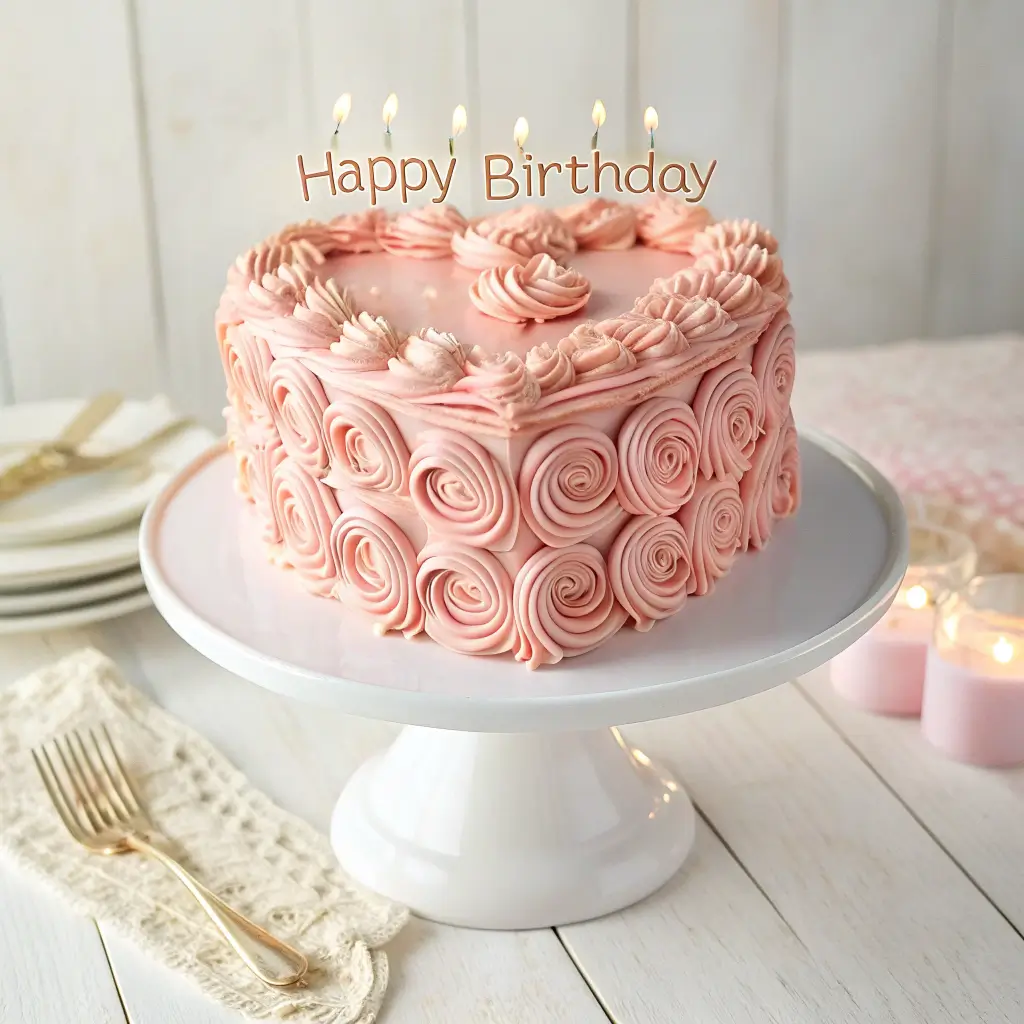
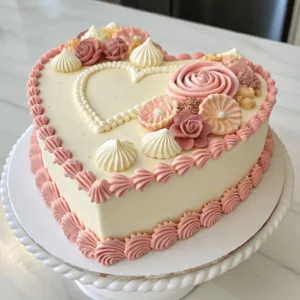
Vintage Heart Cake Decoration: Beautiful Piping Techniques for a Classic Look
Now for the fun part—decorating your heart birthday cake! For a vintage look, piping is key. The following techniques will help you create a beautiful, classic heart cake design.
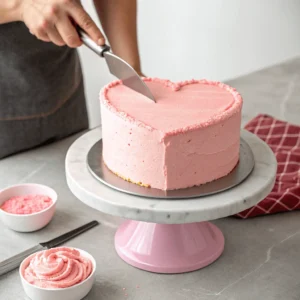
Applying the Final Coat of Frosting
- Once the crumb coat is set, apply a generous layer of frosting to the top of the cake, working it down the sides with an offset spatula.
- Use a bench scraper held at a 90-degree angle to smooth the sides of the cake, rotating the turntable as you go.
- Smooth the top edge of the cake by holding the scraper at a 45-degree angle and working around the cake.
- Chill the frosted cake again for about 15-20 minutes before adding decorative elements.
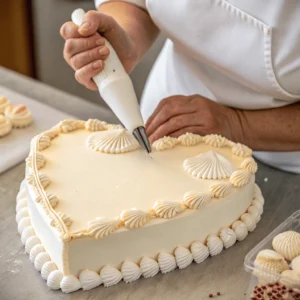
Vintage Piping Designs for Your Heart Shaped Cake
- Prepare your piping bags with the appropriate tips. For a classic vintage look, Wilton tip 3 works well for details, and larger star tips are perfect for borders.
- Start by piping a shell border around the top and bottom edges of the cake. To pipe a shell border, apply pressure as you lower the tip, then release pressure as you pull away.
- For the top of the heart, consider piping a series of small rosettes or swirls. Alternatively, you could pipe a message on top of the cake, such as “Happy Birthday” or “Love You.”
- To add more vintage charm, pipe small dots or pearls along the side of the cake, or create a lattice pattern for a more elaborate look.
- For the bottom of the heart, a simple shell border can add a beautiful finishing touch to your cake design.
Expert Tips and Tricks for Heart Cake Success: Troubleshooting Common Issues
Even experienced bakers face challenges when making a heart cake. Here are some tips and tricks to help you avoid common problems and create a stunning heart birthday cake.
Avoiding Common Heart Cake Problems
- If your cake layers dome too much during baking, use a serrated knife to level them before assembling.
- To prevent the frosting from melting, make sure your cake layers are completely cool before frosting. Additionally, chill the cake between steps if you notice the frosting getting too soft.
- If your heart shape looks uneven, use additional frosting to fill in any gaps or uneven areas. The frosting can help correct minor imperfections in the shape.
- For a perfectly smooth finish, dip your spatula in hot water, wipe it dry, and then use it to smooth the frosting over the sides of the cake.
- If you’re having trouble with the buttercream consistency, add more powdered sugar to stiffen it or a little more cream to soften it.
For more advanced cake troubleshooting, Cake Central’s comprehensive guide to common cake problems offers solutions to issues you might encounter.
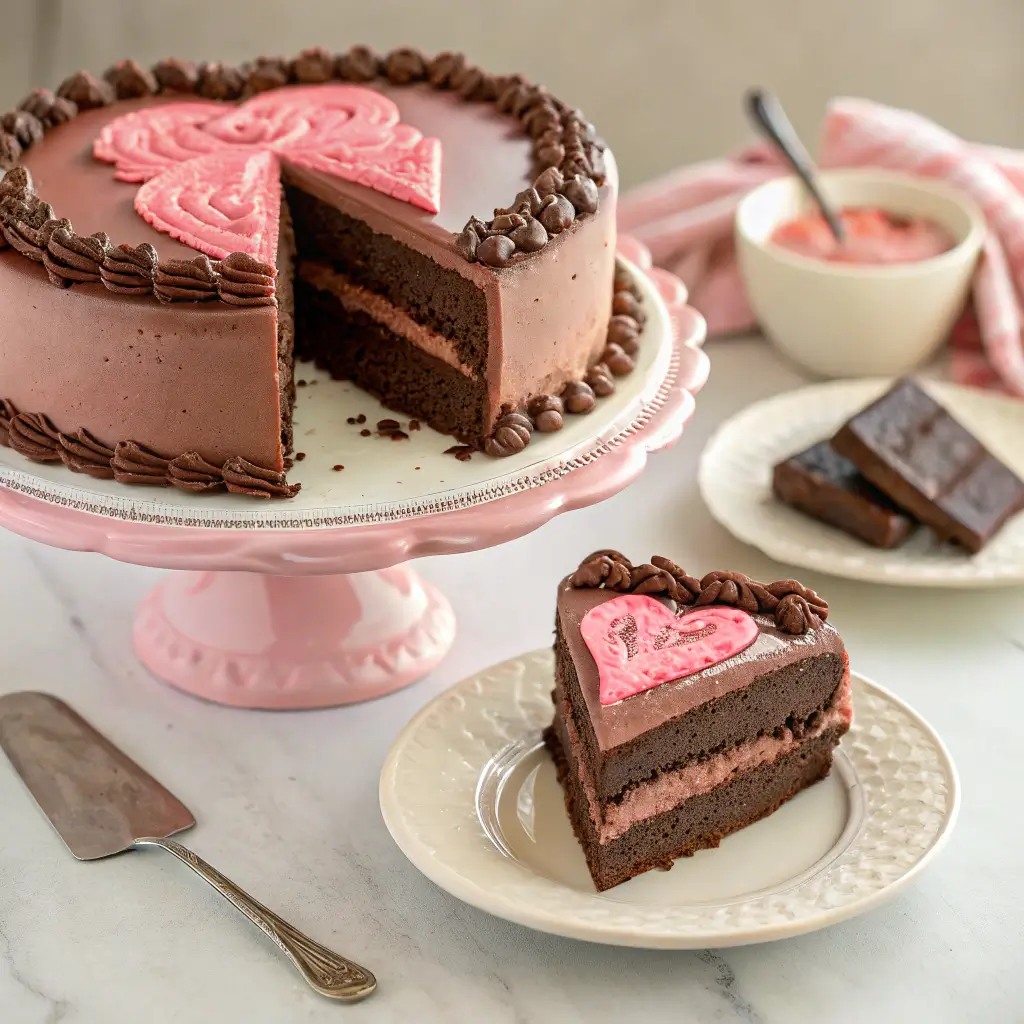
Creative Variations: Delicious Flavor Combinations for Your Heart Shaped Cake
While the classic chocolate cake recipe is delicious, there are many ways to customize your heart cake to suit your taste preferences or the occasion.
Flavor Variations for Your Heart Birthday Cake
- Red Velvet Heart Cake: A red velvet cake is perfect for Valentine’s Day or any romantic occasion. The striking red color pairs beautifully with white cream cheese frosting.
- Vanilla Bean Heart Cake: For a more subtle flavor, try a vanilla bean cake with vanilla buttercream. You can easily color the frosting to match any theme.
- Lemon Heart Cake: A light, tangy lemon cake is perfect for spring or summer celebrations. Pair it with lemon buttercream or a complementary flavor like raspberry.
- Chocolate Buttercream Variation: For chocolate lovers, try filling and frosting your heart cake with chocolate buttercream instead of vanilla.
- Marble Heart Cake: Combine chocolate and vanilla batters for a beautiful marbled effect inside your heart cake.
If you’re looking for more creative ideas beyond the basic heart shape, our vintage heart cake gallery showcases stunning designs from simple to elaborate that you can adapt for any occasion.
Assembling Your Heart Cake: Layering and Filling for Maximum Flavor and Stability
Proper assembly is crucial for a stable, delicious heart birthday cake. Here’s how to layer and fill your cake for the best results.
Layering Your Heart Cake
- If your cake layers are thick, use a serrated knife to slice them horizontally into thinner layers.
- Place the first cake layer on your cake board or serving plate, cut side up (if you’ve split the layers).
- Apply a generous layer of buttercream or your chosen filling to the top of the first layer.
- Add the second layer of cake, cut side down, and press gently to secure.
- If you’re using more than two layers, repeat the process with the remaining layers.
- Once all layers are assembled, apply a layer of frosting to help secure any loose pieces before proceeding with the crumb coat.
Storing and Transporting Your Heart Birthday Cake: Keeping Your Creation Perfect
After all your hard work, you’ll want to make sure your cake stays fresh and beautiful until it’s time to serve.
Storage Tips for Your Heart Cake
- A completely frosted cake can be stored at room temperature for 1-2 days in a cake keeper or under a cake dome.
- For longer storage, refrigerate the cake in an airtight container for up to 5 days. However, bring it to room temperature before serving for the best flavor and texture.
- If you need to store the cake for more than 5 days, freeze it unwrapped until firm, then wrap it tightly in plastic wrap and aluminum foil. Thaw in the refrigerator overnight before serving.
Transporting Your Heart Shaped Cake
- For short distances, place the cake on a non-slip mat in your vehicle and drive carefully.
- For longer distances, consider using a cake carrier specifically designed for transporting cakes.
- If you’re concerned about the cake’s stability, insert a few wooden dowels through the layers before transporting.
Serving Your Heart Birthday Cake: Cutting Suggestions for the Perfect Slice
Cutting a heart shaped cake can be a bit tricky, but with these tips, everyone will get a perfect slice.
How to Cut a Heart Cake
- Start by cutting the cake vertically down the center, from the top to the bottom of the heart.
- Then, make horizontal cuts across each half, working from the center outward.
- For larger cakes, you might also want to make some diagonal cuts from the center to the edges.
- An 8-inch heart cake will typically feed about 10-12 people with reasonably sized slices.
FAQs: Everything You Need to Know About Heart Birthday Cakes
Does Dairy Queen do heart-shaped cakes?
Yes, Dairy Queen does offer heart-shaped cakes, especially around Valentine’s Day. However, availability may vary by location, so it’s best to call your local Dairy Queen to confirm.
How to get a heart-shaped cake?
You can get a heart-shaped cake by either baking one yourself using a heart-shaped pan, creating one from round cakes as described in this article, ordering from a bakery, or purchasing from stores like Walmart or Dairy Queen.
How many will an 8-inch heart cake feed?
An 8-inch heart cake will typically feed about 10-12 people with reasonably sized slices. For larger gatherings, consider making a larger cake or supplementing with cupcakes.
Are heart-shaped cakes trending?
Yes, heart-shaped cakes are trending beyond just Valentine’s Day. They’re popular for birthdays, anniversaries, baby showers, bridal showers, and other special occasions where showing love is the theme.
Does Dairy Queen do custom photo cakes?
Yes, many Dairy Queen locations offer custom photo cakes where they can print an edible image on your cake. Check with your local store for availability and requirements.
How to make a heart cupcake cake?
To make a heart cupcake cake, arrange cupcakes in a heart shape on a large serving tray, frost them as one unit, and decorate. This makes for easy serving and a beautiful presentation.
Do you have to order a Dairy Queen cake in advance?
Yes, it’s recommended to order a Dairy Queen cake at least 24-48 hours in advance, especially for custom designs or during busy seasons.
Can DQ print a picture on a cake?
Yes, many Dairy Queen locations can print pictures on cakes using edible ink and paper. Bring a high-quality image or send it digitally according to their requirements.
How many people does a 10-inch cake feed?
A 10-inch heart cake will typically feed about 20-25 people with reasonably sized slices.
How many layers for a heart cake?
Most heart cakes have 2-3 layers, but you can make them with as many as you like. Just ensure proper support for taller cakes.
What size heart cake for 20 people?
For 20 people, a 10-inch heart cake or two 8-inch heart cakes would be appropriate.
How to cut a heart cake to serve?
Cut down the middle from top to bottom, then cut horizontal slices across each half. For larger cakes, you may also want to cut diagonal slices from the center outward.
Conclusion: Create a Heart Birthday Cake Filled with Love
Creating a heart birthday cake is more than just baking—it’s an expression of love and care for someone special. With the techniques and tips shared in this comprehensive guide, you now have everything you need to create a stunning vintage heart cake that will be the centerpiece of any birthday celebration.
Remember, perfection comes with practice, so don’t be discouraged if your first attempt isn’t exactly as you imagined. The most important ingredient in any heart cake is the love and thought you put into making it.
I’d love to see your creations! Leave a comment below and share your heart cake successes or any questions you might have. Happy baking, and may your heart cakes bring joy to all who receive them!
Vintage Heart Birthday Cake
Equipment
- 2 8-inch round cake pans or 1 heart-shaped pan
- Parchment Paper
- Stand mixer or hand mixer
- mixing bowls
- Measuring Cups and Spoons
- Offset Spatula
- Straight spatula or bench scraper
- Cake board
- Piping bags
- Piping tips (including Wilton tip 3)
- Cooling racks
- Serrated knife
- Ruler or measuring tape
- Toothpicks
Ingredients
Chocolate Cake Layers
- 2¼ cups all-purpose flour
- 2 cups granulated sugar
- ¾ cup unsweetened cocoa powder
- 1½ teaspoons baking powder
- 1½ teaspoons baking soda
- 1 teaspoon salt
- 2 large eggs
- 1 cup buttermilk
- ½ cup vegetable oil
- 2 teaspoons vanilla extract
- 1 cup hot coffee or hot water
Buttercream Frosting
- 1½ cups 3 sticks unsalted butter, softened
- 5-6 cups powdered sugar
- 1-2 tablespoons heavy cream
- 2 teaspoons vanilla extract
- ¼ teaspoon salt
- Gel food coloring pink or red
Instructions
Preheat Oven & Prepare Pans
- Preheat oven to 350°F (175°C).
- Grease two 8-inch round cake pans and line with parchment paper.
Mix Dry Ingredients
- In a large bowl, whisk together flour, sugar, cocoa powder, baking powder, baking soda, and salt until well combined.2¼ cups all-purpose flour, 2 cups granulated sugar, ¾ cup unsweetened cocoa powder, 1½ teaspoons baking powder, 1½ teaspoons baking soda, 1 teaspoon salt
Mix Wet Ingredients
- In another bowl, beat eggs slightly, then add buttermilk, vegetable oil, and vanilla extract. Mix well.2 large eggs, 1 cup buttermilk, ½ cup vegetable oil, 2 teaspoons vanilla extract
Combine Mixtures
- Gradually add the wet ingredients to the dry ingredients, mixing on medium speed until just combined. Do not overmix.
Add Liquid
- Slowly add the hot coffee or water to the batter, mixing on low speed until fully incorporated. The batter will be thin.1 cup hot coffee or hot water
Bake the Cake
- Pour the batter evenly into the prepared pans and bake for 30-35 minutes, or until a toothpick inserted in the center comes out clean with a few moist crumbs.
Cool the Cakes
- Allow cakes to cool in pans for 10 minutes, then turn out onto cooling racks to cool completely. Wrap in plastic wrap and refrigerate for at least 1 hour.

Shape the Heart (if using round cakes)
- If making a heart shape from round cakes:
- Place one round cake on your work surface and cut in half straight across the middle.
- Cut the second cake in half diagonally.
Assemble the Heart Cake
- Arrange cake pieces to form a heart: place the two half circles at the top side by side, and the two triangular pieces at the bottom with points facing outward. Trim as needed for a smooth heart shape.
Prepare the Buttercream Frosting
- In a stand mixer with paddle attachment, beat the softened butter until creamy and pale, about 3-5 minutes.1½ cups 3 sticks unsalted butter, softened
Make the Frosting
- Gradually add powdered sugar, 1 cup at a time, mixing well after each addition.5-6 cups powdered sugar
- Add heavy cream, vanilla extract, and salt, then beat on medium-high speed until light and fluffy, about 5-7 minutes.1-2 tablespoons heavy cream, ¼ teaspoon salt, 2 teaspoons vanilla extract
Color the Frosting
- Divide frosting into bowls and add gel food coloring as desired for your vintage heart cake design.Gel food coloring
Apply Crumb Coat
- Apply a thin layer of frosting all over the cake (crumb coat), smooth with a bench scraper, and refrigerate for 30 minutes to set.
- Associated Ingredients:
- Apply a final generous layer of frosting to the cake, smoothing sides and top with a bench scraper and offset spatula.
Pipe Decorative Borders
- Fill piping bags with remaining frosting and appropriate tips.
- Pipe a shell border around the top and bottom edges of the cake.
Decorate the Cake
- Add additional vintage piping designs such as rosettes, swirls, or dots to complete your vintage heart birthday cake design.
Notes
- This recipe makes enough batter for one heart-shaped cake or two 8-inch round cakes.
- For a lighter cake, you can substitute the hot coffee with hot water.
- The cake can be made up to 2 days in advance and stored in an airtight container at room temperature.
- For a different flavor, swap the chocolate cake recipe with vanilla or red velvet.
- A completely frosted cake can be stored at room temperature for 1-2 days or refrigerated for up to 5 days.
- An 8-inch heart cake will typically feed about 10-12 people with reasonably sized slices.
Did you love this recipe? Rate it and share your experience!
There are no reviews yet. Be the first one to write one.