

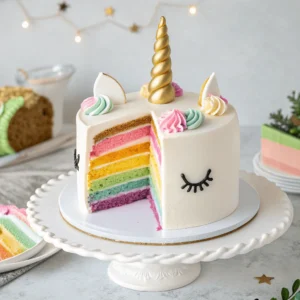
Magical Round Unicorn Cake: From Scratch or Box, We’ve Got You Covered!
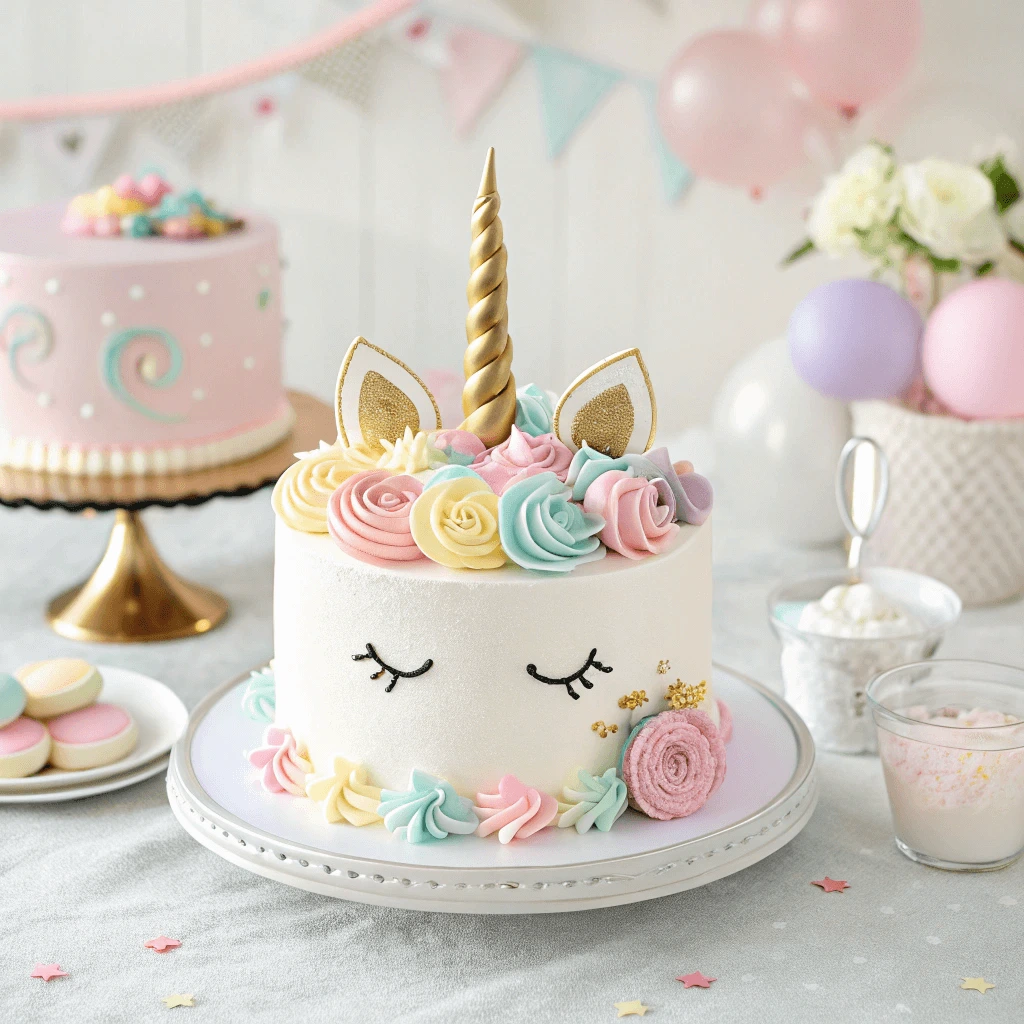
Are you planning a magical celebration and searching for the perfect showstopper dessert? Look no further than this stunning round unicorn cake that’s guaranteed to bring smiles and wonder to any gathering! Whether you’re a seasoned baker ready to tackle a homemade recipe or prefer the convenience of a white cake mix, this comprehensive guide will walk you through creating an enchanting unicorn cake with rainbow layers that’s as delicious as it is beautiful.
Creating a layered unicorn cake might seem intimidating at first glance, but with our step-by-step instructions, even beginners with general baking skills can achieve professional-looking results. It’s actually quite simple once you break down the process! The combination of colorful layers, swirls of buttercream frosting, and whimsical decorations transforms a simple round cake into a magical creation that’s perfect for any birthday party, special occasions, or anytime you want to add a touch of fantasy to your celebration.
The best part? This easy unicorn cake recipe is customizable to suit your preferences and skill level. You can choose vibrant rainbow colored layers or stick with a simpler white and pink color scheme. Furthermore, we’ll show you exactly how to make a unicorn horn and create those signature decorations that bring the character to life!
Recipe Summary: Round Unicorn Cake with Rainbow Layers
- Prep Time: 45 minutes
- Bake Time: 35 minutes
- Total Time: 3 hours (including cooling and decorating)
- Yield: 12-16 servings
- Skill Level: Beginner-Intermediate
Essential Equipment for Your Unicorn Cake Creation
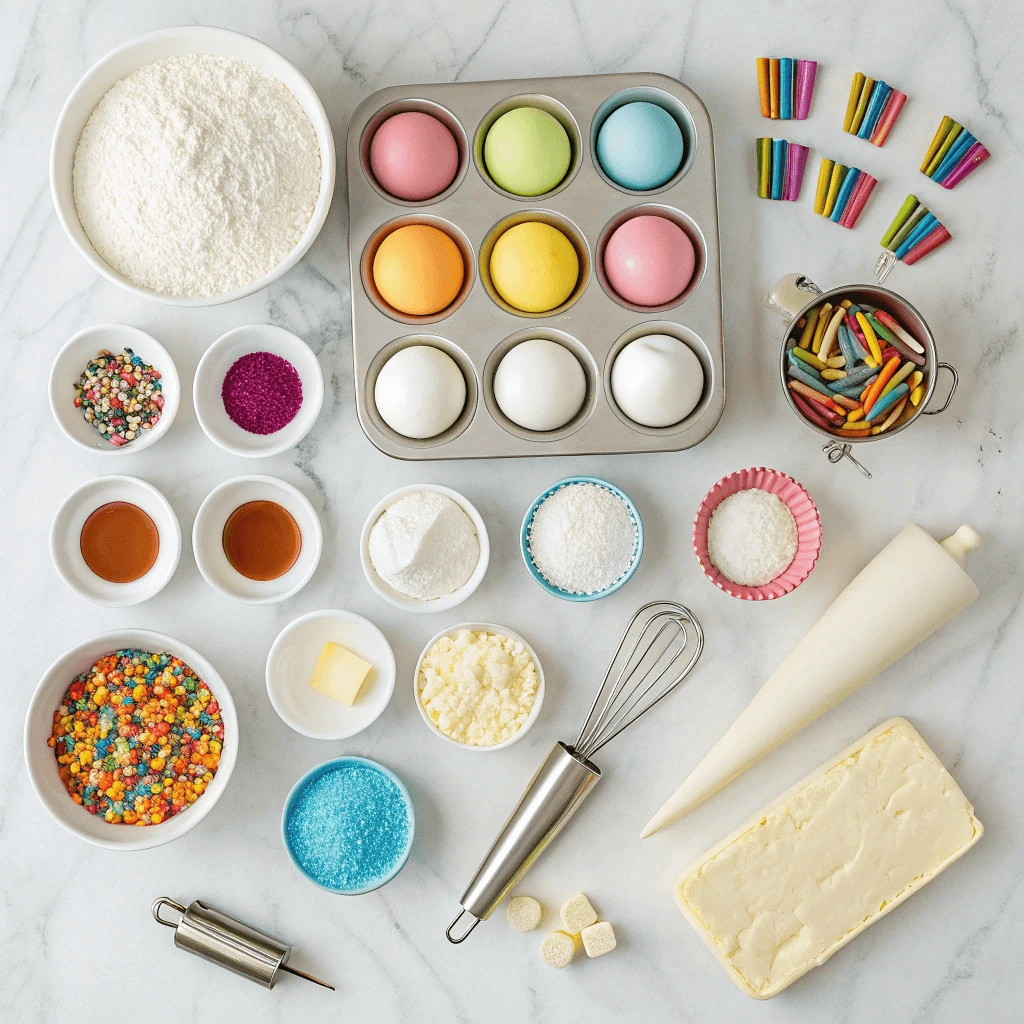
Before diving into the magical world of unicorn cake making, it’s important to gather all the necessary tools. Having the right equipment will make this unicorn cake process smoother and help you achieve that picture-perfect result that everyone will admire.
- Round cake pans (8-inch recommended) or 6-inch cake pans for a smaller version
- Mixing bowls (various sizes)
- Electric mixer (stand or handheld) to mix on low speed
- Measuring cups and spoons
- Piping bags for creating decorative elements
- Piping tips (star tips for the unicorn mane, round tips for details)
- Offset spatula for smooth frosting application
- Cake turntable (optional, but highly recommended)
- Sheet of parchment paper for lining pans
- Cake leveler or serrated knife
- Small bowls for dividing and coloring frosting
With these tools at hand, you’ll be fully prepared to tackle both the from-scratch and boxes of cake mix versions of this enchanting unicorn cake. Additionally, the right equipment will make the decorating process much more manageable, especially when working with multiple colors of buttercream frosting.
From-Scratch Round Unicorn Birthday Cake Recipe
Cake Ingredients
For the perfect homemade unicorn birthday cake, you’ll need the following ingredients to create tender, colorful layers that taste as good as they look.
For the Cake:
- 3 cups all-purpose flour
- 2 cups granulated sugar
- 1 tablespoon baking powder
- 1/2 teaspoon baking soda
- 1/2 teaspoon salt
- 4 large eggs, room temperature
- 1 cup whole milk, room temperature
- 1/2 cup vegetable oil
- 2 teaspoons vanilla extract
- Gel food coloring (pink, purple, blue, yellow, green)
the Buttercream Frosting:
- 2 cups (4 sticks) unsalted butter, softened
- 8 cups powdered sugar, sifted
- 4-6 tablespoons milk or heavy cream
- 2 teaspoons vanilla extract
- Gel food coloring (pink, purple, blue, yellow, green, black food coloring)
For Decorations:
- 1/2 pound white fondant or modeling chocolate
- Edible gold dust or spray
- Rainbow sprinkles
- Edible pearls
- Edible glitter (optional)
Step-by-Step Instructions to Make a Unicorn Cake with Rainbow Layers
Preparing the Cake Pans
- Preheat your oven to 350°F (175°C).
- Grease three 8-inch round cake pans thoroughly with butter or cooking spray.
- Line the bottoms with parchment paper circles for easy removal.
- Dust the sides with a light coating of flour, tapping out any excess.
Mixing the Dry Ingredients
- In a large mixing bowl, whisk together the flour, sugar, baking powder, baking soda, and salt until well combined.
- Make sure there are no lumps in your dry ingredients, as this will affect the texture of your cake batter.
Mixing the Wet Ingredients
- In a separate bowl, whisk together eggs, milk, oil, and vanilla extract until smooth and fully incorporated.
- The wet ingredients should be at room temperature to ensure proper mixing and an even cake texture.
Combining Wet and Dry Ingredients
- Gradually add the wet ingredients to the dry ingredients, mix on low speed with an electric mixer.
- Mix until just combined – be careful not to overmix, which can make your cake tough and dense.
- The cake batter should be smooth but not overly beaten.
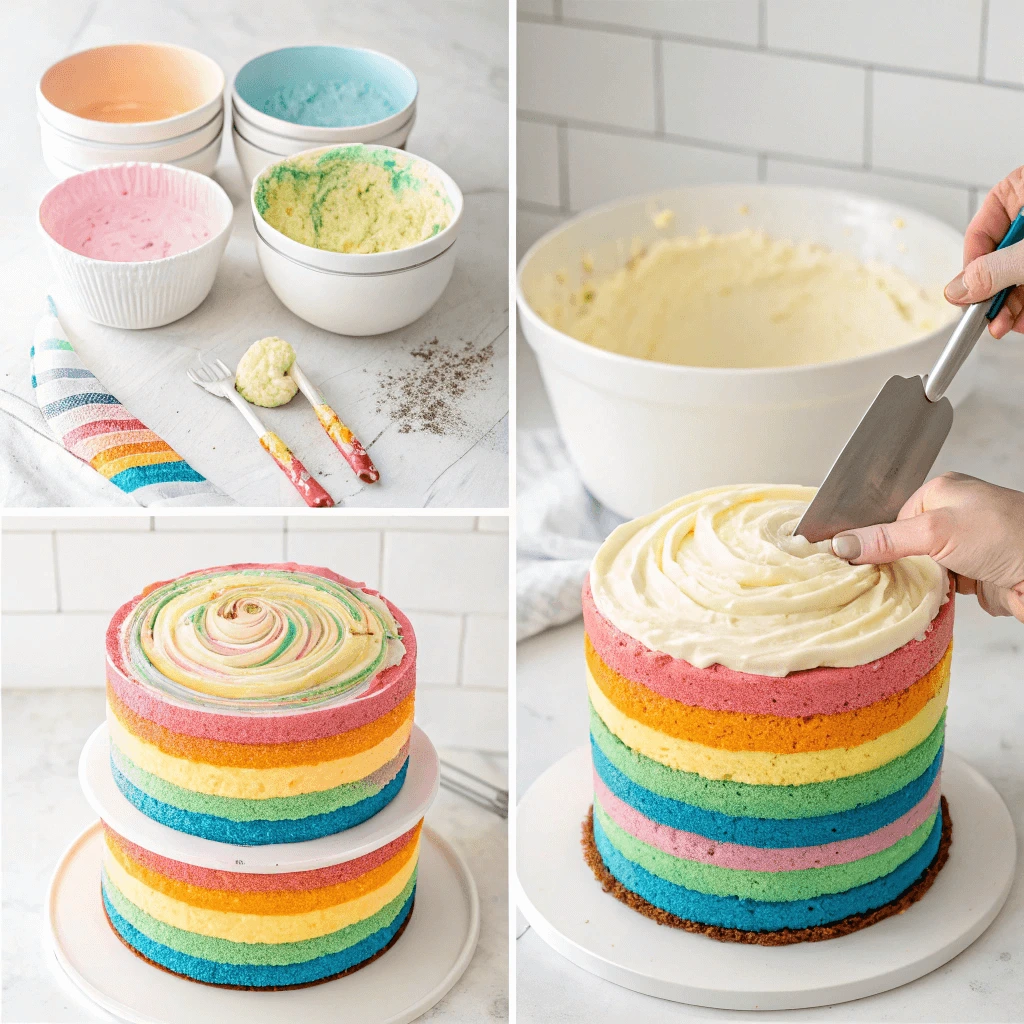
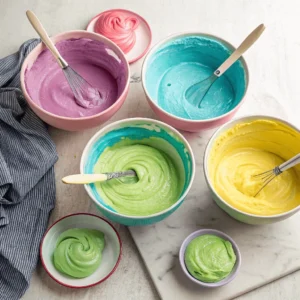
Dividing and Coloring the Batter
- Divide the cake batter equally into 5 separate bowls (or however many colors you want for your rainbow layers).
- Add a small amount of gel food coloring to each bowl and gently fold until the desired shade is achieved.
- Remember that the colors will deepen slightly during baking.
Bake the Cakes
- Pour the colored batters into your prepared cake pans.
- If you only have three pans, you’ll need to bake the cakes in batches.
- Bake for 25-30 minutes, or until a toothpick inserted into the center comes out clean.
- The tops should spring back when lightly touched.
Cooling the Cakes
- Let the cake pieces cool in the pans for 10-15 minutes.
- Carefully invert onto wire racks to cool completely before frosting.
- For best results, wrap the cooled layers in plastic wrap and refrigerate for at least an hour or overnight. This makes them easier to frost without crumbs.
- You can also bake the cake layers ahead of time to make the decorating process less stressful, especially for a birthday tomorrow.
Making the Buttercream Frosting
- In a large mixing bowl, beat the softened butter until light and fluffy (about 3-4 minutes).
- Gradually add the sifted powdered sugar, 1 cup at a time, beating well after each addition.
- Add milk or cream and vanilla extract, then beat until smooth and spreadable.
- If the frosting is too thick, add more milk one tablespoon at a time. If too thin, add more powdered sugar.
- You’ll need a lot of frosting to properly cover and decorate your unicorn cake.
Coloring the Buttercream
- Set aside about 2 cups of white frosting for the base coat.
- Divide the remaining frosting into separate bowls and color as desired for your unicorn’s mane and decorations.
- Popular colors include pink and dark purple, blue, and yellow, but you can use any colors you want for your unicorn design.
- Place each color in its own piping bag fitted with appropriate tips (star tips work well for the mane).
- Reserve a small amount with black food coloring to make the eyes.
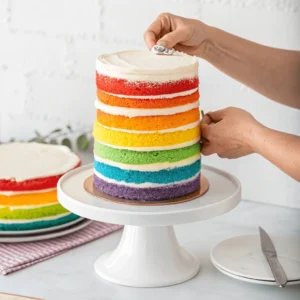
Assembling and Frosting the Cake
- Level each cake layer with a serrated knife if needed.
- Place the first cake layer on a cake turntable or serving plate.
- Spread a thin layer of buttercream (about 1/2 cup) evenly on top.
- Place the second layer on top and repeat with frosting.
- Continue until all layers are stacked.
- Apply a thin layer of buttercream all over the cake to create a crumb coat.
- Refrigerate for 30 minutes to set the crumb coat.
- Apply the final layer of buttercream, smoothing the sides and top as much as possible.
- Use a small offset spatula to get the frosting smooth on the outside of the cake.
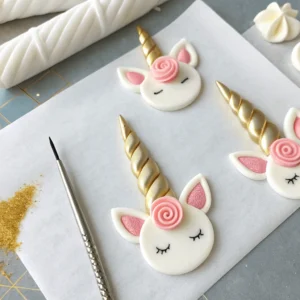
Creating the Unicorn Horn and Ears
- Make a unicorn horn:
- Shape a piece of white fondant or modeling chocolate into a cone shape.
- Twist the fondant slightly to create a spiral effect.
- Insert a wooden skewer or lollipop stick into the base for support.
- Brush with edible gold dust or spray for a magical touch.
- Allow to dry completely before attaching to the cake.
- Alternatively, use an ice cream cone covered in edible gold sprinkles.
- Creating the Ears:
- Roll out white fondant to about 1/8 inch thickness.
- Cut two ear shapes (triangular with rounded bases).
- Shape slightly to create a natural curve.
- Roll smaller pieces of pink fondant for the inner ears.
- Attach the pink inner pieces to the white ear shapes.
- Allow to dry slightly before attaching ears to the cake.
Make a unicorn horn by shaping white fondant into a cone. For detailed fondant techniques, Sugar Geek Show offers excellent tutorials on working with fondant for decorations.
Decorating the Unicorn Cake
- Place the unicorn horn in the center of the top of the cake.
- Position the ears on either side of the horn.
- Use colored buttercream to pipe swirls, rainbow swirls, and stars around the top edge and one side of the cake to create the unicorn mane.
- Alternate colors for a rainbow effect.
- Use black buttercream to create the eyes on the front of the cake.
- Add as much sprinkles, edible pearls, or edible glitter for extra sparkle.
- Once assembled and decorated, your unicorn birthday cake will be the highlight of your next birthday party or 5th birthday celebration!
Expert Tips for Homemade Unicorn Cake Success
- Plan ahead: Bake the cake layers ahead of time and freeze them for up to a month. This makes the assembly process much more manageable.
- Use gel food coloring instead of liquid for more vibrant colors that won’t affect the cake’s texture.
- Chill between steps: Working with a cold cake back makes frosting and decorating much easier.
- Make extra buttercream: It’s always better to have too much than too little, especially when creating the colorful mane.
- Practice piping techniques before decorating the actual cake.
- Use a cake turntable for smooth, even frosting application.
- Don’t rush the process: Take your time, especially when decorating.
- One cup of buttercream is generally enough for filling between each layer.
Easy Boxed Mix Round Unicorn Cake Recipe
For those who prefer a simpler approach but still want a magical unicorn cake, this boxed mix version delivers impressive results with less effort.
Boxed Mix Ingredients
For the Cake:
- 2 boxes white cake mix (recommended: Betty Crocker, Duncan Hines, or Pillsbury)
- 6 large eggs (or as directed on box)
- 2/3 cup vegetable oil (or as directed on box)
- 2 cups water (or as directed on box)
- Gel food coloring (pink, purple, blue, yellow, green)
the Frosting:
- Store-bought vanilla frosting (4-5 containers) OR homemade buttercream (recipe above)
- Gel food coloring (pink, purple, blue, yellow, green, black)
For Decorations:
- Same as from-scratch recipe
Simplified Instructions for Boxed Mix Version
For those who prefer a simpler approach but still want a magical unicorn cake, this boxed mix version delivers impressive results with less effort. Taste of Home offers excellent tips for enhancing boxed cake mixes to make them taste homemade.
Preparing the Cake Mix
- Preheat your oven according to package directions (typically 350°F).
- Prepare cake pans as described in the from-scratch recipe.
- In a large mixing bowl, combine cake mix, eggs, oil, and water according to package directions.
- Mix on low speed for 30 seconds, then on medium speed for 2 minutes.
Enhancing Your Boxed Mix (Optional)
For a richer, more homemade taste:
- Replace water with an equal amount of milk
- Add 1 tablespoon of sour cream or Greek yogurt per box
- Add 1 teaspoon of vanilla extract per box
- Add an extra egg per box
Dividing and Coloring the Batter
- Divide the cake batter equally into bowls (one for each color).
- Add gel food coloring to each bowl and mix until evenly colored.
- The process is the same as the from-scratch recipe.
- For a truly spectacular display, consider making 6 layers of different colors.
Baking and Cooling
- Pour the colored batters into your prepared pans.
- Bake the cakes according to package directions, usually 25-30 minutes.
- Test for doneness with a toothpick inserted in the center – it should come out clean.
- Cool in pans for 10 minutes, then transfer to wire racks to cool completely.
- You can bake cakes the day before and refrigerate overnight.
Frosting and Decorating
Follow the same instructions as the from-scratch recipe for:
- Making/preparing frosting
- Assembling the cake
- Creating the unicorn horn and ears
- Frosting to decorate the cake
Tips Specifically for Boxed Mix Success
- Don’t overbake: Boxed mix cakes can dry out easily, so check for doneness on the early side of the recommended baking time.
- Add flavor: Consider adding extracts like almond or vanilla to enhance the flavor of boxed mixes.
- Moisture matters: The additions mentioned above (sour cream, extra egg) help keep boxed mix cakes moist.
- Store-bought frosting hack: If using store-bought frosting, whip it with an electric mixer for about 30 seconds to make it fluffier and easier to spread, depending on your icing preferences.
Creative Unicorn Cake Decoration Ideas
Rainbow Mane Variations
One of the most striking features of a unicorn cake is its colorful mane. Here are some creative approaches:
- Ombré effect: Gradually blend colors from light to dark
- Rainbow swirls: Pipe multicolored rosettes for a vibrant mane
- Painterly approach: Use a spatula to create watercolor-like streaks of color
- Metallic accents: Add edible gold or silver sprinkles for magical sparkle
Horn and Ear Options
- Ice cream cone method: Cover a sugar cone with edible gold for an easy unicorn horn
- Fondant with wire support: For taller, more dramatic horns
- Chocolate horns: Mold white chocolate into a horn shape and decorate
- Different ear shapes: Try pointed vs. rounded ears for different unicorn looks
Face Design Variations
- Simple vs. detailed: From basic eyelashes to full facial features
- Sleepy unicorn: Create a cute unicorn with closed eyes
- Expressive faces: Various eye and mouth styles for different expressions
- 3D elements: Add dimensional features with additional fondant pieces
Making This Cake for Different Occasions
Birthday Party Adaptations
- Number toppers: Add age numbers beside the unicorn horn for a 5th birthday or any other celebration
- Personalization: Include the birthday person’s name in frosting
- Cake topper combos: Pair the unicorn design with other birthday elements
- Coordinating cakes and cookies: Create matching unicorn treats for larger parties
Create a themed dessert table by pairing your unicorn cake with other special treats. For an elegant alternative, consider our ‘Heart Cake for Birthday: Vintage Chocolate-Heart-Shape‘ for adults or those who prefer classic flavors.
Seasonal Unicorn Cakes
- Holiday unicorns: Adapt colors for Christmas, Halloween, Easter, etc.
- Seasonal flowers: Incorporate seasonal blooms into the unicorn’s mane
- Weather themes: Summer sunshine or winter wonderland unicorns
- Special occasion colors: Wedding, graduation, or other celebration-themed unicorns
Troubleshooting Your Unicorn Cake
Common Issues and Solutions
Cake Layers Problems
- Uneven layers: Use cake strips around pans or lower oven temperature slightly
- Dome tops: Slice off with a serrated knife to create flat layers
- Crumbly cake: Chill layers before cutting and handling
- Dry texture: Don’t overbake; use simple syrup to moisten if needed
- If your cake turned out too dry, brush each layer with simple syrup before frosting
Frosting Challenges
- Buttercream too soft: Refrigerate to firm up; add more powdered sugar
- Buttercream too stiff: Add small amounts of milk or cream
- Air bubbles: Stir frosting with a spatula to release air before applying
- Crumbs in frosting: Apply a thin crumb coat first, chill, then frost
Decoration Difficulties
- Sliding decorations: Chill cake between steps; use supports when needed
- Melting frosting: Work in a cool room; return cake to refrigerator if buttercream softens
- Fondant cracks: Knead fondant well before using; add a tiny bit of shortening if too dry
- Colors bleeding: Use gel colors; allow layers to set between piping different colors
Nutrition Information
Per Serving (Based on 16 servings)
- Calories: 540
- Fat: 28g
- Saturated Fat: 15g
- Cholesterol: 95mg
- Sodium: 280mg
- Carbohydrates: 68g
- Sugar: 52g
- Protein: 4g
Note: Nutrition information is approximate and will vary based on exact ingredients and portions.
Frequently Asked Questions About Round Unicorn Cakes
How do you make a unicorn with a round cake?
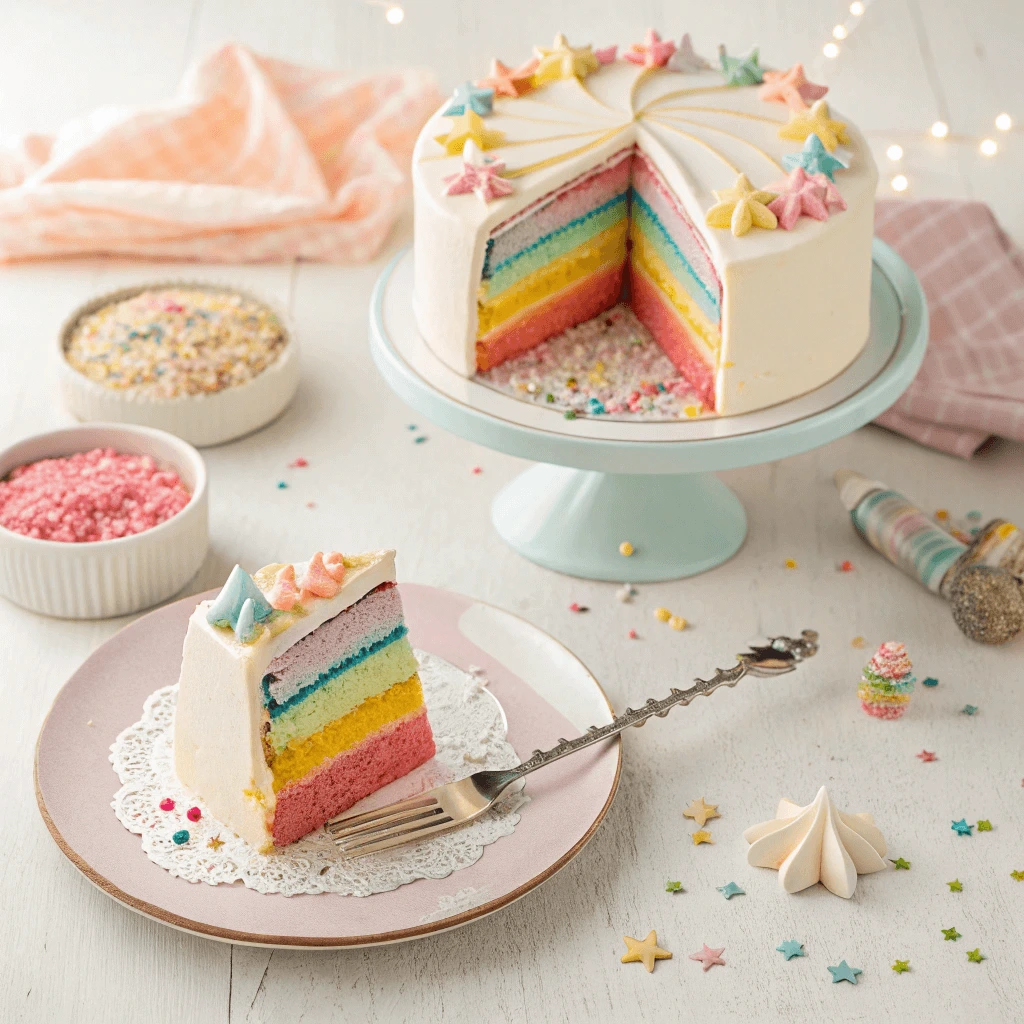
You don’t need to cut a round cake into a unicorn shape! Instead, a round unicorn cake uses the circular shape as the unicorn’s face, with decorative elements like the horn, ears, and mane added on top and around the sides. This approach is much simpler than carving and maintains the structural integrity of your cake.
What flavor is best for a unicorn cake?
While vanilla is the most popular base for unicorn cakes because it’s easy to color, any flavor works! Funfetti, lemon, or even chocolate can make delicious unicorn cakes. The most important thing is that you and your guests will enjoy eating it.
How do you make a unicorn horn for a cake?
There are several methods to make a unicorn horn. The simplest is shaping fondant or modeling chocolate into a cone with a spiral texture and painting it with edible gold dust. Alternatively, you can cover an ice cream cone with white chocolate or frosting and add edible gold decorations.
What size should a unicorn cake be?
An 8-inch round cake is ideal for a standard unicorn cake, serving 12-16 people. However, you can adjust the size based on your needs – a 6-inch cake works well for smaller gatherings, while larger parties might require a 10-inch cake or multiple tiers.
What size cake pan for unicorn cake?
For a standard round unicorn cake, 8-inch round cake pans are recommended. If you’re making a layered rainbow unicorn cake, you’ll need at least 3 layers of the same size for efficiency, though you can bake in batches with fewer pans if necessary. 6-inch cake pans are also popular for smaller unicorn cakes.
How do you use unicorn cake decorations effectively?
Focus on the key elements: the horn positioned at the top center, ears on either side of the horn, and a colorful mane that flows down one side of the cake. Keep the face simple with closed or minimalist eyes. Use complementary colors for a cohesive look.
How many cups of batter for a 9-inch round cake?
You’ll need approximately 5-6 cups of batter for a 9-inch round cake. For a rainbow unicorn cake with multiple layers, you may need to prepare 2-3 boxes of cake mix or double a from-scratch recipe.
How many cake mixes for a unicorn cake?
For a standard three-layer 8-inch unicorn cake, you’ll need 1-2 boxes of cake mix. If you want six layers of cake for a true rainbow effect, plan on using 2-3 boxes of cake mix or double a from-scratch recipe.
How to bake a unicorn cake for beginners?
Start with a boxed mix version for your first unicorn cake. Focus on mastering the basic assembly and simple decorations before attempting more complex designs. It’s actually quite straightforward when you break it down into steps, and even those with only general baking skills can create an impressive result.
Can I make this cake ahead of time?
Absolutely! You can bake the cake layers ahead of time up to a week ahead and store them wrapped tightly in plastic wrap in the refrigerator. For longer storage, freeze the layers for up to three months. This approach breaks up the work and makes decorating day much less stressful, especially if you’re preparing for a birthday tomorrow or other upcoming event.
Final Tips for Unicorn Cake Success
Creating a magical round unicorn cake doesn’t require professional baking skills—just patience, creativity, and the right instructions. Whether you choose the from-scratch recipe for a truly homemade experience or opt for the convenience of a white cake mix, your unicorn cake will bring joy and wonder to any celebration. Remember, the most important ingredient is love, and even imperfect unicorns are magical!
Make a unicorn cake for your next birthday party and watch as everyone’s faces light up with delight. This colorful cake with its stunning rainbow layers will be the centerpiece of any celebration. Happy baking, and may your unicorn cake creation be as enchanting as the mythical creature itself!
Magical Round Unicorn Cake
Equipment
- 3 8-inch round cake pans
- Mixing bowls (various sizes)
- Electric mixer (stand or handheld)
- Measuring Cups and Spoons
- Piping bags
- Piping tips (star tips and round tips)
- Offset Spatula
- Cake turntable (optional but recommended)
- Parchment Paper
- Cake leveler or serrated knife
- Small bowls for dividing frosting
Ingredients
For the Cake
- 3 cups all-purpose flour
- 2 cups granulated sugar
- 1 tablespoon baking powder
- 1/2 teaspoon baking soda
- 1/2 teaspoon salt
- 4 large eggs room temperature
- 1 cup whole milk room temperature
- 1/2 cup vegetable oil
- 2 teaspoons vanilla extract
- Gel food coloring pink, purple, blue, yellow, green
For the Buttercream Frosting
- 2 cups 4 sticks unsalted butter, softened
- 8 cups powdered sugar sifted
- 4-6 tablespoons milk or heavy cream
- 2 teaspoons vanilla extract
- Gel food coloring pink, purple, blue, yellow, green, black
For Decorations
- 1/2 pound white fondant or modeling chocolate
- Edible gold dust or spray
- Rainbow sprinkles
- Edible pearls
- Edible glitter optional
Instructions
Prepare Pans
- Preheat your oven to 350°F (175°C). Grease three 8-inch round cake pans thoroughly with butter or cooking spray. Line the bottoms with parchment paper circles and dust the sides with flour.
Mix Dry Ingredients
- In a large mixing bowl, whisk together the flour, sugar, baking powder, baking soda, and salt until well combined.3 cups all-purpose flour, 2 cups granulated sugar, 1 tablespoon baking powder, 1/2 teaspoon baking soda, 1/2 teaspoon salt
Mix Wet Ingredients
- In a separate bowl, whisk together eggs, milk, oil, and vanilla extract until smooth and fully incorporated.4 large eggs, 1 cup whole milk, 1/2 cup vegetable oil, 2 teaspoons vanilla extract
Combine Batters
- Gradually add the wet ingredients to the dry ingredients, mixing on low speed with an electric mixer until just combined. Be careful not to overmix.
Color Batter
- Divide the cake batter equally into 5 separate bowls. Add a small amount of gel food coloring to each bowl and gently fold until the desired shade is achieved.Gel food coloring
Bake Cakes
- Pour the colored batters into your prepared cake pans. If you only have three pans, you’ll need to bake in batches. Bake for 25-30 minutes, or until a toothpick inserted into the center comes out clean.
Cool Cakes
- Let the cakes cool in the pans for 10-15 minutes, then carefully invert onto wire racks to cool completely before frosting.
Make Frosting Base
- In a large mixing bowl, beat the softened butter until light and fluffy (about 3-4 minutes). Gradually add the sifted powdered sugar, 1 cup at a time, beating well after each addition.8 cups powdered sugar, 2 cups 4 sticks unsalted butter, softened
Finish Frosting
- Add milk or cream and vanilla extract to the butter mixture, then beat until smooth and spreadable. If the frosting is too thick, add more milk; if too thin, add more powdered sugar.4-6 tablespoons milk or heavy cream, 2 teaspoons vanilla extract
Color Frosting
- Set aside about 2 cups of white frosting for the base coat. Divide the remaining frosting into separate bowls and add gel food coloring as desired for the unicorn’s mane and decorations.Gel food coloring
Start Assembly
- Level each cake layer with a serrated knife if needed. Place the first cake layer on a cake turntable or serving plate and spread a thin layer of buttercream (about 1/2 cup) evenly on top.
Crumb Coat
- Continue stacking the cake layers with frosting between each layer. Apply a thin layer of buttercream all over the cake to create a crumb coat, then refrigerate for 30 minutes to set.
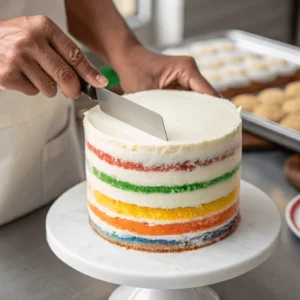
Final Frosting
- Apply the final layer of buttercream, smoothing the sides and top as much as possible with an offset spatula.
Create Horn
- Shape a piece of white fondant into a cone for the unicorn horn. Twist slightly to create a spiral effect, then insert a wooden skewer for support. Brush with edible gold dust and let dry.Edible gold dust or spray
Make Ears
- Roll out white fondant to about 1/8 inch thickness and cut two ear shapes. Add small pieces of pink fondant for the inner ears and allow to dry slightly.1/2 pound white fondant or modeling chocolate, Gel food coloring
Attach Features
- Place the unicorn horn in the center of the top of the cake and position the ears on either side of the horn.
Pipe Mane
- Use colored buttercream to pipe swirls and stars around the top edge and one side of the cake to create the unicorn mane. Alternate colors for a rainbow effect.
Final Details
- Use black buttercream to create the eyes on the front of the cake. Add sprinkles, edible pearls, or edible glitter for extra sparkle.Rainbow sprinkles, Edible pearls, Edible glitter

Notes
- For a simpler version, use two boxes of white cake mix following package directions.
- Plan ahead: Bake the cake layers a day in advance and freeze them for easier handling.
- Use gel food coloring instead of liquid for more vibrant colors.
- The crumb coat is essential for a smooth final result – don’t skip this step! Make extra buttercream to ensure you have enough for decorating.
- For a smaller cake, use 6-inch pans instead of 8-inch. Store leftover cake in the refrigerator for up to 5 days.
- To enhance boxed cake mix, replace water with milk and add an extra egg.