

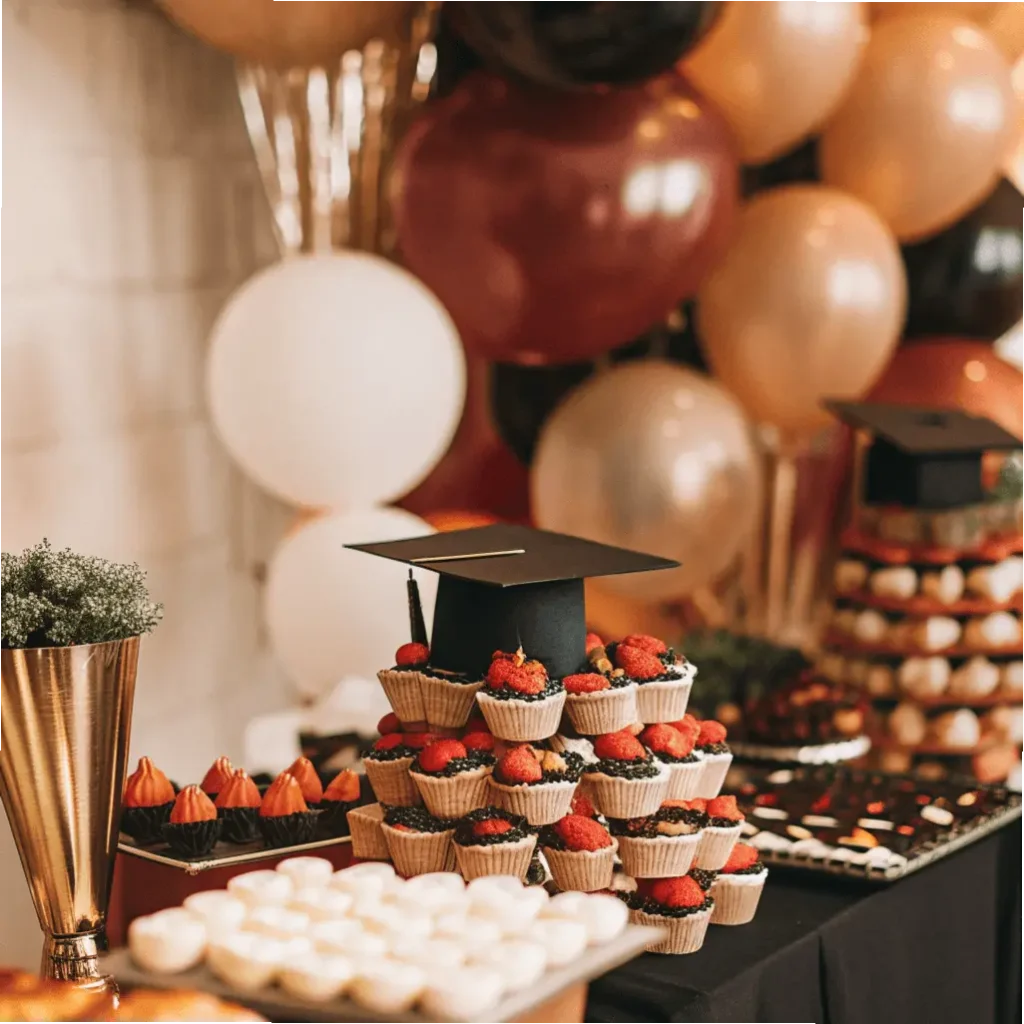
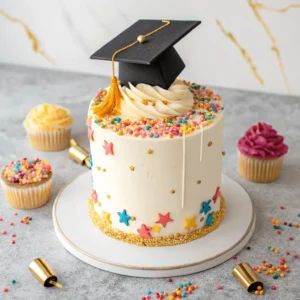
Graduation Cake Ideas: Best Classic Graduation Cake Idea for Your Grad Life
Discover the ultimate Graduation Cake Ideas with this showstopping layer cake recipe that blends tradition with modern creativity. This cake recipe is perfect for celebrating graduation day and turning any event into a memorable party. Enjoy this delicious, versatile cake that combines classic techniques with a contemporary flair. With a striking graduation cake design inspired by school colors and festive decorations, this cake is ideal for any grad in your life.
Recipe Details:
Prep Time: 30 minutes
Cook Time: 35 minutes
Total Time: 1 hour 10 minutes
Servings: 12 slices
Calories: Approximately 320 per serving
Nutrition Information (per serving):
- Calories: 320 kcal
- Fat: 14g
- Protein: 5g
- Carbohydrates: 45g
- Fiber: 1g
Key Benefits: Cake, Graduation & Sheet Cake Ideas

- Versatility: This cake works as a classic sheet cake or a decadent layer cake.
- Striking Presentation: Innovative graduation cake ideas such as a custom graduation cap topper and vibrant décor make this treat the centerpiece of any celebration.
- Flavor Explosion: Savor every bite that tastes just like your favorite chocolate cake or yellow cake, while enjoying a unique graduation twist.
- Customization: Effortlessly decorate your cake using smooth icing, a touch of frost, and personalized edible prints.
- Nutritional Balance: Indulge in a treat that not only delights the palate but also provides essential nutrients.
Graduation Cake Recipe: Ingredients, Cream Cheese Frosting & Icing

Main Ingredients: Cake Recipe, Yellow Cake & Frosting
- Cake Batter:
- 2 ½ cups all-purpose flour
- 2 cups granulated sugar
- 1 cup unsalted butter (softened) – ideal for a classic butter cake
- 4 large eggs
- 1 cup whole milk
- 2 teaspoons baking powder
- ½ teaspoon salt
- 2 teaspoons vanilla extract
- Frosting & Icing:
- 1 batch homemade cream cheese frosting (or your preferred icing)
- 1 batch chocolate ganache for drizzling
- ½ cup whipped cream
- Decorative Elements:
- Edible prints featuring a graduation cap
- Fondant in various shades (including your school colors)
- Edible glitter, metallic paints, and food markers for personalized messages
- Fresh fruit for an extra burst of flavor
- Optional Additions:
- 1 cup cake mix of your choice (for extra moisture)
- 1 tablespoon sour cream for a tender crumb
- A dash of lemon extract for a subtle lemon cake note
Step-by-Step: Cake, Layer Cake & Icing Guide

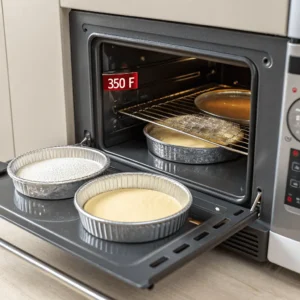
Preheat & Prepare:
Preheat your oven to 350°F (180°C). Grease and flour two 9-inch round pans to ensure your cake layers release effortlessly after baking.
Mix Dry Ingredients:
In a medium bowl, sift together the flour, baking powder, and salt. This blend is crucial for a consistent texture in your cake recipe.
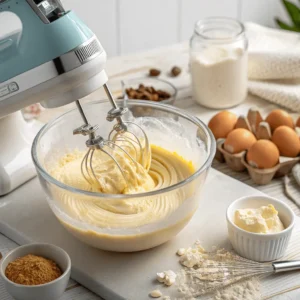
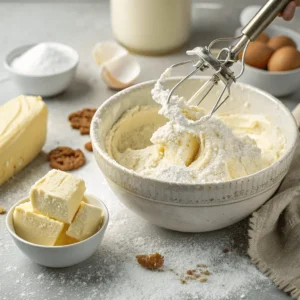
Cream Butter & Sugar:
In a large bowl, beat the softened butter with sugar until light and fluffy. Add the eggs one at a time, ensuring each is well incorporated. This step is the foundation for a smooth cake batter—a technique used in many butter cake and sponge cake recipes, including variations like carrot cake or pound cake.
Combine Wet & Dry:
Gradually mix the dry ingredients and whole milk into the creamed mixture. Stir in the vanilla extract (and optional sour cream) until fully combined, forming a consistent batter without overmixing.
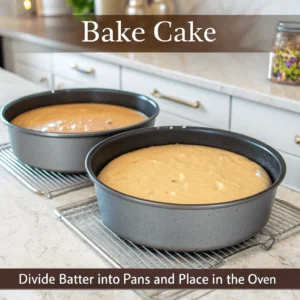
Bake the Cake:
Divide the batter evenly between the pans. Bake for 25–30 minutes; a toothpick inserted into the center should come out clean, proving your cake is perfect. Allow the cake to cool completely on a wire rack.
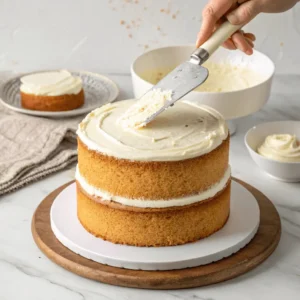
Assemble the Cake:
Level the cooled cake layers using a serrated knife. Place one layer on a cake stand, spread a thin layer of cream cheese frosting, then add the second layer to form a sumptuous layer cake that is both moist and visually appealing.
Decorate with Style:
Adorn the top with edible prints, a delicate drizzle of chocolate ganache, and custom fondant accents. Enhance the design with a personalized graduation cap and hand-written messages using food markers. Lightly sprinkle edible glitter for a festive touch.
Finishing Touches:
Pipe decorative borders with a bit of frost and extra icing. Top with fresh fruit if desired. Your cake recipe now stands as one of the most innovative graduation cake ideas available.
check out our article on Old-Fashioned Cake for more creative inspiration.
Cake Tips: Variations with Chocolate, Angel Food & More
Girl’s Cake: Graduation Cake Idea & Raspberry Cake
For a soft, delicate treat, try a butter cake variation with hints of raspberry. A touch of raspberry cake or even a raspberry layer cake elevates the design for a graceful graduation celebration.
Guys’ Cake: Bold Graduation & German Chocolate Cake
For a robust option, choose a chocolate cake or even a German chocolate cake that provides rich flavor and bold style. This variant is perfect for a hearty and memorable graduation treat.
Shop: Graduation Sheet, Ice Cream, Nutella & Eclair Cake
When time is short, visit a trusted bakery to order a custom graduation sheet cake or ice cream cake. You can also opt for a Nutella cake or even an eclair cake for an elegant twist. Some bakeries also offer an ice cream sandwich cake for those seeking a modern flair.
College Cake: Graduation, Sponge & Texas Sheet Cake Idea
For college grads, design a classic sponge cake or try a Texas sheet cake that radiates school spirit. Both options are reliable, festive, and ideal for a graduation celebration.
Pinterest: Creative Cake, Cookie, Icebox & Hummingbird Cake
Browse Pinterest for endless inspiration. From inventive cookie cakes to creative icebox cakes and charming hummingbird cakes, you’ll find ideas that suit every taste and style.
Funny Cake: Unique Graduation, Pudding, Piña Colada & Coca-Cola Cake
For a humorous twist, consider a pudding cake, piña colada cake, or even a quirky coca-cola cake. These fun designs are sure to bring a smile and add a playful element to the celebration.
Modern Cake: Eclair & Ice Cream Sandwich Cake Idea
For an innovative take, try a modern twist with an eclair cake or an ice cream sandwich cake. Combining contrasting textures, these options create a unique dessert experience that is both unexpected and delightful.
check out our article on Heart Cake for Birthday for more creative inspiration.
Serving Ideas: Graduation, Sheet Cake & More Variations
- Presentation:
Display your cake on a stylish cake stand to elevate its appearance. Arrange each slice elegantly to highlight its layered beauty. - Accompaniments:
Pair your dessert with a scoop of ice cream cake or an ice cream sandwich cake to balance the rich flavors. A fresh fruit salad can also provide a refreshing counterpoint. - Beverage Pairing:
Enjoy your cake with coffee, tea, or a chilled glass of milk, which perfectly complements a chocolate cake or lemon cake variation. - Festive Touches:
Enhance your graduation cake recipes with decorative flags or banners that echo the grad’s school colors, making the celebration even more personal.
Cake Conclusion: Best Graduation Cake Ideas Recap
This cake recipe embodies the spirit of graduation cake ideas by merging creativity with classic techniques. Whether you prefer a traditional yellow cake, a decadent chocolate sheet cake, or a unique twist like a sponge cake or butter cake, every slice celebrates achievement. With options ranging from a robust German chocolate cake to a playful coca-cola cake, you can truly make a graduation celebration unforgettable. Enjoy the journey as you customize your dessert to suit the grad’s unique style and savor every bite of this delightful kind of cake.
For more inspiring ideas on designing your own graduation cake, check out Wilton’s Graduation Cake Ideas for additional tips and creative techniques.
Graduation Cake Ideas
Equipment
- 2 9-inch round cake pans for baking the cake layers
- 1 Mixer for mixing the batter
- 1 Oven preheated to 350°F
- 1 Spatula for frosting and assembling
Ingredients
Cake Batter:
- 2 1/2 cups all-purpose flour sifted
- 2 cups granulated sugar
- 1/2 cup unsalted butter softened
- 1 cup whole milk
- 3 large eggs
- 2 1/2 tsp baking powder
- 1/2 tsp salt
- 1 tsp vanilla extract
Frosting:
- 1 cup unsalted butter softened
- 3-4 cups powdered sugar sifted
- 2 tbsp heavy cream
- 1 tsp vanilla extract
- Food coloring as needed for festive colors
Decoration:
- Graduation-themed toppers as desired
- Sprinkles for a festive touch
- Edible gold dust optional for extra sparkle
Instructions
- Preheat the oven to 350°F. Grease and flour two 9-inch round cake pans.
- Mix all cake batter ingredients in a large bowl using a mixer until smooth and well combined.2 1/2 cups all-purpose flour, 2 cups granulated sugar, 1/2 cup unsalted butter, 1 cup whole milk, 3 large eggs, 2 1/2 tsp baking powder, 1/2 tsp salt, 1 tsp vanilla extract
- Divide the batter evenly between the prepared pans and bake for 45 minutes, or until a toothpick inserted into the center comes out clean.
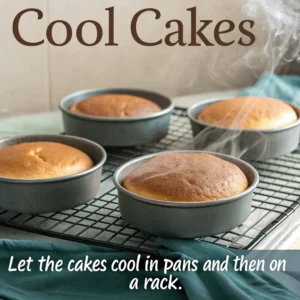
- Allow the cakes to cool in the pans for 10 minutes, then transfer to a wire rack to cool completely.
- Prepare the frosting by beating butter until creamy, gradually adding powdered sugar, heavy cream, vanilla extract, and desired food coloring until smooth.1 cup unsalted butter, 3-4 cups powdered sugar, 2 tbsp heavy cream, 1 tsp vanilla extract, Food coloring as needed
- Assemble the cake by placing one cake layer on a serving plate, spread frosting evenly, then top with the second cake layer and coat the entire cake with frosting.
- Decorate the cake with graduation-themed toppers, sprinkles, and edible gold dust to create a stunning celebratory look.Graduation-themed toppers, Sprinkles, Edible gold dust
Notes
- For a personalized touch, customize the cake with the graduate’s name and school colors. This recipe is versatile and can be adjusted for different serving sizes.
FAQs: Graduation Cake, Bakery & Cake Recipes
Does Costco sell graduation cakes?
Many Costco locations offer a variety of graduation cake recipes, including classic sheet cakes and customized designs. Check with your local store for options that range from simple cake recipes to elaborate graduation cake designs.
How much does a cake for 50 people cost?
The cost for a cake serving 50 people varies by design and ingredients. A high-quality cake recipe that is moist and tastefully decorated (be it a chocolate cake or sponge cake) generally falls in the moderate price range.
What does a cake symbolize in a graduation?
A cake symbolizes achievement, celebration, and the sweet reward of hard work. It marks a significant milestone on graduation day and is a centerpiece that represents success.
What size cake for 100 guests?
For 100 guests, a large sheet cake or multiple layer cakes is recommended. This ensures every guest enjoys a generous slice of the celebratory cake recipe.
Can I order a cake from Costco Bakery?
Yes, you can order a cake from Costco Bakery. Their selection includes options like graduation sheet cakes, chocolate bundt cakes, and other custom designs that celebrate the grad’s special day.
Do you get a cake for graduation?
Absolutely. A cake is a central part of graduation celebrations. Whether you choose a classic butter cake, an elegant angel food cake, or a fun cookie cake, the dessert is a symbol of accomplishment.
Who pays for graduation dinner?
Typically, the cost of a graduation dinner—including the cake—is shared among family members or sponsors. The cake is a gift that represents pride, making it an integral element of the celebration.
Is it rude to not get a graduation gift?
Not at all. While many celebrate with a cake recipe and other treats, graduation is about recognizing achievements. Whether you bring a cake or another token, it’s the thought behind the gesture that counts.
Do graduation parties have cake?
Yes, almost all graduation parties feature a cake as a central dessert. This treat not only delights the taste buds but also symbolizes the culmination of academic success with creative graduation cake ideas.
How much does a Costco cake cost?
Costco cakes are known for great value. A large sheet cake or layer cake from Costco is competitively priced and delivers both quality and taste, making it a popular choice for graduation celebrations.
How far in advance should I order a Costco cake?
It’s recommended to order your cake for graduation at least 48 hours in advance. This ensures the cake is freshly made and perfectly decorated to match your vision of the grad’s special day.
How many people does a sheet cake feed?
A standard sheet cake typically feeds 20 to 25 people. For larger graduation parties, consider ordering multiple cakes or a larger size so every guest can enjoy this delicious treat.
Embrace these creative graduation cake ideas to design a dessert that is not only a standout cake recipe but also a heartfelt celebration of success. Whether you opt for a classic yellow cake, an indulgent chocolate cake, or experiment with bold options like an eclair cake or ice cream sandwich cake, every slice is a tribute to the graduate’s achievement. Enjoy making a graduation celebration that is as unforgettable as it is delicious!
Did you love this recipe? Rate it and share your experience!
There are no reviews yet. Be the first one to write one.