

Basketball Cake Recipe & Tutorial: Score Big with This 3D Basketball Cake
Ready to score major points at your next party? Forget flat, uninspired designs – this guide will walk you step-by-step through creating a stunningly realistic 3D basketball cake that looks as good as it tastes. We’ll cover everything from baking perfect hemispheres to achieving that signature basketball texture and piping clean lines. This basketball cake tutorial is perfect for sports-themed parties, basketball fans, or anyone looking to create a show-stopping dessert that will impress all your guests. Let’s get baking!

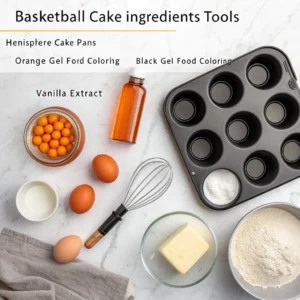
Essential Equipment for Your Basketball Cake Masterpiece
Before diving into this slam dunk 3D tutorial, gather these tools to ensure your basketball theme cake turns out perfectly:
- Cake Pans: Two 6-inch hemisphere pans OR two 8-inch round cake pans (for carving)
- Mixer: Stand mixer with paddle/whisk attachments OR hand mixer
- Measuring Tools: Cups and spoons, kitchen scale (highly recommended for accuracy)
- Cooling Racks: For proper cake cooling
- Serrated Knife: Essential for leveling/carving if using round pans
- Offset Spatula: Both large and small sizes for frosting application
- Cake Turntable: Highly recommended for smooth frosting application
- Piping Bags: For decorating the basketball lines
- Piping Tip: Small round tip (Wilton #3 or #4) for black lines
- Bench Scraper: For smoothing buttercream frosting
- Texturing Tool: Clean sponge, textured paper towel, or specific fondant tool
- Cake Board or Serving Plate: For displaying your basketball cake

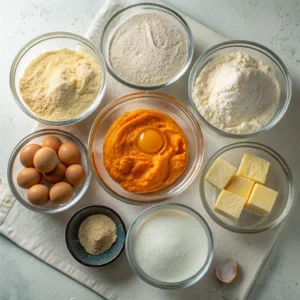
Complete Ingredient List for a Perfect Basketball Birthday Cake
For the Moist Vanilla Cake (Basketball Cake Base)
| Ingredient | Amount | Notes |
|---|---|---|
| All-Purpose Flour | 3 cups (360g) | Sifted for best texture |
| Granulated Sugar | 2 cups (400g) | For sweetness |
| Baking Powder | 1 tablespoon | Leavening agent |
| Baking Soda | ½ teaspoon | Additional leavening |
| Salt | ½ teaspoon | Enhances flavor |
| Unsalted Butter | 1 cup (226g) | Softened at room temperature |
| Eggs | 4 large | Room temperature |
| Vanilla Extract | 2 teaspoons | Use pure extract for best flavor |
| Buttermilk | 1¼ cups (300ml) | Room temperature |
Note: Alternatively, you can use a chocolate cake recipe if preferred. Many basketball fans enjoy a rich chocolate cake with orange frosting!
For the Buttercream Frosting
- 2 cups (452g) unsalted butter, softened
- 8 cups (960g) powdered sugar, sifted
- 2 teaspoons vanilla extract
- 4-6 tablespoons heavy cream or milk
- Pinch of salt
- Orange gel food coloring (must be gel for vibrant color)
- Black gel food coloring (must be gel for deep black color)
Step-by-Step Basketball Cake Tutorial: Creating Your Masterpiece

A. Baking the Perfect Cake Layers
- Preheat and Prepare: First, preheat your oven to 350°F (175°C). Then, thoroughly grease and flour your hemisphere pans, or if using round pans, grease, flour, and line bottoms with parchment paper.
- Mix Dry Ingredients: In a medium bowl, whisk together the flour, baking powder, baking soda, and salt until well combined. Set aside.
- Cream Butter and Sugar: In your stand mixer with the paddle attachment (or using a hand mixer), beat the butter and sugar on medium-high speed for 3-4 minutes until light and fluffy. This step incorporates air into the batter, leading to a better cake texture.
- Add Eggs and Vanilla: Add eggs one at a time, beating well after each addition. Subsequently, mix in the vanilla extract until combined.
- Alternate Ingredients: Gradually add the dry ingredients and buttermilk, alternating between them. Begin and end with the dry ingredients (typically three additions of dry and two of liquid). Mix until just combined – do not overmix as this can result in a tough cake texture.
- Divide and Pan: Divide the batter evenly between your prepared pans. For hemispheres, fill about ¾ full. Furthermore, tap the pans gently on the counter to release any air bubbles.
- Bake with Care: Bake for 30-40 minutes, or until a toothpick inserted into the center comes out clean and the cake springs back when lightly touched. Moreover, rotating the pans halfway through baking ensures even browning.
- Cool Properly: Allow cakes to cool in pans for 15 minutes before inverting onto wire cooling racks to cool completely. Additionally, letting cakes cool completely is crucial before assembling your recipe.
B. Preparing the Perfect Buttercream Frosting
- Beat the Butter: In a clean mixing bowl, beat the softened butter until creamy and smooth, about 2-3 minutes.
- Add Sugar Gradually: On low speed, gradually add the sifted powdered sugar one cup at a time, mixing until incorporated. After each addition, increase speed to medium-high for a few seconds before adding more.
- Add Flavor and Adjust Consistency: Mix in vanilla extract and salt. Then add cream or milk one tablespoon at a time until you reach a medium consistency – firm enough to hold shape but spreadable.
- Whip Until Fluffy: Beat the frosting on medium-high speed for 3-5 minutes until light and fluffy, occasionally scraping down the sides of the bowl.
C. Assembling Your Basketball Cake Sphere
- Level the Cakes: If using round pans, level the tops flat with a serrated knife and carve into hemispheres. If using hemisphere pans, your cakes should already have the right shape.
- Position Base Layer: Place the bottom hemisphere (flat side up) on your cake board or turntable. Secure with a small dab of frosting underneath.
- Optional Flavor Boost: For extra moisture, brush the cut surfaces with simple syrup. Furthermore, this step helps personalize your basketball cake with added flavor.
- Add Filling: Spread a layer of buttercream on the flat surface of the bottom hemisphere. Additionally, you can add a ring of slightly thicker frosting around the edge to create a dam that prevents filling from squeezing out.
- Complete the Sphere: Place the second hemisphere on top (flat side down), gently pressing to secure. Consequently, you should now have a complete sphere resembling a ball shape.
- Apply Crumb Coat: Using an offset spatula, cover the entire sphere with a thin layer of buttercream. This crumb coat traps loose crumbs and creates a base for your final layer of frosting.
- Chill for Stability: Refrigerate the cake for at least 30 minutes (or freeze for 15) until the crumb coat is firm. As a result, your final frosting application will be much smoother.
Creating Realistic Basketball Cake Decorations

Applying the Distinctive Basketball Design
- Color the Frosting: Set aside approximately ½ cup of white buttercream for the black lines. Tint the remaining buttercream with orange gel food coloring until you achieve a vibrant basketball-orange shade. Start with a small amount and gradually add more until you reach the desired color.
- Apply Final Orange Coat: Remove the chilled cake from the refrigerator. Using your offset spatula and turning the cake on the turntable, apply the orange buttercream frosting in a smooth, even layer covering the entire sphere.
- Create Basketball Texture: Use one of these methods to create the distinctive basketball texture:
- Stippling Method: Gently press the flat side of a small offset spatula or the back of a spoon repeatedly over the surface to create dimples resembling basketball texture.
- Paper Towel Method: Once the buttercream has crusted slightly, gently press a clean, textured paper towel onto the surface and carefully lift to create the pebbled texture of a basketball.
- Chill Before Piping: For best results, chill the cake again for 15-20 minutes. This step helps the orange frosting set before adding the black lines, preventing smudging.
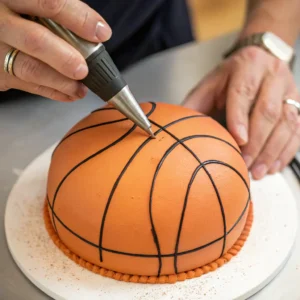
Piping Perfect Basketball Lines
- Prepare Black Frosting: Tint the reserved white buttercream with black gel food coloring until you achieve a deep black color. If desired, start with a chocolate buttercream base to more easily achieve a true black color.
- Create Guidelines: For precision, lightly score guidelines on your cake with a toothpick before piping. This step ensures your cake design looks authentic.
- Pipe the Classic Pattern: Fill a piping bag fitted with a small round tip (#3 or #4) with the black frosting. Carefully pipe:
- One line around the equator of the cake
- Two curved lines connecting the poles, intersecting the equator to create the classic basketball line pattern
- Final Setting: Chill the cake until ready to serve, allowing the black lines to set properly. For the best flavor experience, bring the cake to room temperature 20-30 minutes before serving.
Pro Tips for Basketball Cake Success and Creative Variations
Expert Advice for a Perfect Basketball Theme Cake
- Room Temperature Ingredients: Ensure all refrigerated ingredients (eggs, milk, butter) are at room temperature for better incorporation and a smoother cake batter.
- Don’t Overmix: Mix the cake batter only until ingredients are combined to avoid developing gluten, which can make your cake tough.
- Chilling is Crucial: The importance of chilling the cake between frosting layers cannot be overstated! This step provides stability and prevents frosting smears.
- Deep Black Frosting Tips: For truly black frosting, start with a chocolate frosting base OR use high-quality black gel/powder colorant and let it sit for several hours to deepen in color.
- Smooth Sides Technique: For perfectly smooth sides before texturing, use a bench scraper held at a slight angle while turning the cake on a turntable. For stubborn areas, dip your offset spatula in hot water, wipe dry, and smooth.
- Fix Frosting Cracks: If your buttercream cracks during smoothing, it’s likely too cold. Let it warm slightly or gently warm your spatula.
Basketball Cake Ideas for Creative Variations
- Flavor Combinations: Consider these crowd-pleasing options:
- Chocolate cake with orange-flavored buttercream
- Vanilla cake with chocolate buttercream (under the orange frosting)
- Marble cake for a surprise inside
- Fondant Alternative: For those who prefer fondant, cover the crumb-coated cake with orange fondant and use black fondant strips for the lines. This approach can create an especially smooth basketball cake.
- Basketball Court Base: Create a green “court” base with the board by covering it with green fondant or buttercream and adding court lines.
- Personalization Options: Add a jersey number, team logo, or player’s name using small fondant cutouts or additional piped buttercream decorations to personalize your cake.
- Basketball Cake Topper Ideas: Consider adding:
- A small basketball hoop made from fondant or store-bought cake toppers
- topper figurines of players
- Team logo printed on edible image paper
- A “Happy Birthday” banner across the top for a basketball birthday cake
How to Make a 3D Basketball Cake Without Specialty Pans
Don’t have hemisphere pans? No problem! You can still create an impressive basketball cake using regular round pans:
- Bake Extra Cake: Make three 8-inch round cakes instead of two.
- Carve the Shape: Once cooled, place two cakes on top of each other with frosting between. Use a serrated knife to carve the stacked cakes into a dome shape.
- Create the Top Dome: Cut the third cake in half. Use one half, rounded side up, on top of your stack to complete the spherical shape.
- Crumb Coat and Continue: Follow the same steps for crumb coating, chilling, and decorating as outlined above.
Many basketball fans appreciate this approach as it often results in a slightly larger cake that serves more guests at your birthday party!
Troubleshooting Common Basketball Cake Challenges
Solving Basketball Cake Decorating Problems
- Cake Doming Too Much: If your cake layers dome excessively during baking, use cake strips around your pans or reduce oven temperature by 25°F and bake slightly longer.
- Frosting Splitting or Curdling: This typically happens when butter is too cold. Let it warm up slightly and continue beating until smooth.
- Colors Bleeding: If black lines bleed into orange frosting, ensure your orange layer is completely set (firm to touch) before piping black lines. Additionally, make sure your black frosting isn’t too soft.
- Cake Cracking During Assembly: If your cake sphere cracks when assembling, your layers may be too dry. Next time, don’t overbake and consider using a simple syrup soak.
- Buttercream Too Soft: If your frosting becomes too soft while working, place it (and possibly the cake) in the refrigerator for 15-20 minutes to firm up before continuing.
For your naked cake needs, we have another great tutorial that shows off a different decorating style that’s equally impressive!
Storage Instructions for Your Basketball Cake
- Short-term Storage: Store leftover basketball cake in an airtight container in the refrigerator due to the buttercream frosting.
- Shelf Life: Properly stored, your cake will last 3-4 days while maintaining good quality and taste.
- Serving Recommendation: For the best flavor and texture experience, bring refrigerated cake to room temperature for 20-30 minutes before serving. This allows the buttercream to soften and the cake to regain its moist texture.
If you’re looking for a smaller option, check out our 6 inch cake recipe that can be adapted to this basketball design for a more intimate gathering!
Basketball Cake Decorating for Different Skill Levels
Beginner-Friendly Basketball Cake Options
If you’re new to cake decorating, consider these simplified approaches:
- Flat Basketball Design: Create a round layer cake and decorate the top with orange frosting and black piped lines in the basketball pattern.
- Cupcake Basketball Court: Make cupcakes with orange frosting and minimal black lines, arranged on a green “court” serving board.
- Ready-Made Helpers: Use store-bought basketball cake topper decorations to enhance a simpler cake design.
Advanced Basketball Cake Decorating Techniques
For more experienced bakers looking to create a show-stopping basketball cake:
- Internal Surprise: Create a cake with basketball-themed colored layers inside (orange and black alternating layers).
- Realistic Texture: Use specialized food-safe texturing tools to create an incredibly realistic basketball texture on your fondant or frost.
- Gravity-Defying Elements: Add a “floating” basketball hoop or player elements using food-safe support structures.
Need more themed cake inspiration? Our Harry Potter cake guide shows you how to create magical themed cakes that use similar techniques!
Basketball Cake for Different Occasions and Recipients
Best Basketball Birthday Cake Ideas for Various Age Groups
- Kids Basketball Theme Cake: Brighter colors, more playful designs, perhaps incorporated with other favorite things.
- Teen Fan Cake: Consider adding team colors, logos, or player jersey numbers as basketball cake decorations.
- Adult Basketball Enthusiast: More sophisticated design with realistic texturing and possibly incorporate favorite team elements.
Basketball Cake Ideas for Special Events
- March Madness Celebrations: Incorporate tournament brackets or specific team colors.
- NBA Championship Viewing Party: Add championship trophy elements or specific team colors.
- Basketball Theme Graduation: Combine graduation elements with basketball designs for the graduate with a love of basketball.
- Basketball Birthday Party: Create a complete themed dessert table with a centerpiece cake and complementary cupcakes.
Explore More Cake Decorating Inspiration
Looking for more cake ideas? Check out these related resources:
- The Ultimate Guide to Sports-Themed Cakes
- How to Create Perfect Sphere Cakes Every Time
- 10 Creative Ways to Use Food Coloring in Buttercream
Frequently Asked Questions About Basketball Cakes
Basketball Cake Recipe
When making a basketball cake, the most important components are a sturdy vanilla or chocolate recipe that can hold its shape, and a stable buttercream frosting that can be colored orange. For best results, use cake flour for a tender crumb and ensure all ingredients are at room temperature before mixing. Additionally, adding a small amount of orange extract to the batter can enhance the theme for basketball fans who want flavor coordination.
Basketball Cake for Girl
Creating a basketball cake for a girl who loves the sport involves the same techniques as any cake, but you might consider personalizing it with her team colors, adding her jersey number, or incorporating elements that reflect her personal style. You could add pink or purple accents to the traditional orange and black color scheme, or create basketball decorations in her favorite colors. For birthday party events focused on female players, consider adding custom cake toppers representing women’s basketball stars.
Basketball Cake Ideas
Beyond the standard sphere design, consider these creative basketball cake ideas: a half-court design with a 3D basketball on top; a jersey-shaped cake with basketball details; basketball cupcakes arranged in a court formation; a tiered cake with basketball elements on each layer; or a hoop cake with an edible “net.” For boys basketball themed parties or kids celebrations, you can even create basketball player scene decorations using fondant figures or purchased cake toppers to enhance your sport theme cake.
Basketball Cake Design for Boy
For a boy’s basketball birthday cake, consider incorporating his favorite team’s colors alongside the traditional orange and black. Add personalized elements like his name, age, and jersey number using fondant or piped frosting. You might also include decorations like a small hoop, player figurines, or team logos as cake topper sport cake elements. For theme birthday party supplies, coordinate your cake design with other decorations for a cohesive look that any fan would appreciate.
Birthday Basketball Cake
The perfect birthday basketball cake combines the visual appeal of a realistic with celebratory elements. Add birthday candles, “Happy Birthday” message piped in team colors, or even create a basketball court base with the birthday person’s name. For party decorations, match your cake to other theme party elements. Consider using topper birthday designs that include age numbers or names to make the celebration even more special for kids birthday party events or adult fans alike.
Basketball Cake Topper
The right basketball cake topper can elevate your design from good to spectacular. Options include: plastic figurines of basketball players; edible printed images of favorite players or team logos; handcrafted fondant basketball shoes or jerseys; a small basketball hoop with edible net; or even LED light-up toppers for evening events. For basketball birthday decorations, choose toppers that coordinate with other party decorations sports party supplies. You can find pcs cake topper sets that include multiple decorative elements, or create custom toppers using fondant and food coloring.

3D Basketball Cake
Equipment
- 2 6-inch hemisphere pans Or two 8-inch round cake pans for carving
- 1 Stand mixer With paddle/whisk attachments (or hand mixer)
- 1 Kitchen scale Highly recommended for accuracy
- 2 Cooling racks For proper cake cooling
- 1 Serrated knife For leveling/carving if using round pans
- 2 Offset spatulas Large and small sizes for frosting application
- 1 Cake turntable Highly recommended for smooth frosting application
- 2 Piping bags For decorating the basketball lines
- 1 Small Round Piping Tip Wilton #3 or #4 for black lines
- 1 Bench Scraper For smoothing buttercream frosting
- 1 Texturing tool Clean sponge, textured paper towel, or specific fondant tool
- 1 Cake board or serving plate For displaying your basketball cake
Ingredients
For the Moist Vanilla Cake
- 3 cups all-purpose flour 360g, sifted for best texture
- 2 cups granulated sugar 400g
- 1 tablespoon baking powder
- 1/2 teaspoon baking soda
- 1/2 teaspoon salt
- 1 cup unsalted butter 226g, softened at room temperature
- 4 large eggs room temperature
- 2 teaspoons vanilla extract use pure extract for best flavor
- 1 1/4 cups buttermilk 300ml, room temperature
For the Buttercream Frosting
- 2 cups unsalted butter 452g, softened
- 8 cups powdered sugar 960g, sifted
- 2 teaspoons vanilla extract
- 4-6 tablespoons heavy cream or milk
- 1 pinch salt
- orange gel food coloring must be gel for vibrant color
- black gel food coloring must be gel for deep black color
Instructions
Baking the Perfect Cake Layers
- Preheat your oven to 350°F (175°C). Thoroughly grease and flour your hemisphere pans, or if using round pans, grease, flour, and line bottoms with parchment paper.
- In a medium bowl, whisk together the flour, baking powder, baking soda, and salt until well combined. Set aside.3 cups all-purpose flour, 1 tablespoon baking powder, 1/2 teaspoon baking soda, 1/2 teaspoon salt
- In your stand mixer with the paddle attachment (or using a hand mixer), beat the butter and sugar on medium-high speed for 3-4 minutes until light and fluffy. This step incorporates air into the batter, leading to a better cake texture.2 cups granulated sugar, 1 cup unsalted butter
- Add eggs one at a time, beating well after each addition. Mix in the vanilla extract until combined.4 large eggs, 2 teaspoons vanilla extract
- Gradually add the dry ingredients and buttermilk, alternating between them. Begin and end with the dry ingredients (typically three additions of dry and two of liquid). Mix until just combined – do not overmix as this can result in a tough cake texture.1 1/4 cups buttermilk
- Divide the batter evenly between your prepared pans. For hemispheres, fill about ¾ full. Tap the pans gently on the counter to release any air bubbles.
- Bake for 30-40 minutes, or until a toothpick inserted into the center comes out clean and the cake springs back when lightly touched. Rotate the pans halfway through baking ensures even browning.
- Allow cakes to cool in pans for 15 minutes before inverting onto wire cooling racks to cool completely. Letting cakes cool completely is crucial before assembling.
Preparing the Perfect Buttercream Frosting
- In a clean mixing bowl, beat the softened butter until creamy and smooth, about 2-3 minutes.2 cups unsalted butter
- On low speed, gradually add the sifted powdered sugar one cup at a time, mixing until incorporated. After each addition, increase speed to medium-high for a few seconds before adding more.8 cups powdered sugar
- Mix in vanilla extract and salt. Then add cream or milk one tablespoon at a time until you reach a medium consistency – firm enough to hold shape but spreadable.2 teaspoons vanilla extract, 4-6 tablespoons heavy cream or milk, 1 pinch salt
- Beat the frosting on medium-high speed for 3-5 minutes until light and fluffy, occasionally scraping down the sides of the bowl.
Assembling Your Basketball Cake Sphere
- If using round pans, level the tops flat with a serrated knife and carve into hemispheres. If using hemisphere pans, your cakes should already have the right shape.
- Place the bottom hemisphere (flat side up) on your cake board or turntable. Secure with a small dab of frosting underneath.

- Spread a layer of buttercream on the flat surface of the bottom hemisphere. Add a ring of slightly thicker frosting around the edge to create a dam that prevents filling from squeezing out.
- Place the second hemisphere on top (flat side down), gently pressing to secure. You should now have a complete sphere resembling a ball shape.
- Using an offset spatula, cover the entire sphere with a thin layer of buttercream. This crumb coat traps loose crumbs and creates a base for your final layer of frosting.
- Refrigerate the cake for at least 30 minutes (or freeze for 15) until the crumb coat is firm. This will ensure your final frosting application will be much smoother.
Creating Realistic Basketball Cake Decorations
- Set aside approximately ½ cup of white buttercream for the black lines. Tint the remaining buttercream with orange gel food coloring until you achieve a vibrant basketball-orange shade. Start with a small amount and gradually add more until you reach the desired color.orange gel food coloring
- Remove the chilled cake from the refrigerator. Using your offset spatula and turning the cake on the turntable, apply the orange buttercream frosting in a smooth, even layer covering the entire sphere.
- Create the basketball texture using one of these methods: 1) Stippling Method – Gently press the flat side of a small offset spatula or the back of a spoon repeatedly over the surface to create dimples resembling basketball texture. 2) Paper Towel Method – Once the buttercream has crusted slightly, gently press a clean, textured paper towel onto the surface and carefully lift to create the pebbled texture of a basketball.
- Chill the cake again for 15-20 minutes. This helps the orange frosting set before adding the black lines, preventing smudging.
- Tint the reserved white buttercream with black gel food coloring until you achieve a deep black color. If desired, start with a chocolate buttercream base to more easily achieve a true black color.black gel food coloring
- For precision, lightly score guidelines on your cake with a toothpick before piping. This ensures your cake design looks authentic.
- Fill a piping bag fitted with a small round tip (#3 or #4) with the black frosting. Carefully pipe: 1) One line around the equator of the cake, 2) Two curved lines connecting the poles, intersecting the equator to create the classic basketball line pattern.
- Chill the cake until ready to serve, allowing the black lines to set properly. For the best flavor experience, bring the cake to room temperature 20-30 minutes before serving.
Notes
- For best results, ensure all ingredients are at room temperature before beginning.
- The cake can be made 1-2 days in advance and stored in the refrigerator.
- Allow the cake to come to room temperature for 20-30 minutes before serving for best flavor and texture.
- The hemisphere pans make this project much easier, but regular round pans can be used with additional carving.
- For a truly black frosting, start with chocolate buttercream as the base before adding black gel coloring.
- To make this cake more budget-friendly, use a box cake mix as the base and focus your efforts on the decoration.
- This recipe makes one 6-inch basketball cake that serves approximately 12-16 people.