
The Ultimate Guide to Making a Perfect Naked Cake With Vanilla Buttercream: Simple Steps for Wedding Cake Success
Are you looking to create a beautiful naked cake that’s sure to impress? Whether for a wedding, birthday celebration, or just because, this comprehensive guide will walk you through everything you need to know about making and decorating the perfect naked cake. Unlike traditional cakes completely covered in frosting, a naked cake showcases the layers inside with just a light coating of buttercream on the outside, creating a rustic yet elegant appearance that has become increasingly popular in recent years.
What Makes Naked Cake Decorating So Special for Wedding Cake Celebrations
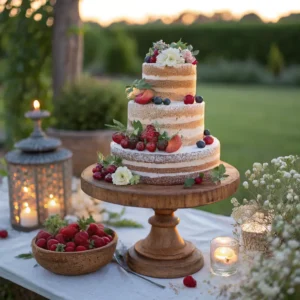
Naked cakes have revolutionized cake decorating with their rustic charm and natural beauty. Furthermore, these stunning layer cakes offer a refreshing alternative to heavily frosted traditional cakes. The minimalist frosting approach of a naked cake allows the actual cake layers to take center stage, creating a rustic yet sophisticated presentation that works beautifully for weddings, birthdays, and other special occasions.

Additionally, naked cakes are incredibly versatile. You can decorate a naked cake with fresh flowers, seasonal fruits, or elegant greenery to match any event theme. Many couples choose a wedding cake in this style because it complements outdoor and rustic venues perfectly while still offering that wow factor.
Moreover, for those who find traditional frosting too sweet, a semi-naked cake provides the perfect balance between cake and buttercream. The beauty of naked cake designs is that they celebrate imperfection and natural aesthetics. If you’re planning a cake for my mom’s birthday, this style offers both elegance and a homemade touch she’ll appreciate.
Essential Ingredients for a Perfect Naked Cake Recipe with Chocolate Cake Options
Before you begin making your naked cake, gathering all the necessary ingredients is crucial for success. The quality of your ingredients will significantly impact the final taste and texture of your cake.
For the Vanilla Cake Layers:
- 3 cups (375g) cake flour, sifted
- 2 teaspoons baking powder
- 1/2 teaspoon baking soda
- 1 teaspoon salt
- 1 cup (226g) unsalted butter, room temperature
- 2 cups (400g) granulated sugar
- 4 large eggs, room temperature
- 2 teaspoons vanilla extract
- 1 cup (240ml) buttermilk, room temperature
Chocolate Cake Recipe Alternative:
- 2 cups (250g) all-purpose flour
- 2 cups (400g) granulated sugar
- 3/4 cup (65g) unsweetened cocoa powder
- 2 teaspoons baking soda
- 1 teaspoon baking powder
- 1 teaspoon salt
- 2 large eggs
- 1 cup (240ml) buttermilk
- 1/2 cup (120ml) vegetable oil
- 2 teaspoons vanilla extract
- 1 cup (240ml) hot coffee
For the Vanilla Buttercream Frosting:
- 1 1/2 cups (340g) unsalted butter, room temperature
- 4-5 cups (480-600g) powdered sugar, sifted
- 2-3 tablespoons heavy cream
- 2 teaspoons vanilla extract
- 1/4 teaspoon salt
Optional Cake Fillings for Your Layer Cake Recipe:
- Fresh berries
- Lemon curd
- Chocolate ganache
- Fruit preserves
For Decorating Your Naked Cake With Fresh Accents:
- Fresh flowers (ensure they’re food-safe)
- Fresh fruits (berries, figs, etc.)
- Herbs (mint, rosemary, thyme)
- Edible flowers
- Powdered sugar for dusting
Essential Equipment for Creating a Beautiful Naked Cake With Scrollwork
Having the right tools on hand will make the cake-making process much smoother. Therefore, consider investing in these essentials for decorating a naked cake:
- Three 8-inch or 9-inch round cake pans
- Parchment paper
- Stand mixer or hand mixer
- Measuring cups and spoons
- Mixing bowls
- Rubber spatula
- Offset spatula for frosting
- Serrated knife or cake leveler
- Cake turntable (highly recommended)
- Cake board or cake stand
- Piping bags and tips (for scrollwork details)
- Cake dowels (for taller cakes)
- Bench scraper (for smoothing frosting)
- Cake circle or cake plate for serving
The cake turntable is particularly important when creating a naked cake, as it allows you to easily rotate the cake while applying the minimal frosting layer evenly around the sides of the cake.
Step-by-Step Instructions for Making a Perfect Naked Cake or Semi-Naked Cake
Preparing Your Round Cake Pans and Cake Layers
- First, preheat your oven to 350°F (175°C). Grease three 8-inch round cake pans with butter or cooking spray, then line the bottoms with parchment paper circles.
- In a medium bowl, whisk together the sifted cake flour, baking powder, baking soda, and salt. Set aside.
- In the bowl of a stand mixer fitted with the paddle attachment, cream together the room temperature butter and sugar until light and fluffy, about 3-5 minutes.
- Add the eggs one at a time, beating well after each addition. Then, mix in the vanilla extract.
- Alternately add the dry ingredients and buttermilk to the butter mixture, beginning and ending with the dry ingredients (three additions of dry, two of buttermilk). Mix until just combined after each addition.
- Divide the batter evenly among the prepared cake pans and smooth the tops with an offset spatula.
- Bake for 25-30 minutes, or until a toothpick inserted into the center of the cake comes out clean or with a few moist crumbs.
- Allow the cake layers to cool in the pans for 10 minutes before inverting onto cooling racks to cool completely.
Making the Vanilla Buttercream to Frost Your Naked Cake
- In a stand mixer fitted with the paddle attachment, beat the room temperature butter until creamy and smooth, about 2 minutes.
- Gradually add the sifted powdered sugar, one cup at a time, beating well after each addition.
- Add the vanilla extract and salt, then beat on medium speed.
- Add heavy cream as needed to achieve your desired consistency. For a naked cake, you’ll want the buttercream to be slightly firmer than for a fully-frosted cake.
- Beat the buttercream on medium-high speed for 3-4 minutes until light and fluffy.
How to Assemble and Frost Your Layer Cake to Make a Naked Cake
- Once your cake layers are completely cool, level the cake layers if necessary using a serrated knife or cake leveler. Flat layers are essential for a stable naked cake.
- Place your first cake layer on a cake board or directly on a cake stand. If you’re using a cake turntable, place the cake board on the turntable.
- Spread a layer of buttercream on top of the first cake layer using an offset spatula. Keep the layer even and about 1/4 to 1/2 inch thick.
- If you’re adding filling, pipe a dam of buttercream around the edge of the cake layer first to prevent the filling from spilling out, then add your desired filling in the center.
- Place the second cake layer on top, pressing down gently to secure it. Repeat the frosting process.
- Add the third cake layer on top, placing it bottom-side up for a flat top surface.
- Apply a thin layer of buttercream to the top and sides of the cake. This is where the “naked” technique comes in – you’ll apply just enough frosting to partially cover the cake, allowing parts of the cake layers to show through.
- Use a bench scraper or offset spatula to scrape off excess frosting from the sides, creating that characteristic naked cake look. The key is to apply enough buttercream to seal in the crumbs but still show the cake layers underneath.
- For a semi-naked cake, leave slightly more frosting on the sides while still allowing the cake to peek through.
- Turn the cake as you work to ensure even coverage and to create that beautiful rustic finish where you can see the layer of cake through the minimal frosting.
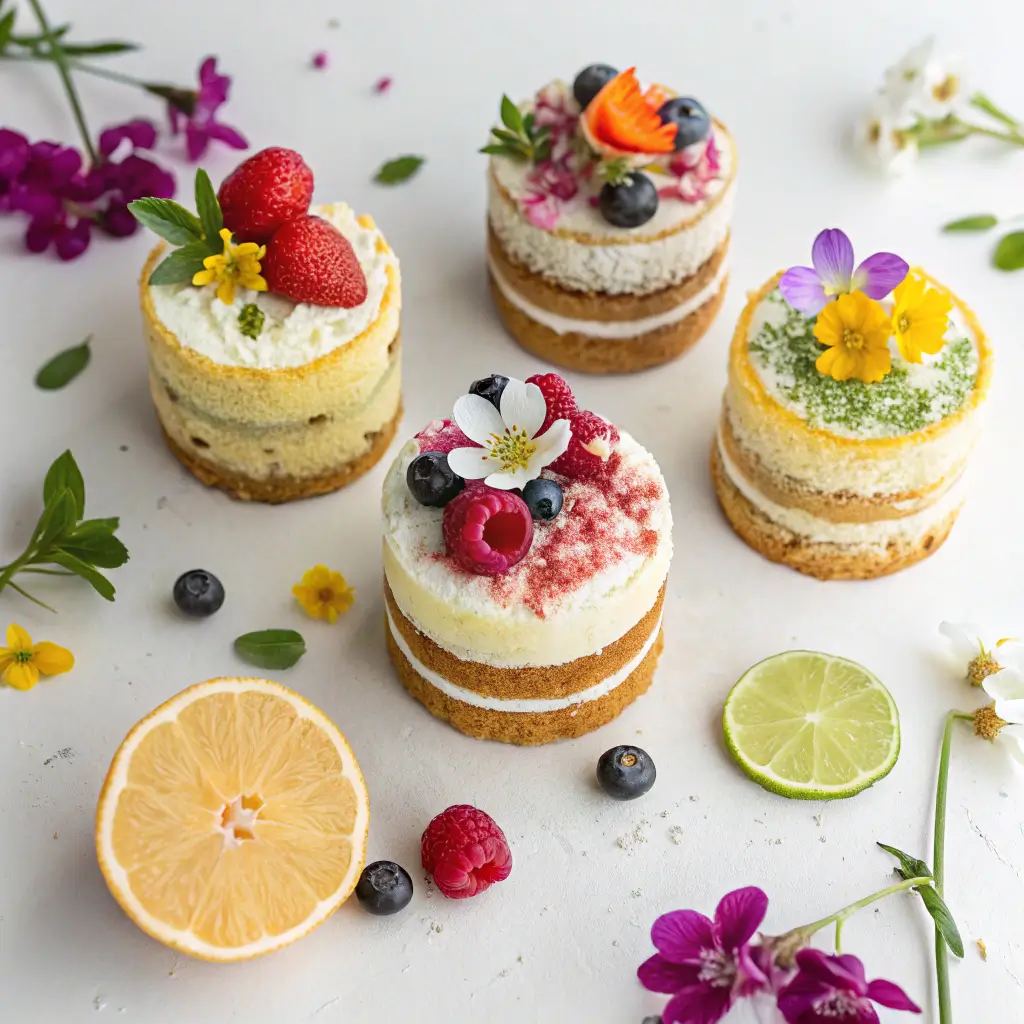
Creative Ways to Decorate the Cake with Naked Cake Designs
Once you’ve mastered the basic naked cake technique, consider these beautiful naked cake decorating ideas to make this cake perfect for any occasion:
Fresh Flower Decorations for Wedding Cake Styling
Fresh flowers create a stunning decoration for any naked cake with vanilla or chocolate layers. However, ensure they’re food-safe or wrap the stems in floral tape before placing them on the cake. Popular choices include:
- Roses
- Peonies
- Baby’s breath
- Lavender
- Eucalyptus leaves
Decorating a Naked Cake with Scrollwork and Buttercream Details
For those who want to add more decorative elements while maintaining the naked cake aesthetic:
- Use a piping bag with a small round tip to add delicate scrollwork designs to the top of the cake or along the edge of the cake
- Create minimal buttercream flourishes at the cake layer transitions
- Add small buttercream pearls around the bottom of the cake
- Pipe thin buttercream borders along the top edge of the cake using a decorative tip
- Create a semi-naked cake effect with scrollwork details for a more elegant finish
Decorating with Fresh and Natural Elements on Types of Naked Cakes
These additional elements can enhance your naked cake’s appearance:
- Drizzle caramel, chocolate, or fruit syrup over the top of the cake, allowing it to drip down the sides
- Dust the top with powdered sugar for a simple, elegant finish
- Add edible gold leaf for a touch of luxury
- Incorporate herbs like mint, thyme, or rosemary
- Place cake with fresh berries both on top and between layers
- Create a true naked cake with minimal frosting and maximum natural decoration
How to Make a Naked Cake That Stays Fresh: Solving Common Problems
Preventing Dry Cake Layers When Making a Naked Cake
Since naked cakes have less frosting to seal in moisture, they can dry out faster than traditional cakes. To combat this:
- Apply a simple syrup to each cake layer before assembling. Make simple syrup by boiling equal parts sugar and water until the sugar dissolves, then cool completely. Brush onto cake layers for added moisture.
- Use recipes that produce naturally moist cake layers. A vanilla cake recipe with buttermilk or sour cream works well for a naked cake.
- Don’t overbake your cake layers, as this is the primary cause of dryness.
- Keep the cake in the refrigerator with a loose covering that won’t touch the frosting.
- Place your cake out at room temperature about an hour before serving for the best flavor and texture.
Creating Stable Cake Layers for Your Wedding Cake
A wedding cake or tall naked cake requires special attention to stability:
- Level your cake layers properly so they stack evenly.
- For cakes taller than three layers, consider using dowels for support. You can puncture the cake with food-safe straws or dowels for additional stability.
- Make sure your buttercream is the right consistency – not too soft that the layers slide, but not too stiff that it’s difficult to spread.
- Chill the cake between adding layers if your kitchen is warm.
- For a layer cake that will be transported, insert food-safe straws or dowels through all layers for added stability.
- Consider placing the cake board on top of a larger cake board for extra support when moving the cake.
Achieving the Perfect Semi-Naked Cake Frost Finish
Getting that perfect naked cake look can take practice:
- Apply buttercream to the sides of the cake in a thin, even layer.
- Use a bench scraper or offset spatula held vertically against the side of the cake while turning the cake stand to scrape off excess frosting.
- For a semi-naked cake, leave a bit more frosting on the sides while still allowing the cake layers to peek through.
- Work in a cool room, as warm temperatures can make the buttercream too soft to work with effectively.
- Chill the cake after applying the crumb coat to set the buttercream before adding final decorations.
- Pay special attention to the top of the cake using a smooth, even frosting layer while keeping the sides rustic and partially exposed.
Make a Beautiful Naked Cake Ahead: Storage and Preparation Tips
Given that naked cakes have less frosting protection, proper storage is crucial:
- Fresh naked cakes are best served within 24 hours of assembly, especially if decorated with fresh fruit or flowers.
- If you need to make components ahead, you can:
- Bake cake layers up to 2 days in advance, wrap well in plastic wrap and store at room temperature
- Freeze cake layers for up to 3 months (wrap in plastic wrap and foil)
- Make buttercream 3-5 days in advance and store in the refrigerator
- Assemble the cake without decorations 1 day ahead
- Store your completed naked cake in the refrigerator if not serving immediately, but allow it to come to room temperature for 1-2 hours before serving for the best flavor and texture.
- When refrigerating, place the cake in a cake box or loosely tent with foil, being careful not to touch the frosting. This will protect the cake from drying out.
- Avoid storing naked cakes in places with strong odors, as the exposed cake can absorb these smells.
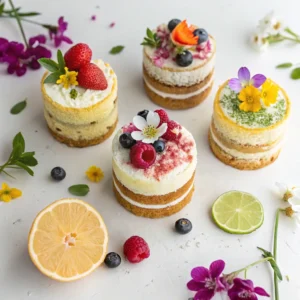
Naked Cake with Vanilla, Chocolate, and Other Delicious Cake Variations
One of the many reasons people love naked cakes is their versatility. Consider these popular options:
Make This Cake with Vanilla Layer Cake Recipe and Vanilla Buttercream
A timeless choice that never disappoints. The vanilla cake layers pair perfectly with vanilla buttercream, creating a canvas for any decoration theme. For a vanilla layer cake recipe that works beautifully as a naked cake:
- Use cake flour for a tender crumb
- Add a splash of almond extract along with vanilla for depth of flavor
- Consider using vanilla bean paste instead of extract for visible flecks
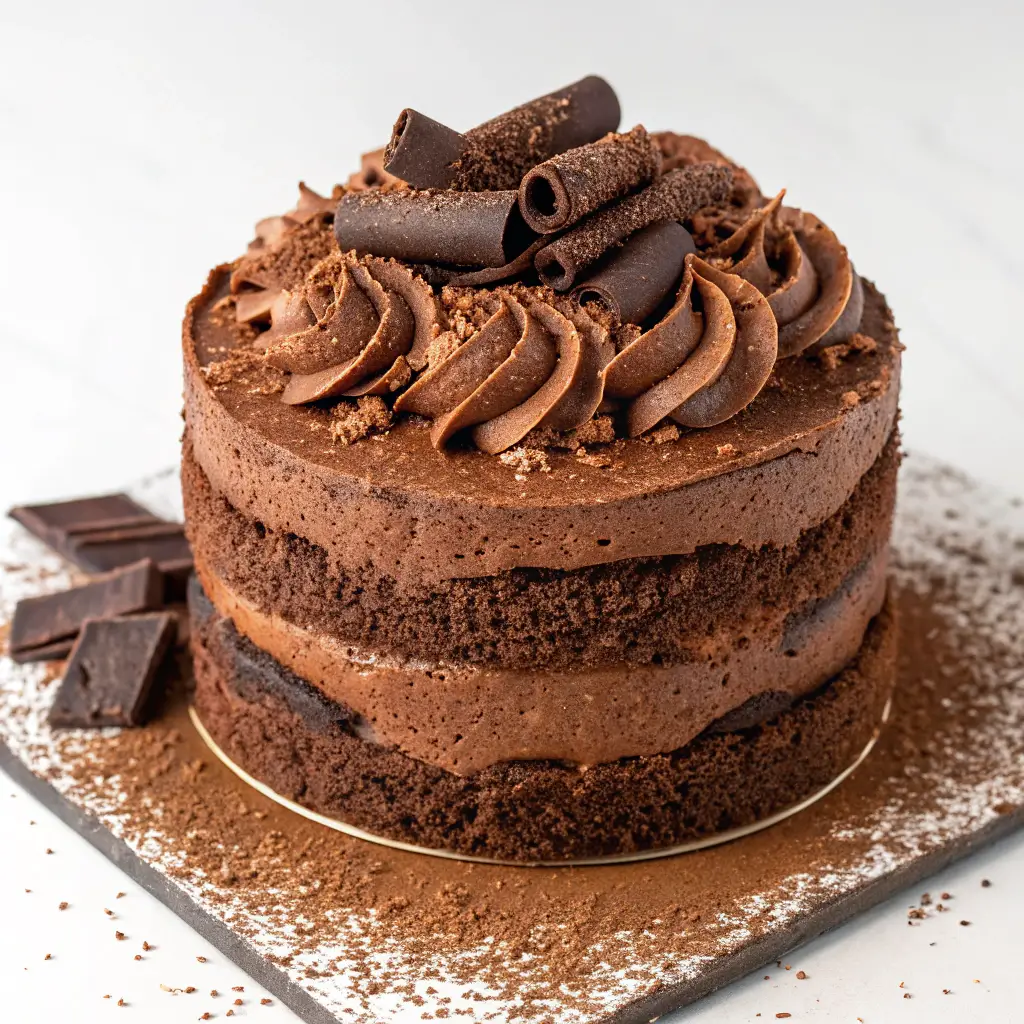
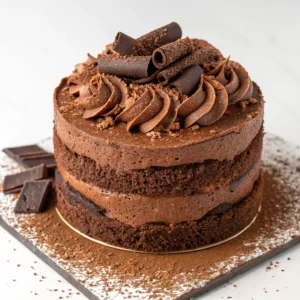
Rich Chocolate Cake Recipe with Chocolate Ganache
For chocolate lovers, a chocolate cake recipe made with high-quality cocoa paired with silky chocolate ganache makes for a decadent naked cake. To enhance your chocolate layer cake:
- Use hot coffee instead of water to intensify the chocolate flavor
- Add a pinch of espresso powder to deepen the chocolate notes
- Consider a whipped chocolate ganache for the filling between layers
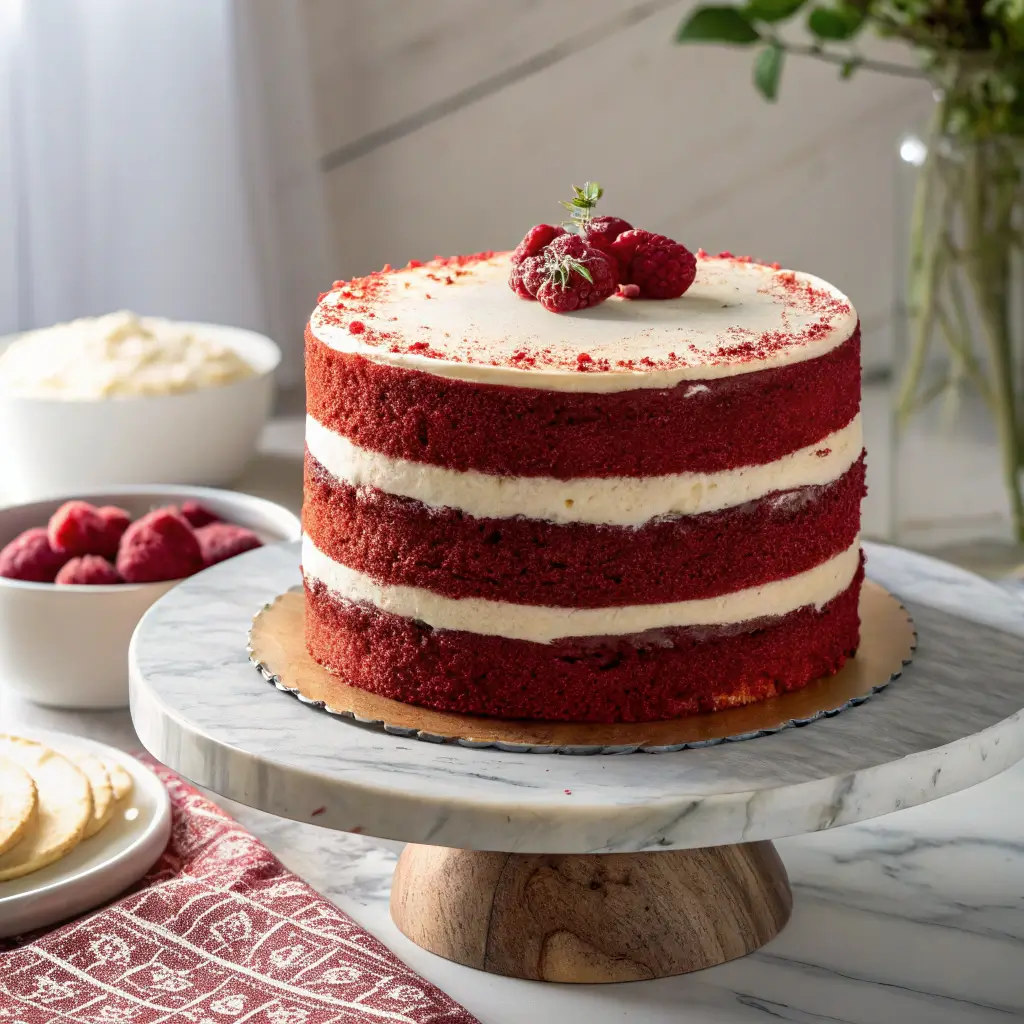
Red Velvet Cake with Cream Cheese Frosting
The striking red layers of this cake look spectacular in a naked cake style, with white cream cheese frosting providing beautiful contrast. A red velvet cake makes a stunning naked cake because:
- The vibrant red color creates dramatic visual impact when layers are exposed
- The tangy cream cheese frosting complements the subtle cocoa flavor
- It’s perfect for Valentine’s Day, Christmas, or patriotic celebrations
Specialty Cake Layer Options for One Cake to Remember
Looking for something more unique? Consider these special cake flavor combinations:
- Lemon cake with lavender buttercream
- Spiced carrot cake with cream cheese frosting
- Earl Grey cake with honey buttercream
- Coconut cake with lime filling
- Almond cake with raspberry preserves
How to Transport Your Naked Cake Safely to the Wedding Cake Venue
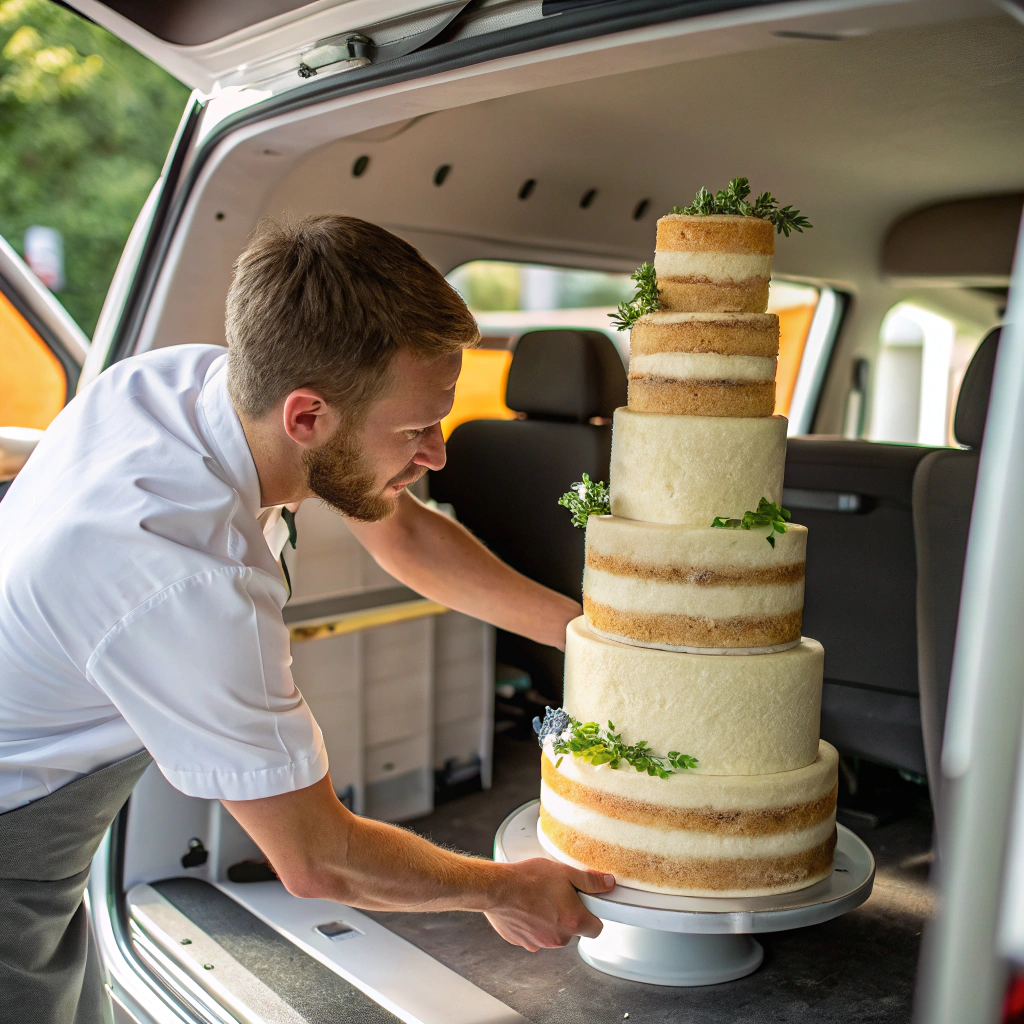
Transporting a naked cake requires special care:
- Chill the cake thoroughly before transport to firm up the buttercream and fillings.
- Use a cake carrier with a flat bottom and high sides that won’t touch the cake.
- If traveling far, consider inserting dowels vertically through the cake for added stability.
- Place non-slip matting beneath the cake board to prevent sliding.
- For very tall cakes or wedding cakes, consider transporting the layers separately and assembling on site. You may need a layer cake recipe that’s designed to hold up well during transport.
- Keep the vehicle air-conditioned, especially in warm weather.
- Add fresh elements like flowers and fruits at the destination rather than before transport when possible.
- If you must transport a cake with fresh decorations, carefully secure any elements that might shift during travel.
Why Choose a Naked Cake with Scrollwork for Your Wedding Cake Style
Naked cakes have become increasingly popular for weddings and special events for several compelling reasons:
- Visual Impact: The exposed layers create a striking, rustic-elegant aesthetic that photographs beautifully. A naked cake with scrollwork adds just enough decoration while maintaining the rustic charm.
- Versatility: They complement many different event styles, from rustic barn weddings to elegant garden parties.
- Flavor Focus: With less frosting, the actual cake flavor takes center stage.
- Customization: Easy to personalize with seasonal fruits, flowers, and decorations that match your event theme.
- Budget-Friendly: Often require less frosting and decorating time than traditional fondant-covered cakes.
- Better for Frosting-Averse Guests: Perfect for those who prefer less sweetness or don’t enjoy thick layers of frosting.
- Modern Approach: Represents a more relaxed, contemporary style of cake compared to heavily decorated traditional wedding cakes.
- Natural Beauty: A naked cake or semi-naked cake celebrates the inherent beauty of the cake itself, making it perfect for nature-inspired or organic wedding themes.
Expert Tips for Making the Cake Layers for a Perfect Birthday Cake
General Tips for All Types of Naked Cakes
- Make sure all your ingredients are at room temperature before beginning to ensure proper mixing.
- Use a kitchen scale to divide your batter evenly between cake pans for uniform layers.
- Rotate your cake pans halfway through baking for even baking results.
- Allow cake layers to cool completely before frosting to prevent the buttercream from melting.
- A cake turntable makes frosting much easier, especially for achieving that perfect naked cake scrape.
- Freeze cake layers for 30 minutes before assembling to make them easier to work with and reduce crumbs.
- Apply a light layer of frosting first as a crumb coat, chill, then add the final layer of frosting.
- When placing your cake on a serving plate or cake stand, add small pieces of parchment paper under the edges to keep the plate clean while decorating.
How to Decorate the Cake for a Stunning Naked Cake Presentation
- Choose decorations that complement the cake flavors and the event theme.
- When using fresh flowers, place them on the cake shortly before serving.
- Create height and visual interest by placing decorations at varying levels on the cake.
- For a cohesive look, echo the cake’s flavor in its decoration (like using berries on a vanilla cake with berry filling).
- Consider the season when selecting decorations – use what’s fresh and available.
- Less is often more – don’t overcrowd your cake with too many different decorative elements.
- To make a naked cake with a more polished look, consider adding a thin layer of buttercream to the top of the cake using smooth, even strokes while keeping the sides minimally frosted.
- For special occasions like a birthday cake, consider adding a simple message piped onto the top of the cake using a contrasting color of buttercream.
Making a 9-Inch Cake Perfect for Special Occasions
When making a naked cake using 9-inch cake pans:
- You’ll need to adjust your recipe. For three 9-inch cake layers, increase your recipe by 25% from an 8-inch cake recipe.
- Baking time will likely be slightly shorter – begin checking for doneness about 5 minutes earlier than you would for 8-inch cakes.
- A 9-inch cake is perfect for serving 20-24 people, making it ideal for larger gatherings.
- When stacking three layers of cake in 9-inch rounds, be sure to use a cake board that’s at least 10 inches in diameter to provide proper support.
- A larger naked cake may benefit from additional support – consider placing one cake board on top of your first cake layer and another between the second and third cake layer for added stability.
Explore More Cake Decorating Inspiration
Looking for more cake ideas? Check out these related resources:
Frequently Asked Questions About Naked Cakes
Why is it called a naked cake?
A naked cake is called “naked” because it features exposed cake layers with minimal frosting on the outside. Unlike traditional cakes that are completely covered with frosting or fondant, naked cakes have a rustic, unfinished look where you can see the actual cake layers through the thin layer of frosting. This style originated around 2013 when baker Christina Tosi of Milk Bar popularized the unfrosted sides look, and it has since become a major trend in wedding cakes and celebration cakes. The “naked” appearance celebrates the natural beauty of the cake itself rather than hiding it under heavy decoration.
What is Elvis Presley cake?
Elvis Presley cake, inspired by the King’s famous food preferences, is a moist pineapple-soaked yellow cake topped with cream cheese frosting. The signature version includes pineapple chunks in the batter and a pineapple syrup that soaks into the warm cake. While not traditionally served as a naked cake, you could adapt it by creating yellow cake layers, soaking each with pineapple syrup, and using cream cheese frosting between layers with a minimal coating on the exterior. Some versions even incorporate banana or peanut butter elements as a nod to Elvis’s favorite sandwich ingredients. If you make this cake as a naked style, the visible pineapple-soaked layers would create a particularly moist and appetizing appearance.
Why is it called miserable cake?
“Miserable cake” or “gâteau miserable” is a traditional European dessert with a fascinating name that belies its delicious taste. The name has several origin stories: some say it’s because the cake is so light it’s “miserably small,” while others suggest it’s because making the delicate layers was once considered miserably difficult. The classic version features thin layers of almond meringue and buttercream. When adapted as a naked cake, the striking contrast between the crisp meringue and smooth buttercream creates a visually stunning effect, with the layers clearly visible through the minimal exterior frosting. The kind of cake that results is anything but miserable—it’s actually a sophisticated and elegant dessert perfect for special occasions.
What is the witches cake?
“Witches cake” historically refers to a peculiar cake made during the Salem witch trials, but in modern baking, it often describes a rich, dark chocolate cake with unexpected ingredients like black cocoa powder or activated charcoal for an intensely black appearance. Some versions incorporate spices like cinnamon and clove for a mystical flavor profile. As a naked cake, a witches cake would be particularly dramatic with its deep black layers visible through minimal dark frosting, perhaps with purple or green accents. For Halloween or themed parties, this style of cake with fresh blackberries on the center of the cake makes a spooky yet sophisticated centerpiece that showcases the contrasting dark layers and light filling.
Why is it called Devil cake?
Devil’s food cake earned its name as the sinful, indulgent counterpart to the light and airy Angel food cake. This rich chocolate cake is characterized by its deep, dark color and moist, velvety texture. The “devilish” quality comes from its decadence and the traditional addition of hot water or coffee that activates the cocoa powder, creating a more intense chocolate flavor. When made as a naked cake, Devil’s food cake layers create a dramatic visual contrast with white vanilla buttercream, making it popular for those wanting a show-stopping cake with rich flavor. The bottom of the cake can be garnished with chocolate shavings for added texture and visual interest, while the top of the cake using a light dusting of cocoa powder creates a beautiful finish.
Why is it called depression cake?
Depression cake originated during the Great Depression of the 1930s when ingredients like eggs, milk, and butter were scarce or expensive. Also known as “wacky cake” or “poor man’s cake,” these recipes cleverly omit dairy and eggs while still creating a delicious cake, often using vinegar and baking soda for leavening. The resourcefulness of these recipes made them popular during economically challenging times. Depression cake makes an excellent base for a naked cake because its moist texture helps it stay fresh even with minimal frosting, and its humble origins create a meaningful connection to heritage baking traditions. The cake layers can be made ahead and frozen, making it convenient for budget-conscious bakers who need to spread out their preparation time and costs.
What is a JFK cake?
The term “JFK cake” typically refers to a favorite dessert of President John F. Kennedy—a chocolate bundt or layer cake with chocolate frosting. According to White House history, JFK enjoyed a specific chocolate cake recipe that became known informally as the “JFK cake.” While not originally presented as a naked cake, you could adapt this rich chocolate cake into a naked style by creating layers with minimal frosting on the exterior. This would showcase the deep chocolate color of the cake while maintaining the presidential connection that makes this dessert special for history enthusiasts. Place your cake on an elegant cake stand and drizzle lightly with chocolate ganache for a modern interpretation of this historical favorite.
What ice cream did Elvis eat?
Elvis Presley reportedly loved vanilla ice cream, particularly when paired with his favorite desserts. According to accounts from his personal chef, Elvis enjoyed vanilla ice cream alongside warm fruit pies and with his beloved peanut butter and banana sandwiches. While ice cream itself doesn’t work on a naked cake (it would melt!), you can incorporate Elvis’s flavor preferences into your naked cake design by using vanilla cake layers with banana filling, peanut butter buttercream, and perhaps a drizzle of caramel or honey—flavors that would complement the vanilla ice cream that would traditionally be served alongside. This combination creates a delicious cake that pays homage to the King’s famous taste preferences.
What is Robert Redford cake?
Robert Redford cake, sometimes called “Better Than Robert Redford Cake” or “Robert Redford Dessert,” is a layered dessert featuring a chocolate base, cream cheese layer, chocolate pudding, and whipped cream topping, typically garnished with chocolate shavings. Named after the handsome actor because it was considered “just as tempting,” this dessert can be adapted into a naked cake format by creating chocolate cake layers with cream cheese frosting between them, leaving the sides minimally frosted to showcase the contrasting layers. One cake layer on a serving plate with cream cheese frosting, then chocolate mousse, topped with another cake layer and finished with whipped cream creates a stunning naked interpretation of this classic dessert that’s sure to impress.
What was the pinky thing in Elvis?
The “pinky thing” associated with Elvis refers to his famous pinky ring, a 11.5-carat diamond ring he often wore and sometimes gave to fans. While not directly related to cake, you could create a themed naked cake honoring Elvis with vanilla cake layers, banana buttercream filling, and a subtle nod to his famous jewelry with edible silver or gold accents. For special occasions, like an Elvis-themed birthday cake, you might add a small edible gold ring decoration on top of the cake using fondant or modeling chocolate. This cake style would combine Elvis’s favorite flavors with a decorative element honoring his iconic fashion, creating a truly unique celebration cake for fans of the King.
What is a billy cake?
A billy cake is a traditional Australian bush cake, named after the “billy can” (a metal pot used for cooking over campfires) in which it was historically prepared by swagmen and travelers. This simple cake usually contains basic ingredients like flour, sugar, dried fruits, and sometimes golden syrup. When adapted as a naked cake for modern presentations, a billy cake would highlight its rustic origins with visible spiced cake layers complemented by minimal frosting. The edge of the cake can be decorated with native Australian elements like macadamia nuts or wattleseed for an authentic touch. This style of cake offers a wonderful opportunity to showcase traditional Australian baking in a contemporary format, perfect for cultural celebrations or themed events.
What is Elvis hair called?
Elvis Presley’s iconic hairstyle was called a “pompadour,” characterized by hair swept upward and back from the forehead with sides combed back. While this isn’t cake-related, you could create an Elvis-themed naked cake with vanilla cake layers and buttercream, then add a decorative top inspired by his famous hairstyle using piped frosting in black or navy blue. This creative touch would make a striking birthday cake for Elvis fans. The cake would combine classic naked cake technique with a playful decorative element that references the King of Rock and Roll’s most recognizable feature. You could also add a simple guitar decoration made from fondant or chocolate to complete the Elvis theme while maintaining the beauty of the naked cake aesthetic.
Naked Cake with Buttercream Frosting
Equipment
- 1 Cake Pans Two 8-inch round cake pans
- 1 Mixer Stand mixer or hand mixer
Ingredients
Cake Layers
- 2 ½ cups All-purpose flour
- 2 cups Granulated sugar
- 1 cup Unsalted butter Softened
- 1 cup Buttermilk
- 3 large Eggs
- 2 teaspoons Vanilla extract
- 2 teaspoons Baking powder
- ½ teaspoon Baking soda
- ½ teaspoon Salt
Buttercream Frosting
- 1 cup Unsalted butter Softened
- 3-4 cups Powdered sugar Sifted
- 2-3 tablespoons Heavy cream
- 1 teaspoon Vanilla extract
- Pinch Salt
Instructions
- Preheat the oven to 350°F (175°C). Grease and flour two 8-inch round cake pans.2 ½ cups All-purpose flour, 2 cups Granulated sugar, 1 cup Unsalted butter
- In a large bowl, cream the butter and sugar together until light and fluffy.1 cup Unsalted butter, 2 cups Granulated sugar
- Add the eggs one at a time, beating well after each addition. Add the vanilla extract.3 large Eggs, 2 teaspoons Vanilla extract
- In a separate bowl, whisk together the flour, baking powder, baking soda, and salt.2 ½ cups All-purpose flour, 2 teaspoons Baking powder, ½ teaspoon Baking soda, ½ teaspoon Salt
- Gradually add the dry ingredients to the butter mixture, alternating with buttermilk. Mix until just combined.1 cup Buttermilk, 2 ½ cups All-purpose flour, 2 cups Granulated sugar
- Divide the batter evenly between the prepared pans and bake for 30-35 minutes, or until a toothpick inserted comes out clean.2 ½ cups All-purpose flour
- Allow the cakes to cool in the pans for 10 minutes before removing to wire racks to cool completely.
- To make the buttercream frosting, beat the softened butter with powdered sugar until fluffy. Add cream and vanilla, and beat until smooth.1 cup Unsalted butter, 3-4 cups Powdered sugar, 2-3 tablespoons Heavy cream, 1 teaspoon Vanilla extract

- Frost the cooled cake layers with the buttercream frosting, starting with a crumb coat and then finishing with the final layer of frosting.1 cup Unsalted butter, 3-4 cups Powdered sugar
Notes
- This Naked Cake is perfect for any celebration.
- It pairs well with fresh fruits and flowers for added decoration.
- Keep the cake refrigerated for optimal freshness.