

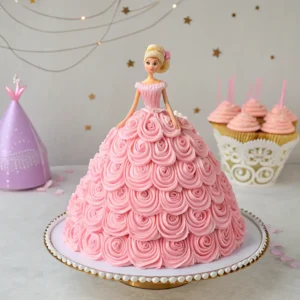
How to Make a Barbie Cake: The Ultimate Birthday Cake Tutorial
Have you ever dreamed of creating that perfect barbie cake for a special celebration? There’s something truly magical about a beautifully decorated barbie cake that transforms an ordinary birthday cake into an extraordinary event. Whether you’re planning a child’s birthday or a nostalgic themed celebration, this comprehensive guide will walk you through every step to make a barbie cake that will leave everyone impressed. From selecting the right barbie cake pan to mastering the art of cake decorating, you’ll discover all the secrets to creating this iconic showstopper.
Essential Barbie Cake Ingredients and Equipment to Frost and Decorate Your Masterpiece
Before diving into the cake-making process, gathering the right ingredients and tools is crucial for success. Making a beautiful barbie cake requires some planning, but with the proper cake layers and frosting, you’ll be able to decorate your barbie doll cake like a professional.
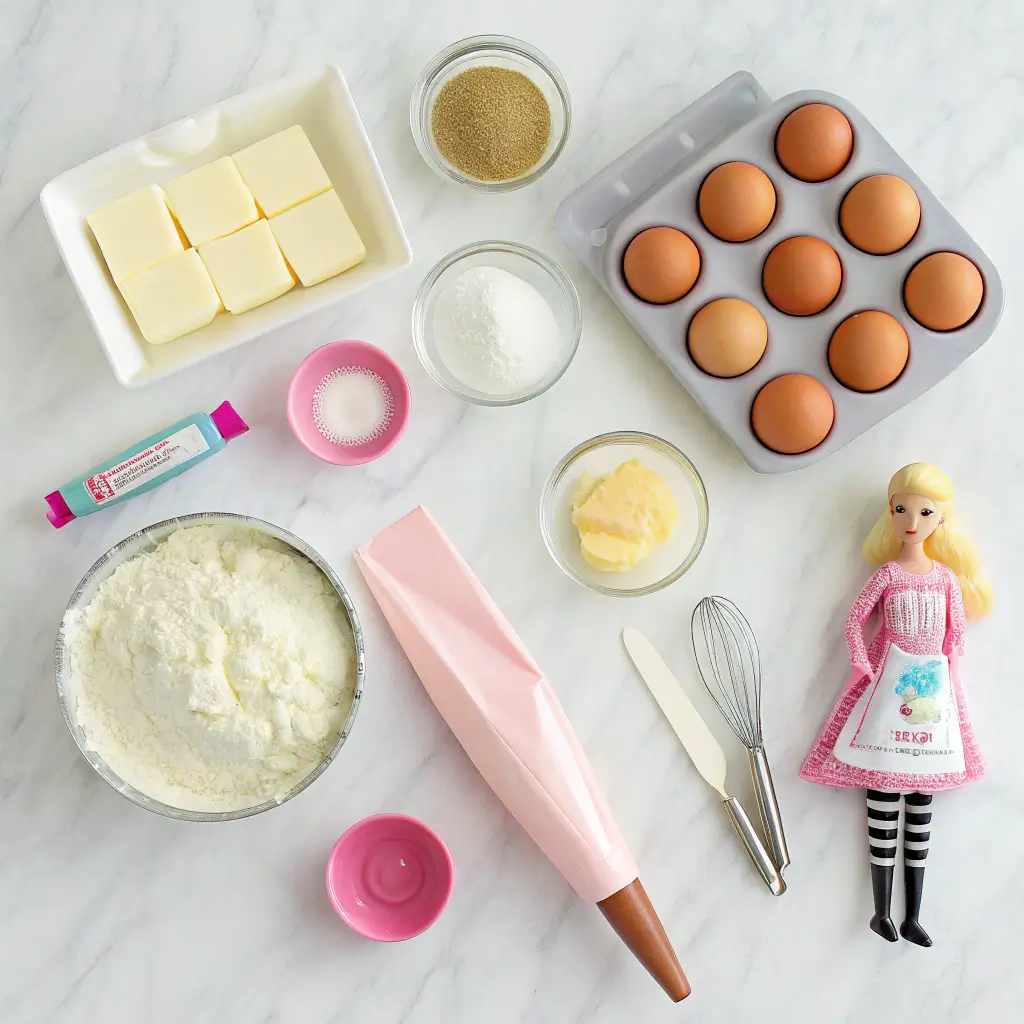
Ingredients for Your Perfect Barbie Cake Recipe
For the Cake (Choose ONE Option):
Option 1: Reliable Vanilla Cake (From Scratch)
- 4 cups cake flour
- 2 cups granulated sugar
- 4 teaspoons baking powder
- 1 teaspoon salt
- 1 cup unsalted butter, softened
- 8 large eggs, room temperature
- 1 1/2 cups whole milk
- 2 teaspoons pure vanilla extract
Option 2: Enhanced Cake Mix
- 2 boxes of cake mix (white or vanilla)
- Ingredients called for on box (typically eggs, oil, water)
- Consider these enhancements: use milk instead of water, add an extra egg, or substitute melted butter for oil
- 1 teaspoon pure vanilla extract
Buttercream Frosting Ingredients to Pipe and Decorate Your Barbie Doll Cake
- 2 cups unsalted butter, softened
- 8 cups powdered sugar, sifted
- 4-6 tablespoons milk or heavy cream
- 2 teaspoons pure vanilla extract
- Pinch of salt
- Pink gel food coloring (or color of choice for the dress)
Essential Equipment for Baking and Decorating Your Barbie Cake Pan Creation
To successfully create your barbie doll cake, you’ll need:
- Barbie cake pan OR 1 Bundt pan OR Set of graduated round cake pans (8″, 6″, 4″)
- Barbie doll (or similar fashion doll)
- Large mixing bowls
- Stand mixer with paddle attachment or hand mixer
- Rubber spatula and offset spatula
- Wire cooling racks
- Plastic wrap
- Serrated knife (for leveling and carving)
- Piping bags
- Various piping tips (star tip, round tip, etc.)
- Cake turntable (optional but recommended)
- Measuring cups and spoons
- 6-inch round biscuit cutter (optional, for shaping)
| Equipment Type | Essential Items | Optional but Helpful |
|---|---|---|
| Baking Tools | Cake pan, mixing bowls, spatulas | Rotating cake pedestal |
| Decorating Tools | Piping bags, star tip, offset spatula | Biscuit cutter, specialty tips |
| Assembly Items | Serrated knife, plastic wrap | Cake boards, dowels |
| Doll Preparation | Barbie doll, plastic wrap | Specialty pick dolls |
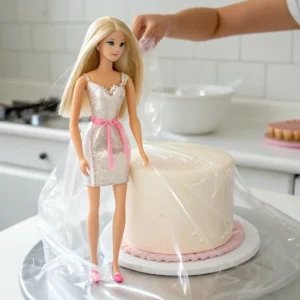
Step 1: Preparing Your Barbie Doll Before You Make a Barbie Cake
The first step in creating your barbie cake is properly preparing the doll. This essential preparation ensures food safety and the perfect fit for your cake dress design.
- Remove any clothing from the barbie doll below the waist
- Thoroughly clean the doll, especially the legs and torso
- Wrap the doll’s legs and lower torso tightly and securely with plastic wrap
- Ensure no hair can get into the cake or frosting
- Set the prepared doll aside while you work on the cake layers
Remember, the plastic wrap not only keeps the doll clean but also makes it easier to remove from the cake later. Additionally, if you’re concerned about using a real barbie for this purpose, specialty dolls designed specifically for cake decorating are available.
2: Preparing Your Cake Pan and Oven to Bake the Cakes
Proper preparation of your cake pan is crucial for ensuring your cake releases cleanly and bakes evenly. Furthermore, careful oven setup contributes to perfect cake layers that will form the foundation of your barbie cake.
- Preheat your oven to 350°F (175°C)
- Thoroughly grease and flour your chosen baking pan(s)
- If using round pans, line the bottoms with parchment paper circles
- For a barbie cake pan, ensure all crevices are well-greased
- If using a bundt pan for the dress shape, be extra generous with the greasing
Having the right cake pan makes a significant difference in the final appearance of your barbie cake. A specialty barbie cake pan will give you the classic dome shape, but graduated round cake pans work wonderfully as well.
Step 3: How to Mix Your Cake Batter to Make a Barbie Doll Cake
Now it’s time to make the cake batter that will form the base of your beautiful barbie cake. Whether you choose to make your cake from scratch or use a cake mix, the process is straightforward.
Using the Scratch Cake Recipe:
- In a medium bowl, whisk together the cake flour, baking powder, and salt
- In a large bowl using a stand mixer, cream butter and sugar until light and fluffy (about 3-5 minutes)
- Beat in eggs one at a time, then add vanilla
- Alternately add dry ingredients and milk, beginning and ending with dry ingredients
- Mix until just combined – do not overmix as this can make your cake dense
Box Cake Mix:
- Prepare the cake mix according to package directions
- For a more homemade taste, use milk instead of water
- Add an extra egg for richness
- Consider using melted butter instead of oil
- Add the teaspoon of vanilla extract
- Mix until just combined
Using cake mix can be a real time-saver when making a barbie cake, and with these simple enhancements, no one will know it’s not completely from scratch! For the best results, consider using 2 boxes of cake mix to ensure you have enough batter for all your cake layers.
4: Bake the Cakes for Your Perfect Doll Cake Creation
Proper baking is crucial for the structure of your barbie cake. The cake needs to be firm enough to hold its shape but still moist and delicious.
- Pour batter into your prepared pan(s)
- If using stacked round pans, distribute batter accordingly (more in larger, bottom pans)
- Bake for 45-60 minutes for doll/bundt pans (possibly less for smaller rounds)
- Test for doneness by inserting a wooden skewer into the center – it should come out clean
- For a barbie cake pan, expect longer baking times due to the depth of the pan
Remember that baking times may vary depending on your specific oven and the cake pans you’re using. Keep an eye on your cakes rather than relying solely on the timer to avoid over-baking. The top of the cake layer should spring back when lightly touched when fully baked.
Step 5: Cooling Your Cake Layers Before You Frost and Decorate
Proper cooling is absolutely essential before you attempt to frost or decorate your barbie cake. Rushing this step can lead to melted frosting and a cake disaster.
- Let the cake(s) cool in the pan(s) on a wire rack for 15-20 minutes
- Carefully invert onto wire cooling racks
- Allow to cool completely – at least 2-3 hours or even overnight
- For best results, wrap each cooled cake layer tightly with plastic wrap and refrigerate for a few hours before decorating
Patience during this stage will make frosting and decorating much easier. Additionally, slightly chilled cakes are easier to carve if you need to shape your cake layers. Many professional bakers recommend waiting at least 3 hours before decorating to ensure the cake structure is stable.
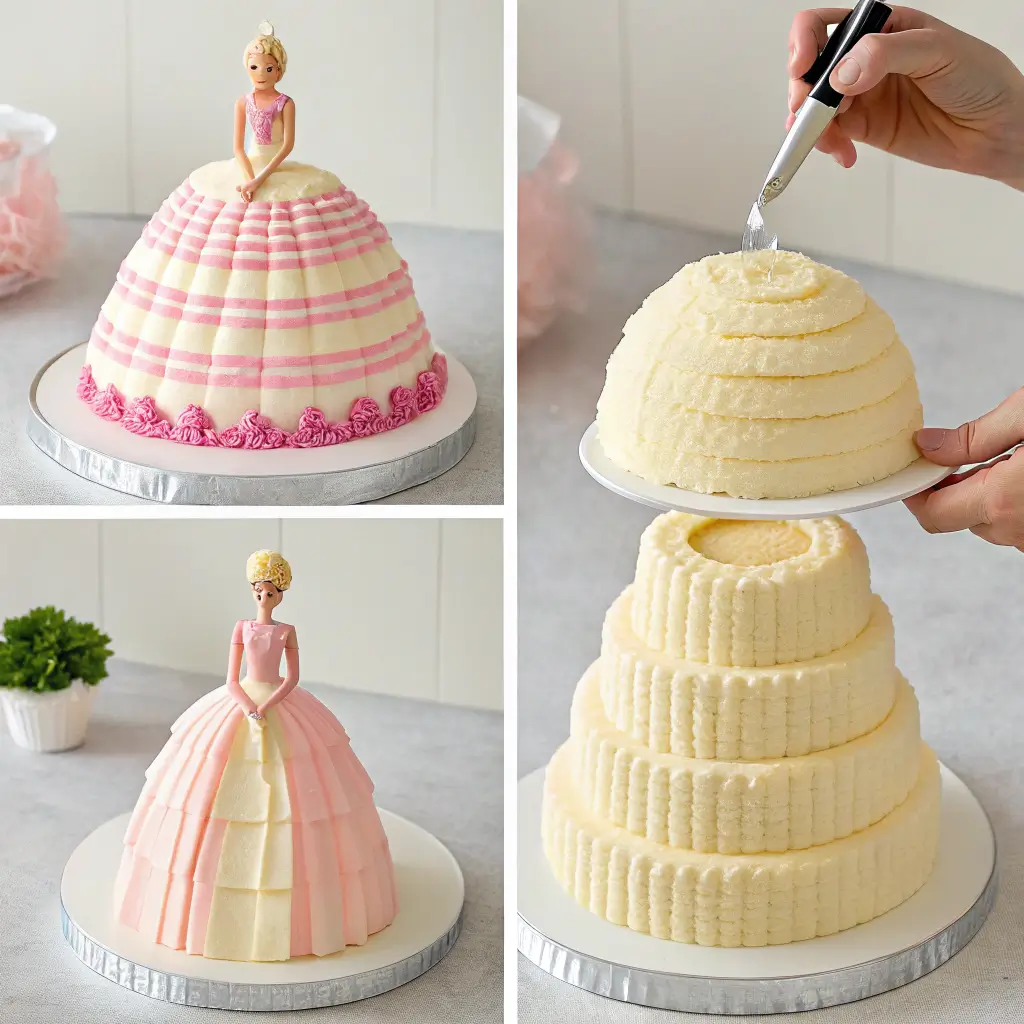
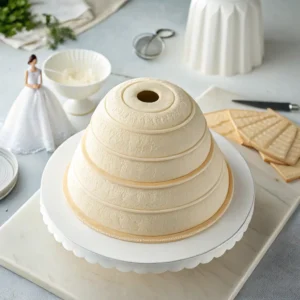
6: How to Shape the Cake Layers for Your Barbie Doll Cake
Depending on the pans you used, you may need to do some shaping to create the perfect skirt silhouette for your barbie cake.
If Using a Doll/Barbie Cake Pan:
- Ensure the base is level by trimming if needed
- The dome shape should already resemble a skirt
If Using Round Pans:
- Level the top of each cake layer using a serrated knife
- Stack the layers on your serving plate or cake board with a thin layer of frosting between layers
- Starting with the largest on the bottom, use progressively smaller layers
- Carefully carve the stacked cakes into a gradual cone/dome shape resembling a skirt
- Use a knife to start trimming the cake to create a smooth transition between layers
Once your cake is shaped appropriately, carefully cut a hole from the top center down through the cake layers. This hole should be just wide enough to fit the wrapped doll’s legs. Be careful not to go all the way through the bottom layer if possible. The center of the cake needs to be carved out carefully so the barbie doll to fit properly.
Step 7: Making Perfect Buttercream Frosting to Frost Your Barbie Doll Cake
The frosting is what transforms your cake into a beautiful barbie dress. This classic American buttercream recipe provides the perfect consistency for both filling and decorating your barbie cake.
- In a large bowl using a stand mixer or hand mixer, beat the softened butter until creamy (2-3 minutes)
- Gradually add the sifted powdered sugar, alternating with the milk/cream
- Start and end with sugar, beating on low speed until combined
- Increase speed to medium-high and beat for 3-5 minutes until light and fluffy
- Beat in the vanilla extract and salt
- Reserve some white frosting if desired for accents before coloring the rest
This frosting recipe makes enough buttercream to generously frost the whole cake and create decorative elements. You can adjust the consistency by adding more milk if it’s too stiff or more powdered sugar if it’s too soft. A good frosting recipe is essential for successful cake decorating.
8: How to Color Your Frosting for the Perfect Barbie Cake Dress
The color of the frosting will define the look of your barbie doll cake, so take your time to achieve the perfect shade.
- Divide your frosting if you plan to use multiple colors
- Add pink gel food coloring (or your chosen color) a little at a time
- Mix well after each addition until the desired shade is reached
- Remember that colors often deepen slightly upon sitting
- Consider making various shades of the same color for a more dynamic dress design
Gel food coloring is recommended over liquid food coloring as it provides more vibrant colors without affecting the consistency of your frosting. For a classic barbie cake, pink frosting is traditional, but feel free to get creative with the dress color! Purple frosting or strawberry frosting can make beautiful alternatives to the traditional pink.
Step 9: How to Assemble Your Barbie Doll Cake Before You Pipe the Decorations
Now comes the exciting part – assembling your barbie cake! This is where your creation starts to take shape.
- Apply a thin layer of frosting all over the cake skirt (this is called a crumb coat)
- The crumb coat locks in any loose crumbs before the final frosting layer
- Chill the cake for 15-20 minutes to set the crumb coat
- Gently insert the plastic-wrapped doll into the hole in the center of the cake
- Ensure the barbie stands straight and is inserted deep enough so the top of the cake meets her waist
- Use extra pieces of cake or frosting inside the hole to secure her if needed
- The doll should be positioned with the base of the cake acting as the bottom of her dress
If your cake doesn’t have enough height, you can add another cake layer to the top. Just make sure the barbie in the middle is secure and standing straight before proceeding to decorate. Setting the barbie in the middle of the cake is a crucial step that requires patience and precision.
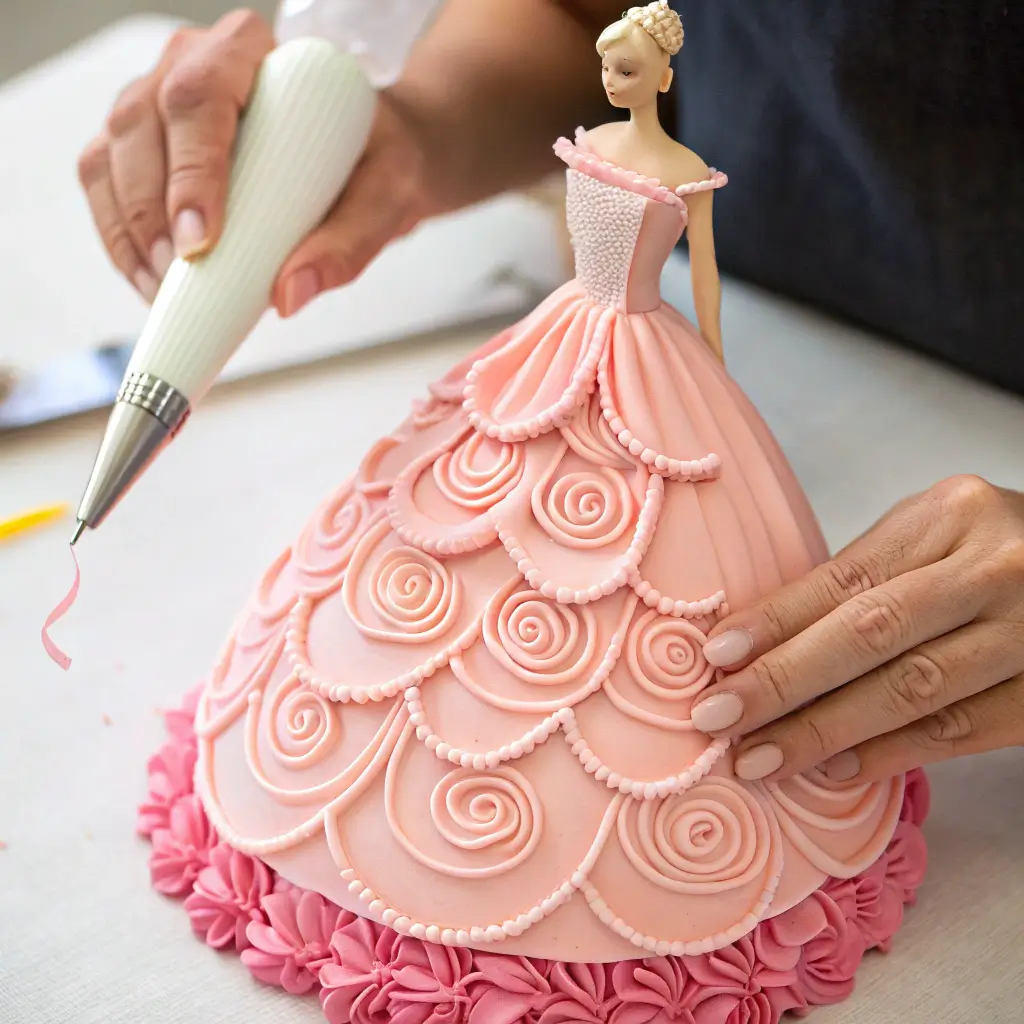
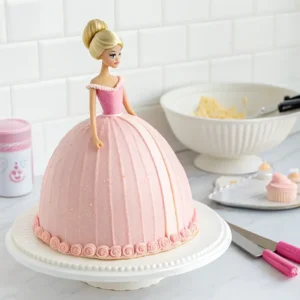
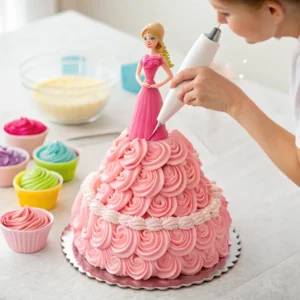
10: How to Pipe and Decorate Your Barbie Cake with Beautiful Frosting Techniques
Now for the most creative part – decorating your barbie cake to create a stunning dress design! There are multiple techniques you can use to pipe decorative elements onto your cake.
Basic Frosting Layer:
- Apply a smooth base layer of your colored frosting over the crumb coat
- Use an offset spatula to create a smooth finish
Decorative Piping:
- Fit a piping bag with your chosen tip (a star tip works wonderfully for dress details)
- Start at the bottom edge of the cake skirt and pipe your chosen design
- Common options include rows of overlapping stars, vertical ruffles, or horizontal ruffles
- Work your way up the skirt, ensuring full coverage
Bodice and Dress Details:
- Use a smaller tip to carefully pipe details onto the doll’s bodice
- Create a seamless connection between the frosted skirt and the bodice
- Add any desired accents such as sprinkles, edible glitter, or small piped bows
- Consider adding rosette piping for an elegant touch – hold the tip perpendicular to the cake and pipe in a circular motion
Remember to hold the piping bag at a consistent angle for uniform results. If you make a mistake, simply smooth it out with a spatula and try again. When you pipe the frosting details, consistent pressure will help create professional-looking decorations.
Advanced Decoration Techniques for Your Barbie Cake Dress:
- Create a ruffle effect by using a petal tip perpendicular to the cake
- Make the flower decorations with a flower tip for elegant dress embellishments
- Make the stars around the bottom of the cake to create a finished edge
- Use the tip perpendicular to the cake when creating precise decorative elements
Expert Tips for Barbie Cake Success and Storage for Your Birthday Cake
Creating a successful barbie cake requires attention to detail and proper technique. Here are some expert tips to ensure your cake is a showstopper:
Tips for Success:
- Cool Completely: Don’t rush the cooling process; warm cake is fragile and will melt frosting
- Stable Doll: Make sure the doll is securely wrapped and inserted straight
- Crumb Coat is Key: Don’t skip the crumb coat for a cleaner final decoration
- Chill if Needed: If your kitchen is warm or frosting becomes soft, chill the cake periodically during decorating
- Pipe Consistently: When using a star tip or other decorative tips, maintain consistent pressure for uniform results
- Rotate as You Decorate: Using a rotating cake pedestal makes decorating much easier, as you can rotate the cake while keeping your piping hand steady
Make-Ahead and Storage Options:
- Cake Layers: Can be baked a day ahead, cooled completely, and stored well-wrapped at room temperature or in the fridge
- Frosting: Can be made ahead and stored refrigerated (bring to room temp and re-whip before use)
- Assembly and Final Decoration: Best done on the day of serving or the day before
- Storage: Store the finished cake loosely covered in the refrigerator due to the buttercream
- Serving: Let the cake sit at room temperature for about 30 minutes before serving for better texture
- Transport: Transport carefully, keeping the cake level and cool
If you need to make your spongebob cake in advance, consider frosting the cake layers and inserting the doll, then refrigerating overnight. You can add the final decorative elements the next day. Wait at least 3 hours before decorating to ensure the cake is completely cool and stable.
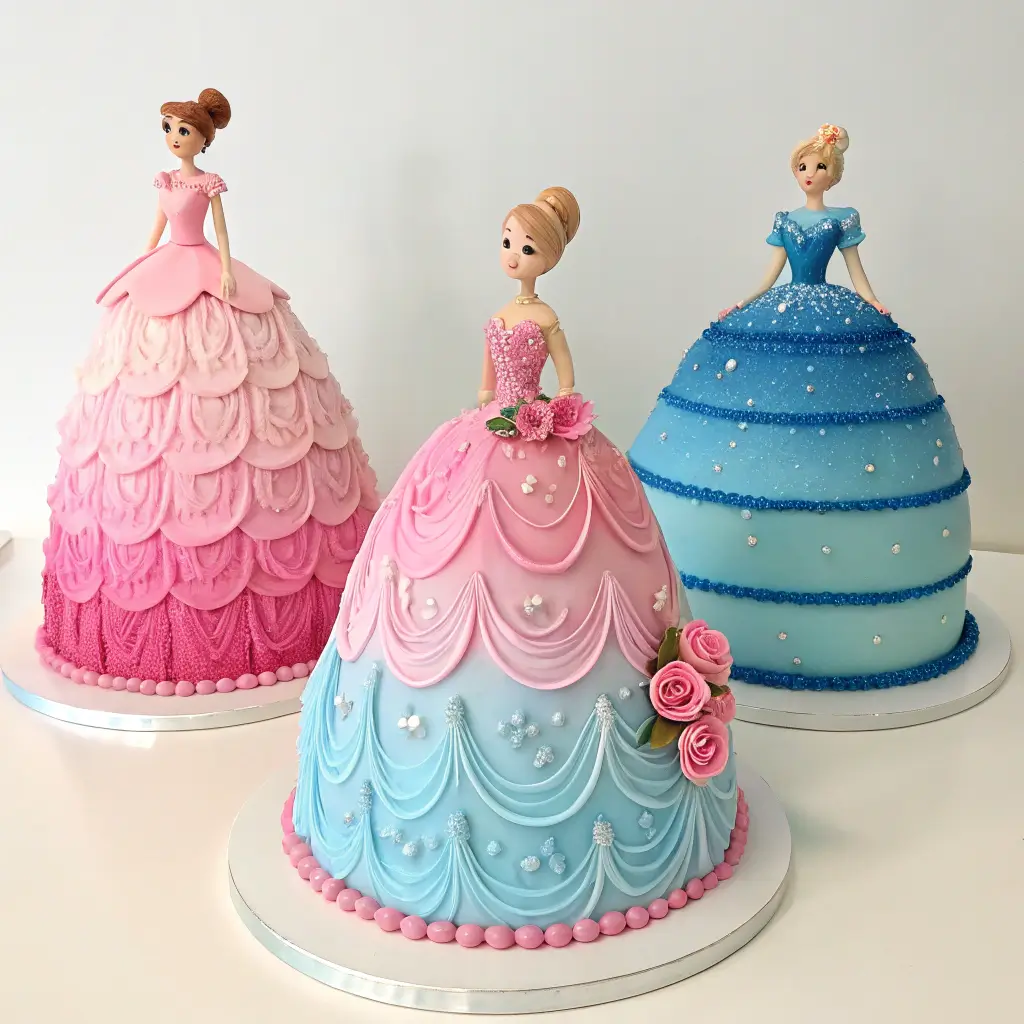
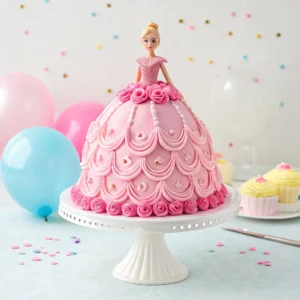
Creative Barbie Cake Ideas Beyond the Classic Design for Your Next Birthday Cake
While the classic pink barbie cake is timeless, there are many variations you can try to make your creation unique:
- Themed Dress: Match the cake dress to a favorite barbie doll outfit or movie character
- Ombré Effect: Create a gradient effect with frosting colors that transition from light to dark
- Different Colors: Try purple frosting, blue, or even rainbow layers for a unique twist
- Fondant Options: Consider using fondant for a smooth finish or detailed decorations
- Edible Embellishments: Add edible pearls, flowers, or other decorations to enhance the dress design
- Character Themes: Create are you kidding me cake inspired by the barbie movie or other popular themes
The flexibility of the barbie cake concept allows for endless creativity. You can adapt your cake to match party themes or the birthday celebrant’s favorite colors. Your favorite cake flavor can be used as the base, from vanilla to chocolate cake or something more adventurous.
Troubleshooting Common Barbie Doll Cake Problems
Even experienced bakers encounter challenges when making a barbie cake. Here are solutions to common issues:
How to Fix Common Cake Structure Issues:
- Doll Won’t Stand Straight: Create a more stable base by inserting a wooden skewer alongside the doll’s legs
- Cake Crumbling During Carving: Refrigerate the cake before carving, and use a serrated knife with gentle sawing motions
- Frosting Too Soft: Add more powdered sugar or chill the frosting briefly before piping
- Frosting Too Stiff: Add small amounts of milk until reaching the desired consistency
- Cake Layers Sliding: Use more frosting between layers and insert dowels for stability
- Dome Not High Enough: Add an extra small cake layer on top or build up with frosting
Remember that cake decorating is both an art and a science. Sometimes improvisation is necessary, and that’s perfectly okay! Dealing with crumb issues can be frustrating, but a good crumb coat will help contain any loose crumbs before applying the final layer of frosting. check this quince cakes you will love it .
Barbie Cake Pan Alternatives and Special Dietary Options
Everyone should be able to enjoy a beautiful barbie cake, regardless of dietary restrictions. Here are some adaptations:
Special Diet Barbie Cake Recipes:
- Gluten-Free Option: Use gluten-free cake flour or cake mix
- Dairy-Free Option: Substitute plant-based butter and milk alternatives
- Egg-Free Option: Use appropriate egg replacers in the cake recipe
- Reduced Sugar: Consider reducing sugar in the frosting or using alternatives
- Chocolate Cake Option: Substitute a chocolate cake recipe for a different flavor profile
- Mini Barbie Cakes: Use the same concept but with cupcakes for individual servings
Alternative Pans When You Don’t Have a Barbie Cake Pan:
- Using a Bundt Pan: A bundt pan works well as the base for the dress, with additional cake layers
- Using 3 Cake Layers: Stack three graduated cake layers (8-inch, 6-inch, 4-inch) to create the skirt shape
- Using a Bowl: A small oven-safe bowl can create the dome top of the dress
With these adaptations, you can create a barbie cake that everyone can enjoy while still maintaining the wow factor of this classic design, even without a specialty barbie cake pan.
Frequently Asked Questions About Barbie Cakes
How much do you charge for a Barbie cake?
Professional bakeries typically charge between $75-$150 for a custom barbie cake, depending on size, complexity of decoration, and location. Making one at home costs approximately $20-$40 for ingredients and the doll, making it a more economical option for those willing to invest the time.
How to make a beautiful Barbie cake?
To make a beautiful barbie cake, start with a sturdy cake recipe, properly prepare your doll by wrapping the legs in plastic wrap, create a stable dress shape with well-leveled cake layers, apply a crumb coat before decorating, and use piping techniques like rosettes or ruffles to create an elegant dress design. Focus on consistent piping pressure and even decoration distribution for professional-looking results.
Does HEB make Barbie cakes?
Yes, HEB bakeries (a grocery chain in Texas) typically offer barbie cakes as part of their custom cake options. Prices vary by location and complexity, but they generally require 24-48 hours advance notice for special orders like barbie cakes. Contact your local HEB bakery department directly for current availability and pricing.
Can you use a bundt pan for a Barbie cake?
Yes, a bundt pan works well as an alternative to a specialized barbie cake pan. The center hole provides a natural space for the doll, while the fluted design adds interesting texture to the dress. You may need to level the bottom (which becomes the top when inverted) and might require additional cake layers to achieve sufficient height for the doll.
Why are Barbie dolls so expensive?
Barbie dolls range in price due to several factors: licensing costs, quality of materials, level of detail in design, collector status, and special editions. While basic Barbie dolls start around $10-$15, specialty or collector editions can cost significantly more. For cake decorating purposes, consider using less expensive fashion dolls or specialized “pick” dolls designed specifically for cakes.
How many people does a Barbie cake feed?
A standard barbie cake typically serves 12-16 people, depending on the size of the cake layers used. With an 8-inch base layer and progressively smaller layers, you can easily serve a dozen guests. For larger parties, consider making the base layers wider (10-inch or 12-inch) to increase serving capacity to 20-25 people.
How many cake mixes for Barbie cake pan?
For a standard barbie cake pan, you’ll need approximately 1-2 boxes of cake mix. Some specialty barbie cake pans provide specific instructions, but generally, two 8-inch rounds plus a dome shape requires about two standard cake mix boxes. Always have a bit extra batter prepared to ensure you have enough for all the necessary layers.
What are the flavors of Barbie cakes?
While vanilla cake with pink frosting is the traditional choice for barbie cakes, the cake flavor can be customized to preference. Popular alternatives include chocolate cake, strawberry, confetti/funfetti, lemon, or marble cake. The exterior frosting color often remains pink or another bright color to maintain the classic barbie aesthetic, regardless of the internal cake flavor.
How to do rosette piping?
To create rosette piping: 1) Fill a piping bag fitted with a star tip (like Wilton 1M). 2) Position the tip perpendicular to the cake surface. 3) Apply even pressure to the bag while piping in a spiral motion, starting from the center and working outward. 4) Release pressure and pull away when the rosette reaches desired size. 5) Practice on parchment paper before decorating your cake.
When were Barbie cakes popular?
Barbie cakes first gained popularity in the 1960s following Barbie’s introduction in 1959, experienced another surge in the 1980s and 1990s, and have remained a birthday party staple ever since. They’ve experienced renewed interest recently due to nostalgia trends and the popularity of the barbie movie. These iconic cakes have truly stood the test of time as a celebration centerpiece.
How many people does a 10 inch cake feed?
A 10-inch round cake typically serves 20-25 people when cut into standard wedges. When used as the base of a barbie cake with additional smaller layers stacked above, the entire cake can serve approximately 25-30 people, making it ideal for larger birthday parties or celebrations.
How much does a Barbie cake feed?
A standard barbie cake made with 8-inch, 6-inch, and smaller top layers typically feeds 12-16 people. Larger versions using 10-inch or 12-inch base layers can serve 20-30 people. The exact serving count depends on how the cake is cut and the size of the portions. For parties with more guests, consider making additional cupcakes or cake pops as supplementary desserts.
Classic Barbie Cake
Equipment
- 1 Barbie doll (or similar fashion doll) Clean and wrapped in plastic wrap
- 1 Bundt pan or graduated round cake pans 8″, 6″, and 4″ pans if using round pans
- 1 Stand mixer or hand mixer With paddle attachment
- 1 Piping bags With various tips, especially star tip
- 1 Offset Spatula For smoothing frosting
- 1 Serrated knife For leveling and carving cake
- 1 Cake turntable Optional but recommended
Ingredients
For the Vanilla Cake
- 4 cups cake flour
- 2 cups granulated sugar
- 4 teaspoons baking powder
- 1 teaspoon salt
- 1 cup unsalted butter softened
- 8 large eggs room temperature
- 1 1/2 cups whole milk
- 2 teaspoons pure vanilla extract
For the Buttercream Frosting
- 2 cups unsalted butter softened
- 8 cups powdered sugar sifted
- 4-6 tablespoons milk or heavy cream
- 2 teaspoons pure vanilla extract
- 1 pinch salt
- pink gel food coloring or color of choice
Instructions
Prepare the Doll
- Remove any clothing from the barbie doll below the waist.
- Thoroughly clean the doll, especially the legs and torso.
- Wrap the doll's legs and lower torso tightly and securely with plastic wrap.
- Set the prepared doll aside while you work on the cake layers.
Prepare and Bake the Cake
- Preheat your oven to 350°F (175°C).
- Thoroughly grease and flour your chosen baking pan(s). If using round pans, line bottoms with parchment paper.
- In a medium bowl, whisk together the cake flour, baking powder, and salt.4 cups cake flour, 4 teaspoons baking powder, 1 teaspoon salt
- In a large bowl using a stand mixer, cream butter and sugar until light and fluffy (about 3-5 minutes).2 cups granulated sugar, 1 cup unsalted butter
- Beat in eggs one at a time, then add vanilla.8 large eggs, 2 teaspoons pure vanilla extract
- Alternately add dry ingredients and milk, beginning and ending with dry ingredients. Mix until just combined – do not overmix.1 1/2 cups whole milk
- Pour batter into your prepared pan(s). If using stacked round pans, distribute batter accordingly (more in larger, bottom pans).
- Bake for 45-60 minutes for doll/bundt pans (possibly less for smaller rounds). Test for doneness by inserting a wooden skewer into the center – it should come out clean.
- Let the cake(s) cool in the pan(s) on a wire rack for 15-20 minutes, then carefully invert onto wire cooling racks.
- Allow to cool completely – at least 2-3 hours or overnight. For best results, wrap each cooled cake layer with plastic wrap and refrigerate for a few hours.
Make the Buttercream Frosting
- In a large bowl using a stand mixer or hand mixer, beat the softened butter until creamy (2-3 minutes).2 cups unsalted butter
- Gradually add the sifted powdered sugar, alternating with the milk/cream. Start and end with sugar, beating on low speed until combined.8 cups powdered sugar, 4-6 tablespoons milk or heavy cream
- Increase speed to medium-high and beat for 3-5 minutes until light and fluffy.
- Beat in the vanilla extract and salt.2 teaspoons pure vanilla extract, 1 pinch salt
- Reserve some white frosting if desired for accents before coloring the rest with pink gel food coloring, adding color gradually until desired shade is reached.pink gel food coloring
Assemble and Decorate the Cake
- If using round pans, level the top of each cake layer using a serrated knife and stack them with a thin layer of frosting between layers, starting with the largest on the bottom.
- Carefully carve the stacked cakes into a gradual cone/dome shape resembling a skirt.
- Cut a hole from the top center down through the cake layers, just wide enough to fit the wrapped doll's legs.
- Apply a thin layer of frosting all over the cake skirt (crumb coat) and chill for 15-20 minutes to set.
- Gently insert the plastic-wrapped doll into the hole in the center of the cake, ensuring she stands straight and is inserted deep enough so the top of the cake meets her waist.
- Apply a smooth base layer of your colored frosting over the crumb coat using an offset spatula.
- Fit a piping bag with your chosen tip (a star tip works wonderfully) and pipe decorative elements onto the dress, starting at the bottom edge of the cake skirt.
- Use a smaller tip to carefully pipe details onto the doll's bodice, creating a seamless connection between the frosted skirt and the bodice.
- Add any desired accents such as rosettes, ruffles, or small piped bows to complete the dress design.
- Store the finished cake loosely covered in the refrigerator. Let sit at room temperature for about 30 minutes before serving for better texture.
Notes
- For best results, bake the cake a day ahead and refrigerate overnight before decorating. This helps with carving and reduces crumbs.
- If using a real Barbie doll, you may want to save it as a keepsake after the celebration rather than washing and reusing.
- For dietary restrictions, you can substitute gluten-free flour, dairy-free butter alternatives, or egg replacers as needed.
- If you don’t have a specialty Barbie cake pan, stacked round cake pans or a bundt pan work well as alternatives.