
Easiest Ever Vintage Heart Cake: A Beginner’s Delight
Have you fallen in love with those gorgeous vintage heart cakes all over social media? They look intimidating, but I’m here to tell you they’re easier than you think! Whether you’re a seasoned baker or just starting your baking journey, this vintage heart cake recipe breaks down the process into simple, manageable steps that anyone can follow. Moreover, with rising grocery prices and the cost of eggs increasing, learning to make your own cake is more valuable than ever.
Furthermore, this recipe is designed to be beginner-friendly with a simplified cake recipe, straightforward frosting techniques, and tips for avoiding common mistakes. As a result, you’ll be able to create a beautiful and delicious vintage heart cake, even if you’re new to baking! In addition, you’ll learn the secrets to achieving that perfect vintage aesthetic that’s currently taking over bakeries and social media feeds with those satisfying decorating videos that seem everywhere lately.
Essential Ingredients for Your Vintage Heart Cake Design That Bakers Charge Higher Prices For
Cake Ingredients That Guarantee Success Without Breaking the Bank
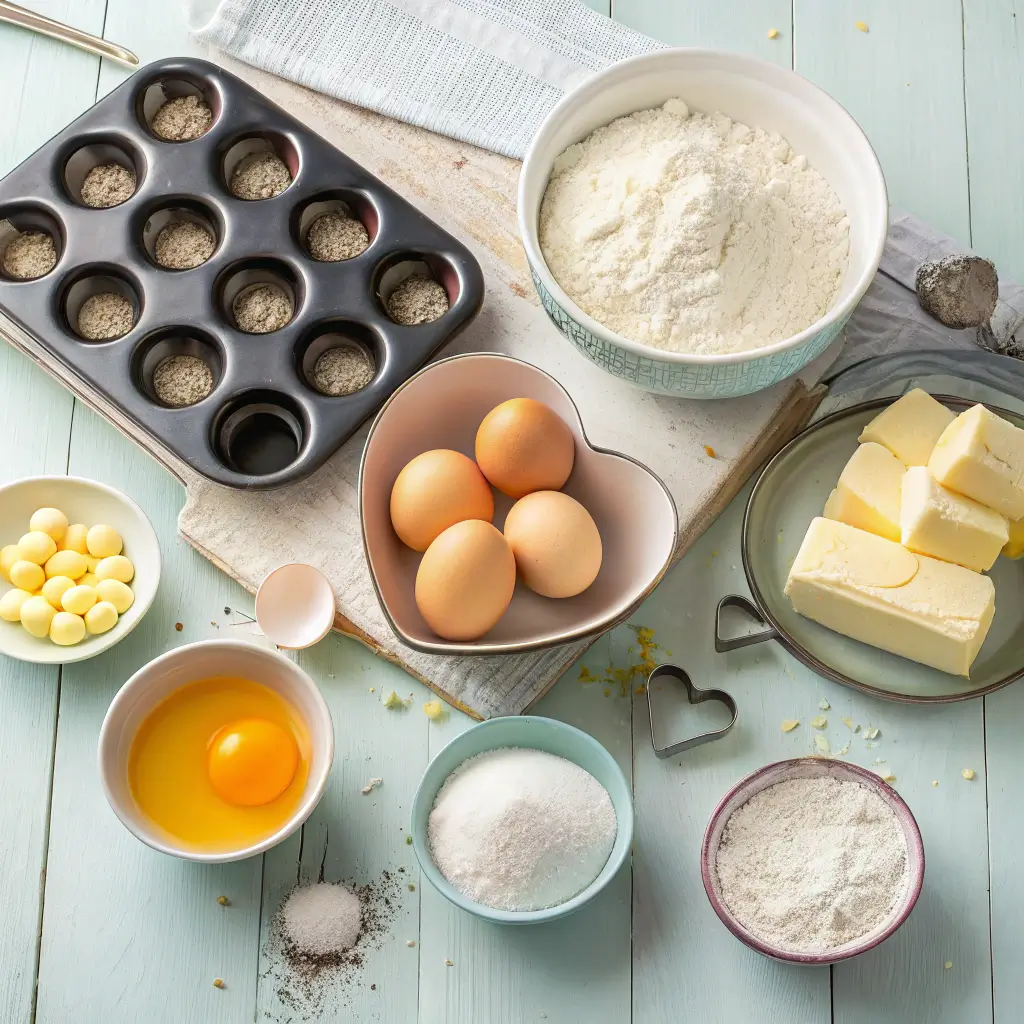
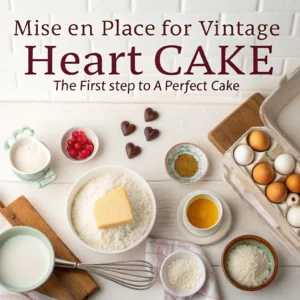
To start your vintage heart cake journey, you’ll need these high-quality ingredients for the cake base:
- 2 cups all-purpose flour, plus more for dusting the pan
- 1 1/2 cups granulated sugar
- 3/4 cup unsalted butter, softened to room temperature
- 1 cup whole milk, at room temperature
- 3 large eggs, at room temperature
- 2 1/2 teaspoons baking powder
- 1/2 teaspoon salt
- 2 teaspoons vanilla extract
- 1/4 teaspoon almond extract (the secret ingredient!)
Ingredient Notes for Perfect Cake Flavor Results
- All-purpose flour: Bleached or unbleached will work fine. If you want a more tender cake, use cake flour instead. For accurate measurement, spoon the flour into measuring cups and level with a knife rather than scooping directly from the bag.
- Unsalted butter: Using unsalted butter allows you to control the amount of salt in the recipe. Make sure it’s properly softened but not melted for the best texture.
- Eggs: Room temperature eggs incorporate more easily into the batter and help create a lighter texture.
- Whole milk: The fat content in whole milk contributes to the cake’s moisture and richness. However, 2% milk can be substituted if necessary.
- Almond extract: This secret ingredient adds a subtle depth of flavor that complements the vanilla beautifully. Don’t worry – it won’t make your cake taste like marzipan!
Buttercream or Whipped Frosting Ingredients for Perfect Piping
For the vintage-style buttercream that pipes beautifully and holds its shape:
- 1 1/2 cups (3 sticks) unsalted butter, softened to room temperature
- 6 cups powdered sugar, sifted
- 3-4 tablespoons heavy cream or whole milk
- 2 teaspoons vanilla extract
- 1/4 teaspoon salt
- Gel food coloring (pink, peach, or other pastel shades for vintage look)
Frosting Ingredient Notes for Type of Frosting That Professionals Use
- Unsalted butter: Must be softened but still cool to the touch. If it’s too warm, your buttercream will be too soft for piping.
- Powdered sugar: Sifting is crucial to remove any lumps that could clog your piping tips.
- Heavy cream: Provides a smoother consistency than milk, but milk can be used in a pinch.
- Gel food coloring: Gel food coloring is more concentrated and less likely to change the consistency of the frosting. Start with just a tiny amount for pastel shades like light pink or darker pink, depending on your preference.
Essential Equipment for 8-Inch Heart Cake Success That Bakers Invest In
To create your vintage heart cake, you’ll need these tools:
- 8-inch heart-shaped cake pan (6-inch heart cake pan works too for a smaller version)
- Large mixing bowls (various sizes)
- Electric mixer (handheld or stand mixer)
- Rubber spatula
- Offset spatula (small and large sizes ideal)
- Piping bags (disposable or reusable)
- Piping tips for vintage design (Wilton 1M, Wilton 2D, Wilton 32 for shell borders)
- Cake turntable (optional but highly recommended)
- Measuring cups and spoons
- Parchment paper
- Whisk
- Cake tester or toothpick
- Wire cooling rack
- Bench scraper or straight edge for smooth frosting
- Cake board (heart-shaped if possible)
- Cookie cutter (heart shape for templates if needed)
Having the right equipment makes the process so much easier, especially when you’re trying to achieve that perfect vintage look. The Wilton piping tips are particularly important for creating those classic vintage decorations that stores have always sold cheaper versions of, but the quality isn’t comparable to what you’ll make at home.
According to Nielsen-Massey, a renowned vanilla producer, the difference between extract and vanilla bean paste can significantly impact your cake’s flavor profile.
Step-by-Step Cake Baking Instructions for Birthday Cake Period Perfection

Preparing Your Heart-Shaped Pan for Baking Success
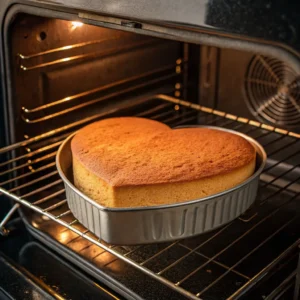
- Preheat your oven to 350°F (175°C). Position the rack in the center of the oven.
- Prepare your heart-shaped pan by generously greasing the bottom and sides with butter. Then, dust with flour and tap out any excess. For extra insurance against sticking, cut a piece of parchment paper to fit the bottom of the pan.
- Measure all ingredients and have them ready at room temperature before beginning.
Mixing the Perfect Vintage Heart Cake Batter That Bakers Charge $17-$30 an Hour For
- Cream the butter and sugar in a large bowl using an electric mixer on medium speed until light and fluffy, about 3-4 minutes. Don’t rush this step – proper creaming incorporates air into the batter for a lighter cake.
- Add eggs one at a time, beating well after each addition. Then stir in the vanilla extract and almond extract.
- In a separate bowl, whisk together the flour, baking powder, and salt.
- Gradually add the dry ingredients to the butter mixture, alternating with the milk. Begin and end with the dry ingredients (dry → milk → dry → milk → dry) and mix until just combined. Do not overmix or your cake will be tough.
- Pour the batter into the prepared heart-shaped pan and spread evenly with an offset spatula. Gently tap the pan on the counter a few times to release any air bubbles.
Baking Your Heart Cake to Perfection Like Nia2016 on TikTok Shows
- Bake for 30-35 minutes, or until a cake tester inserted into the center comes out clean. The top should be golden brown, and the edges will begin to pull away from the sides of the pan.
- Cool in the pan for 10 minutes before inverting onto a wire rack to cool completely. This helps prevent the cake from breaking.
- Once completely cool, level the top of the cake if needed using a serrated knife for a flat surface to frost.
Creating the Perfect Buttercream for Your Vintage Heart Cake Design That Waitlists Are Neverending For
Mixing Your Buttercream Frosting That Bakers Use For 100 Cake Orders
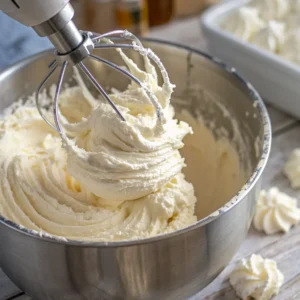
- Beat the softened butter in a large bowl using an electric mixer on medium speed until smooth and creamy, about 2 minutes.
- Gradually add the powdered sugar, one cup at a time, beating on low speed until combined. After each addition is incorporated, increase to medium-high speed for about 10 seconds before adding the next cup.
- Add the vanilla extract, salt, and 3 tablespoons of heavy cream. Beat on medium-high speed until light and fluffy, about 3-4 minutes. If the frosting is too stiff, add the remaining tablespoon of cream.
- Test the consistency by lifting the beater – the frosting should form a soft peak that holds its shape but is still smooth enough to pipe.
Coloring Your Frosting for Vintage Aesthetic Like Birdysbakery on TikTok
- Divide the frosting into separate bowls if you want multiple colors. For a classic vintage look, leave about 2/3 of the frosting in one bowl for the base coat.
- Add gel food coloring to each portion, starting with a tiny amount on the tip of a toothpick. Mix thoroughly and add more if needed. For vintage colors, aim for soft, muted shades rather than bright colors.
- Prepare your piping bags by fitting them with the appropriate tips. Fill each bag no more than halfway with colored frosting, and twist the top to seal.
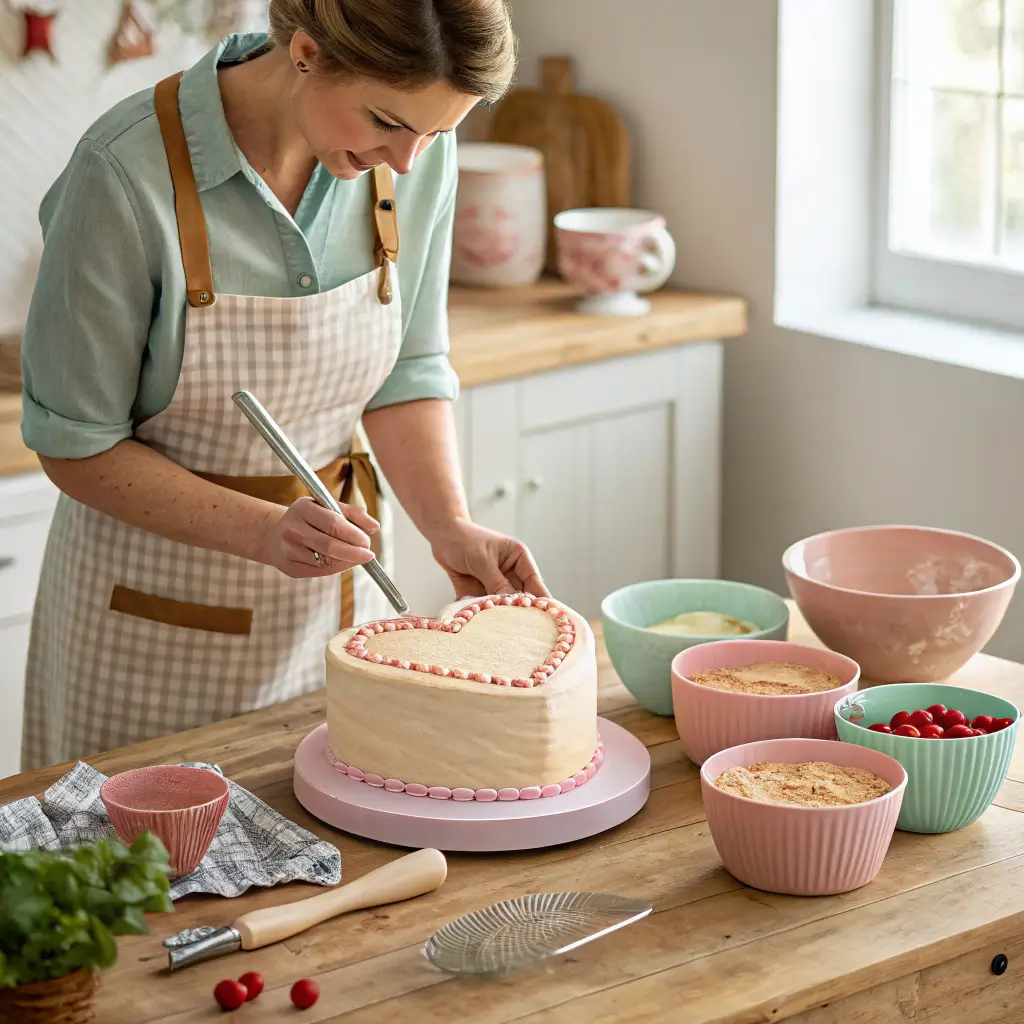
Vintage Heart Cake Assembly and Crumb Coat Application For Flawless Results
Preparing Your Cake for Frosting the Cake Properly
- Place your cooled cake on a cake board or serving plate. If using a turntable, place the cake board on the turntable.
- Apply a thin layer of frosting as a crumb coat over the entire cake. This initial layer seals in any loose crumbs and provides a smooth base for the final coat.
- Refrigerate the cake with the crumb coat for at least 20 minutes to set the frosting.
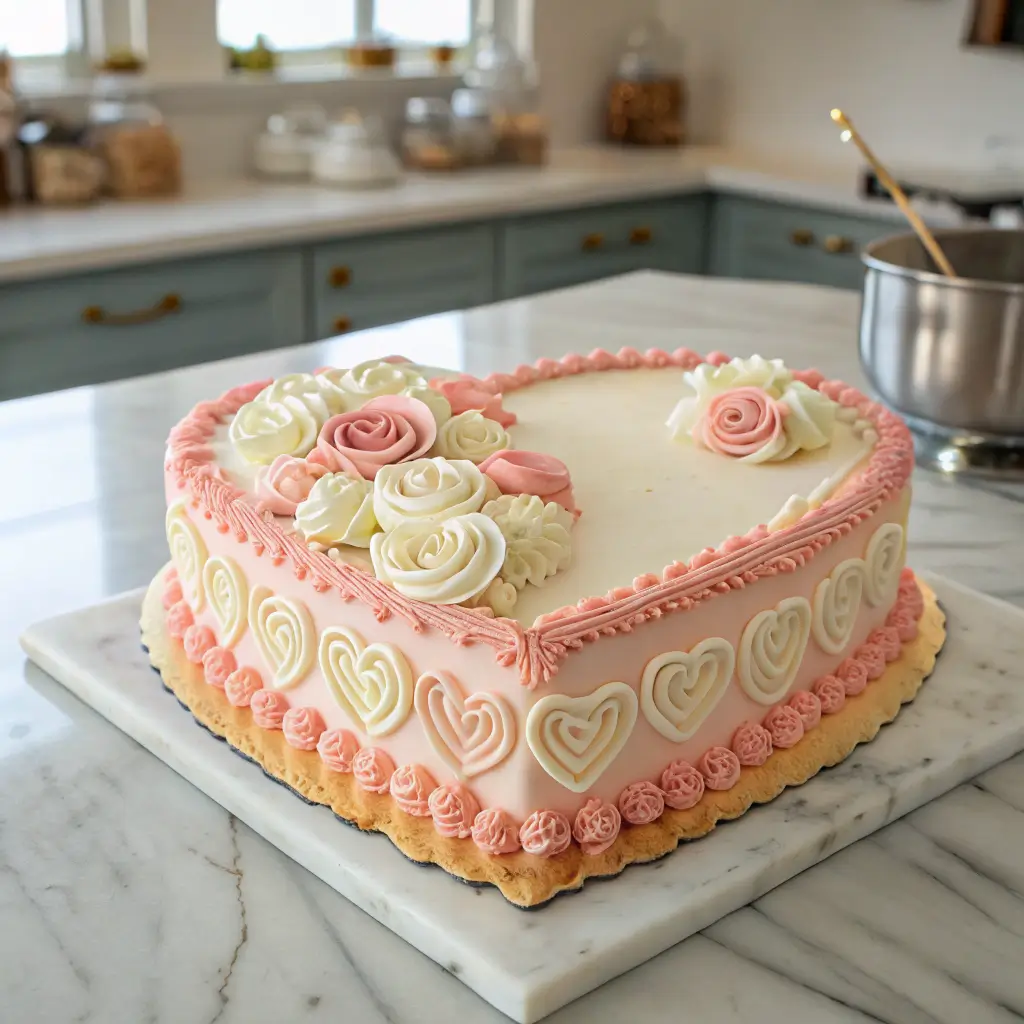
Decorating Your Vintage Heart Cake with Beautiful Piping Techniques That Deserve a Cake Spotlight
Final Frosting and Shell Border Design on Top of the Heart
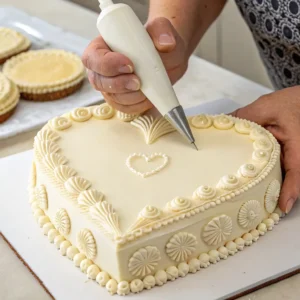
- Apply the final layer of frosting to the cake, using an offset spatula to spread it evenly over the top and sides of the cake.
- Smooth the frosting using a bench scraper or straight edge, turning the cake on the turntable for even coverage.
- Create texture if desired by gently pressing the offset spatula into the frosting and lifting up to create soft peaks.
Piping Beautiful Vintage Designs on Your Frosted Cake
- Pipe a shell border around the top edge of the cake using a Wilton 32 tip. Hold the piping bag at a 45-degree angle with the tip slightly above the surface of the cake. Apply pressure as you lower the tip to the cake, then release pressure as you pull away to create each shell.
- Add decorative elements to the top of the heart using a Wilton 1M tip for rosettes or a Wilton 2D tip for drop flowers. For rosettes, start in the center and pipe in a circular motion outward. For drop flowers, hold the bag perpendicular to the cake and pipe with steady pressure, then quickly pull away.
- Create texture on the sides of the cake by piping vertical lines with a small round tip, or use the shell border technique around the bottom edge.
- Add finishing touches like small dots or leaves as desired. For a true vintage look, stick to a cohesive color palette with subtle variations.
For more decorative inspiration, check out our guide to creating the perfect Heart Cake: Vintage Heart Shaped Cake with various design options.
Expert Tips for Vintage Heart Cake Success and Troubleshooting When Costs That Go Into Baking Stack Up
Baking Tips for Perfect Cake Results That Stores Have Always Sold Cheaper
- Measure ingredients accurately using the spoon-and-level method for flour.
- Room temperature ingredients blend better and create a more uniform cake texture.
- Don’t overmix the batter once you add the flour – this develops gluten and makes the cake tough.
- Test for doneness early – insert a cake tester at the 25-minute mark to avoid overbaking.
- Cool completely before frosting to prevent the buttercream from melting.
Frosting and Decorating Tips for Vintage Heart Cakes That Walmart Cakes Use Different Techniques For
- Practice piping techniques on parchment paper before decorating the cake.
- Proper consistency is key – frosting should hold its shape but be smooth enough to pipe easily.
- Keep the piping tip close to the surface of the cake for more control.
- Clean your piping tips between colors to keep designs crisp.
- If hands get warm, refrigerate the piping bag for a few minutes to firm up the frosting.
Common Problems and How to Fix Them When Making a Heart-Shaped Cake
- Dry cake: Don’t overbake; make sure you’re measuring the flour correctly.
- Dome-shaped cake: Use cake strips around the pan or bake at a lower temperature.
- Frosting too thick: Add a little more heavy cream, one teaspoon at a time.
- Frosting too thin: Add more powdered sugar, one tablespoon at a time.
- Frosting is grainy: Make sure butter is softened but not melted; beat longer.
- Cake sticking to pan: Did you grease AND flour the pan? Next time, add parchment paper.
- Frosting melting: Cake wasn’t cooled completely; chill the cake before continuing.
For troubleshooting common cake issues, Sally’s Baking Addiction provides science-based solutions to problems like sinking centers and tough texture.
Delicious Variations for Your Vintage Heart-Shaped Cake That Cheaper Cakes Than an Independent Bakery Can’t Match
Flavor Variations for the Cake Layer That Grocery Stores Have Always Sold
- Chocolate cake: Replace 1/4 cup of flour with cocoa powder and add 1/4 cup more sugar.
- Lemon Vintage Heart Cake: Add the zest of one lemon to the cake batter and 1 tablespoon of lemon juice to the frosting.
- Spiced Vintage Heart Cake: Add 1 teaspoon of cinnamon, 1/4 teaspoon of nutmeg, and a pinch of cloves to the dry ingredients.
- Vanilla cake: Substitute vanilla bean paste for extract for visible specks of vanilla.
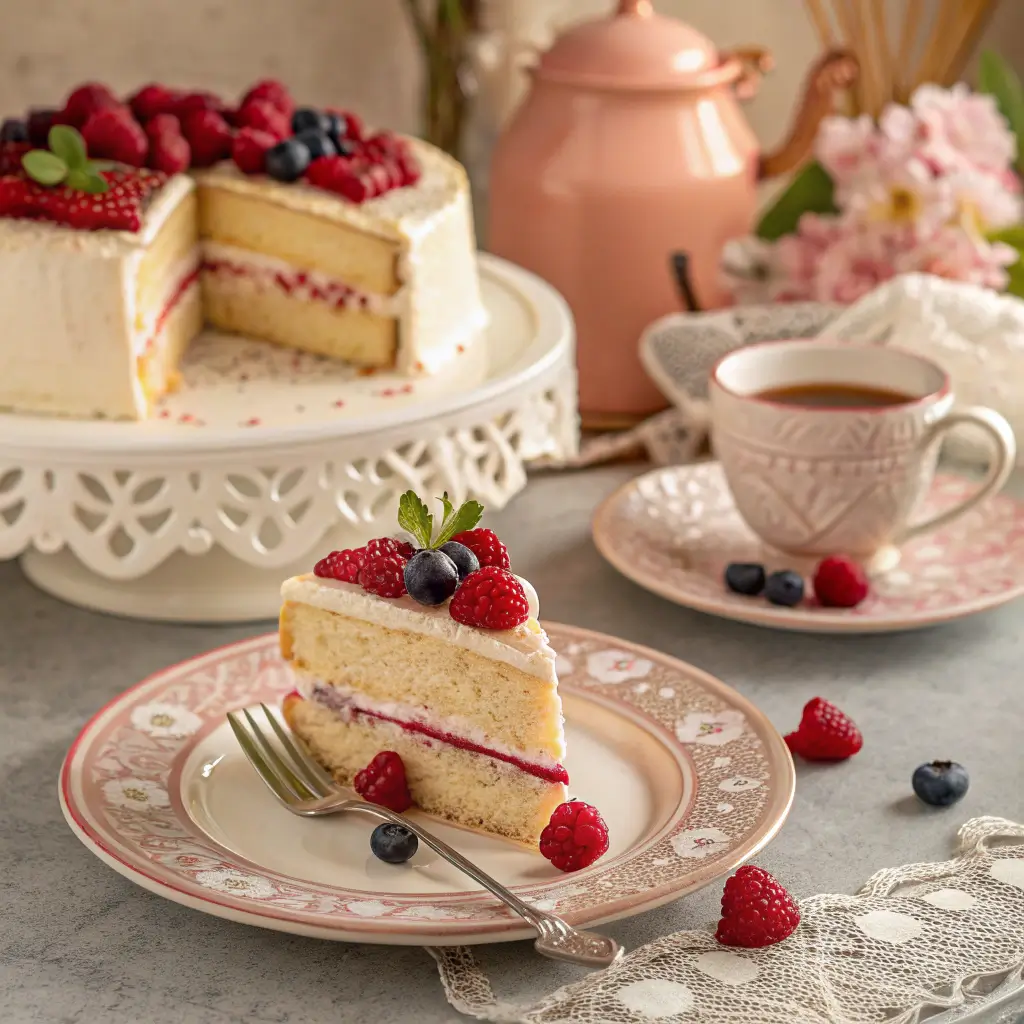
Filling and Frosting Variations for Your Cut Cake Creativity
- Add a layer of fruit preserves between cake layers for a fruity surprise.
- Try Swiss meringue buttercream instead of American buttercream for a less sweet, silky frosting.
- Add flavor extracts to buttercream – almond, lemon, or coconut pair beautifully with the vanilla cake.
- Color variations: Create an ombre effect with different shades of the same color for a stunning visual impact.
Not confident with your piping skills yet? Our heart shaped cake decorating guide includes beginner-friendly techniques.
Storing Your Vintage Heart Cake for Freshness When You Want to Shell Out for Baking
Storage Instructions for Maximum Freshness of Your Cake Made With Love
- Unfrosted cake layers can be wrapped tightly in plastic wrap and stored at room temperature for up to 2 days or frozen for up to 2 months.
- Frosted cake should be stored in a cake keeper or under a cake dome at room temperature for up to 3 days if your kitchen isn’t too warm.
- Refrigerate the cake if your kitchen is warm or if you’ve used perishable fillings. Bring to room temperature before serving for best flavor and texture.
- Freezing completed cake: Place the cake in the freezer uncovered for 1 hour until the frosting is firm, then wrap well in plastic wrap and aluminum foil. Freeze for up to 1 month. Thaw overnight in the refrigerator, then bring to room temperature before serving.
Vintage Heart Cake Recipe That Bakers Charge Higher Prices For Made Simply
Easiest Ever Vintage Heart Cake
Prep Time: 45 minutes Cook Time: 35 minutes Cooling Time: 1 hour Decorating Time: 1 hour Total Time: 3 hours 20 minutes Servings: 8-10
Ingredients:
- 2 cups all-purpose flour
- 1 1/2 cups granulated sugar
- 3/4 cup unsalted butter, softened
- 1 cup whole milk, room temperature
- 3 large eggs, room temperature
- 2 1/2 teaspoons baking powder
- 1/2 teaspoon salt
- 2 teaspoons vanilla extract
- 1/4 teaspoon almond extract
For the frosting:
- 1 1/2 cups unsalted butter, softened
- 6 cups powdered sugar, sifted
- 3-4 tablespoons heavy cream
- 2 teaspoons vanilla extract
- 1/4 teaspoon salt
- Gel food coloring (pink, peach, or desired color)
Instructions:
- Preheat oven to 350°F. Grease and flour an 8-inch heart-shaped pan.
- Cream butter and sugar until light and fluffy, about 3-4 minutes.
- Add eggs one at a time, then stir in extracts.
- Whisk flour, baking powder, and salt in a separate bowl.
- Gradually add dry ingredients to butter mixture, alternating with milk.
- Pour batter into prepared pan and bake for 30-35 minutes.
- Cool in pan for 10 minutes, then transfer to wire rack to cool completely.
- For frosting, beat butter until creamy, then gradually add powdered sugar.
- Add vanilla, salt, and cream, beating until light and fluffy.
- Apply crumb coat, chill, then frost and decorate with piping techniques.
Why Vintage Heart Cakes Are So Popular and Bakers Running Their Texas-Based Home Bakery Since Years
Making a vintage heart cake is not just about creating a beautiful dessert – it’s about embracing a timeless baking tradition that brings joy to both the baker and those who get to enjoy the finished creation. Furthermore, with the skills you’ve learned from this recipe, you’ll be able to create other vintage-style cakes for special occasions.
Additionally, the satisfaction of creating something beautiful with your own hands is immeasurable. Most importantly, remember that perfection isn’t the goal – each vintage cake has its own unique charm and character. Therefore, embrace the process, enjoy the creative journey, and be proud of your delicious creation!
Did you try this recipe? Leave a comment below and let me know how it turned out! Also, share your photos on social media and tag me @VintageCakeBaker! Moreover, sign up for my email list to get more delicious recipes delivered straight to your inbox!
The Institute of Culinary Education shares professional baking secrets that help home bakers achieve bakery-quality results.
Frequently Asked Questions About Vintage Heart Cakes That One Person Wrote About
What is a vintage heart cake?
A vintage heart cake is a heart-shaped cake decorated with classic piping techniques, typically featuring shell borders, rosettes, and other traditional designs. Furthermore, these cakes often use pastel colors and elegant, timeless decorating styles that hearken back to classic bakery designs of the past.
Does Dairy Queen do heart-shaped cakes?
Yes, Dairy Queen does offer heart-shaped cakes, especially around Valentine’s Day. However, their designs are typically more modern rather than vintage-style. Additionally, a DQ heart cake typically costs between $25-30 depending on size and location.
What are vintage style cakes called?
Vintage style cakes are often referred to as “heritage cakes,” “retro cakes,” or “classic decorated cakes.” In addition, they may be called “old-fashioned” or “traditional” cakes, reflecting their timeless decorating techniques and aesthetic appeal.
What frosting is used for vintage cakes?
American buttercream is commonly used for vintage cakes because of its stability and ease of piping. Alternatively, Swiss meringue buttercream is another popular choice as it provides a silky texture that’s less sweet and holds detailed piping well.
How to pipe hearts on cake?
To pipe hearts on a cake, use a round tip or a small star tip. First, hold the piping bag at a 45-degree angle to the cake surface. Then, pipe a “V” shape by applying pressure and dragging the tip downward at an angle, then back up at an angle. Finally, release pressure and pull away to complete the heart shape.
Why are vintage cakes so popular?
Vintage cakes have experienced a resurgence in popularity due to their nostalgic appeal, timeless beauty, and the growing interest in traditional baking techniques. Moreover, social media has amplified this trend, with many bakers sharing satisfying decorating videos of these classic designs.
How many people does a heart-shaped cake feed?
An 8-inch heart cake typically serves 8-10 people with generous portions. Furthermore, a 6-inch heart cake serves about 6-8 people, while a larger 10-inch heart cake can serve 12-16 people.
How do you shape a heart cake?
You can shape a heart cake using a dedicated heart-shaped cake pan, which is the easiest method. Alternatively, you can create a heart shape by using one square cake and one round cake of the same size – cut the round cake in half and position the halves against one side of the square to form a heart.
How much frosting for vintage heart cake?
For a standard 8-inch heart cake with elaborate vintage decorations, you’ll need approximately 4-5 cups of frosting. This includes enough for the crumb coat, final coating, and decorative piping work. Additionally, if you’re using multiple colors, make sure to divide the frosting accordingly before adding color.
What type of frosting is used on cakes?
Professional bakers often use American buttercream, Swiss meringue buttercream, Italian meringue buttercream, or French buttercream for decorating cakes. For vintage cakes specifically, American buttercream is commonly used because it crusts slightly, providing stability for intricate piping designs.
Why are cakes aren’t cheap when purchasing from bakeries?
When you purchase a cake from an independent bakery, you’re not just paying for ingredients. One commenter under one post explained that the costs that go into professional baking include specialized equipment, years of training, overhead costs like rent and utilities, and the time it takes to create beautiful decorations. That’s why even a simple vintage heart cake can seem expensive compared to grocery stores that have always sold cheaper cakes than an independent bakery.
How much does a professional charge for a vintage heart cake?
Professional bakers typically charge between $17-$30 an hour for their skilled labor, plus the cost of ingredients and overhead. As another viral baker pointed out, when you consider the time that goes into creating a beautiful vintage heart cake with shell borders and detailed piping, the price reflects the craftsmanship involved.

Easiest Ever Vintage Heart Cake
Equipment
- 1 8-inch heart-shaped cake pan
- 1 Electric mixer (handheld or stand)
- 1 Large mixing bowls
- 1 Rubber spatula
- 1 Offset spatula (small and large)
- 1 Piping bags
- 1 Piping tips (Wilton 1M, 2D, 32)
- 1 Cake turntable (optional)
- 1 Measuring Cups and Spoons
- 1 Parchment Paper
- 1 Whisk
- 1 Cake tester or toothpick
- 1 Wire cooling rack
- 1 Bench scraper or straight edge
- 1 Cake board (heart-shaped preferred)
Ingredients
Cake:
- 2 cups all-purpose flour
- 1 1/2 cups granulated sugar
- 3/4 cup unsalted butter softened
- 1 cup whole milk room temperature
- 3 large eggs room temperature
- 2 1/2 teaspoons baking powder
- 1/2 teaspoon salt
- 2 teaspoons vanilla extract
- 1/4 teaspoon almond extract
Frosting:
- 1 1/2 cups unsalted butter softened
- 6 cups powdered sugar sifted
- 3-4 tablespoons heavy cream
- 2 teaspoons vanilla extract
- 1/4 teaspoon salt
- Gel food coloring pink, peach, or desired color
Instructions
- Prepare IngredientsBring all ingredients to room temperature. Measure ingredients precisely for best results.2 cups all-purpose flour, 1 1/2 cups granulated sugar, 3/4 cup unsalted butter, 1 cup whole milk, 3 large eggs, 2 teaspoons vanilla extract
- Preheat and Prepare PanPreheat oven to 350°F. Grease and flour an 8-inch heart-shaped pan. Line bottom with parchment paper.
- Mix Cake BatterCream butter and sugar until light and fluffy, about 3-4 minutes. Add eggs one at a time. Stir in vanilla and almond extracts.3 large eggs, 2 teaspoons vanilla extract, 1 1/2 cups unsalted butter, 6 cups powdered sugar, 1/4 teaspoon almond extract
- Combine Dry IngredientsWhisk flour, baking powder, and salt in a separate bowl.2 cups all-purpose flour, 2 1/2 teaspoons baking powder, 1/2 teaspoon salt
- Combine Wet and Dry IngredientsGradually add dry ingredients to butter mixture, alternating with milk. Mix until just combined. Do not overmix.
- Bake CakePour batter into prepared pan. Bake for 30-35 minutes. Test with a cake tester for doneness.
- Cool CakeCool in pan for 10 minutes. Transfer to wire rack to cool completely.
- Prepare FrostingBeat softened butter. Gradually add powdered sugar. Mix in vanilla, salt, and cream until light and fluffy.3/4 cup unsalted butter, 2 teaspoons vanilla extract, 6 cups powdered sugar, 1/4 teaspoon salt, 3-4 tablespoons heavy cream
- Frost and DecorateApply crumb coat and chill. Add final frosting layer. Pipe decorative borders using different tips for vintage design.Gel food coloring
Notes
- Room temperature ingredients blend better
- Don’t overmix batter
- Cool cake completely before frosting
- Practice piping techniques on parchment paper first
Did you love this recipe? Rate it and share your experience!
There are no reviews yet. Be the first one to write one.