
The Perfect Heart Shaped Cakes Recipe: Easy, Delicious & Romantic
Looking to bake a romantic treat? This heart shaped cakes recipe is perfect for Valentine’s Day, anniversaries, or just because! Nothing says “I love you” quite like a homemade heart-shaped cake that’s been lovingly crafted with your own hands. The good news is that creating this beautiful dessert is much easier than you might think.
This classic vanilla heart shaped cakes with elegant vintage piping techniques is not only visually impressive but also incredibly delicious. Moreover, the recipe is straightforward enough for beginners yet produces results that look like they came from a professional bakery. Furthermore, I’ll walk you through every step of the process, from baking the perfect cake layers to creating that stunning heart shape and decorating it with beautiful vintage-inspired designs.
Whether you’re planning a special Valentine’s Day celebration, commemorating an anniversary, surprising someone for their birthday, or simply want to show someone you care, this heart-shaped cake will be the perfect centerpiece. Additionally, this versatile recipe can be adapted for weddings, engagements, or any occasion that calls for a touch of romance and sweetness.
One of the best things about this recipe is its reliability. As a result of careful testing, you’ll achieve a moist, delicious cake every time. In addition, the detailed instructions ensure that even if you’ve never attempted a shaped cake before, you’ll be able to create something truly special.
What Makes This Heart Shaped Cake Recipe Special With Vintage Buttercream Decoration
Before we dive into the ingredients and instructions, let me share why this particular heart shaped cakes recipe stands out from others you might find online. First of all, this recipe doesn’t require any special heart-shaped pans, which can be expensive and are rarely used. Instead, we’ll create our heart shape using regular round cake layers that most bakers already have on hand.
Furthermore, the vintage piping techniques we’ll use give this cake a timeless, elegant appearance that’s reminiscent of classic bakery designs. Consequently, your finished cake will have that professional look without requiring advanced decorating skills.
Another thing that makes this recipe special is the balance of flavors. The moist vanilla cake pairs perfectly with the rich buttercream frosting, creating a classic combination that everyone loves. Additionally, I’ll share some flavor variations so you can customize the cake to suit your recipient’s tastes.
One of my favorite heart shaped cakes I’ve ever made was for my sister’s anniversary. The vintage heart shaped cake became the highlight of their celebration, and guests couldn’t believe it was homemade. Therefore, I’m confident this recipe will help you create equally memorable moments.
Essential Ingredients for Your Perfect Heart Shaped Cake with Vintage Piping Tutorial
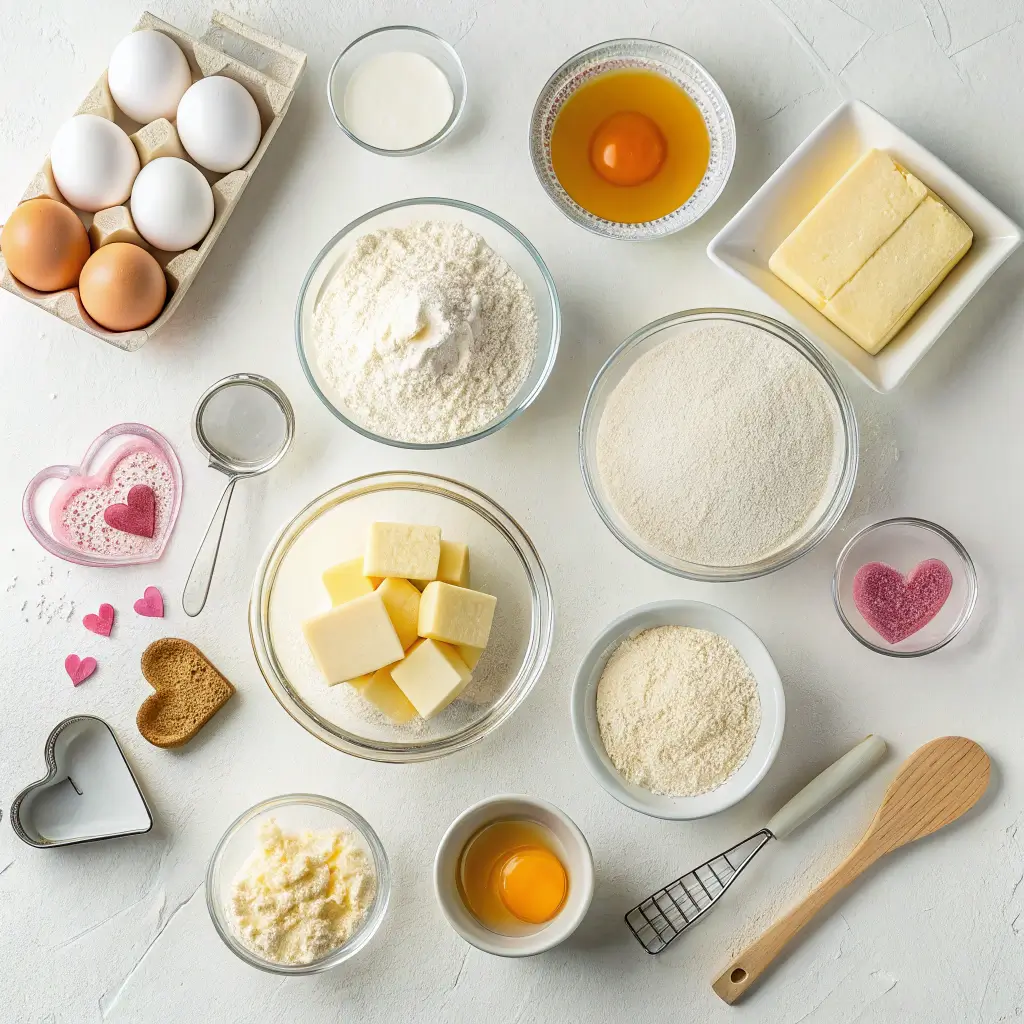
For the Vanilla Cake Layers:
- 3 cups all-purpose flour
- 2 1/2 teaspoons baking powder
- 1/2 teaspoon salt
- 1 cup (2 sticks) unsalted butter, room temperature
- 2 cups granulated sugar
- 4 large eggs, room temperature
- 2 teaspoons pure vanilla extract
- 1 cup whole milk, room temperature
Vanilla Buttercream Frosting:
- 1 1/2 cups (3 sticks) unsalted butter, room temperature
- 6 cups powdered sugar, sifted
- 3 tablespoons heavy cream or milk
- 2 teaspoons pure vanilla extract
- 1/4 teaspoon salt
- Gel food coloring (optional – pink or red for a Valentine’s theme)
For the Filling (Optional):
- 1 cup strawberry preserves OR
- 1 cup chocolate ganache
Equipment You’ll Need:
- Two 8-inch round cake pans
- Mixing bowls (large and medium)
- Electric mixer (stand or handheld)
- Measuring cups and spoons
- Rubber spatula
- Parchment paper
- Cooling rack
- Serrated knife (for leveling cakes)
- Cake board or serving plate
- Offset spatula
- Piping bags
- Piping tips (star tip for shell borders and other vintage designs)
- Bench scraper or straight edge (for smooth frosting)
- Cake turntable (optional but helpful)
Professional bakers at The Spruce Eats recommend chilling your cakes before leveling to prevent crumbling and ensure clean cuts.
Detailed Heart Shaped Cake Recipe Instructions With Layer Cake Preparation
Preparing Your Round Cake Layers for a Heart-Shaped Design
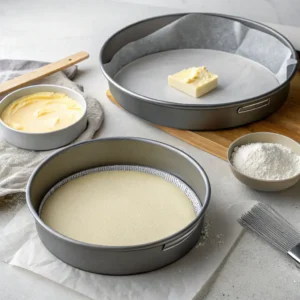
- Preheat and prepare: First, preheat your oven to 350°F (175°C). Next, grease two 8-inch round cake pans and line the bottoms with parchment paper circles. Then, lightly flour the sides of the pans.
- Mix dry ingredients: In a medium bowl, whisk together the flour, baking powder, and salt. Set aside.
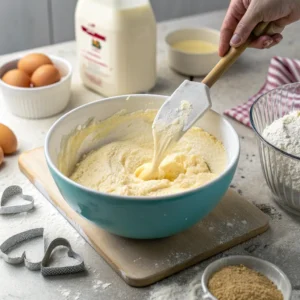
- Cream butter and sugar: In a large bowl, use an electric mixer to beat the butter on medium speed until creamy (about 1 minute). Subsequently, add the sugar and continue beating on medium-high speed until light and fluffy (about 3-4 minutes). This step is crucial for a tender cake texture.
- Add eggs and vanilla: Add the eggs one at a time, beating well after each addition. Then, mix in the vanilla extract. The mixture should look light and fluffy.
- Alternate dry ingredients and milk: Reduce mixer speed to low. Add about one-third of the flour mixture and mix until just combined. Next, add half the milk and mix. Continue alternating with another third of flour, remaining milk, and finishing with the last third of flour. Be careful not to overmix.
- Divide and bake: Divide the batter evenly between the two prepared 8-inch cake pans. Smooth the tops with a spatula. Bake for 25-30 minutes, or until a toothpick inserted into the center comes out clean with just a few moist crumbs.
- Cool properly: Allow the cakes to cool in the pans for 10 minutes. Afterward, remove from pans and transfer to a wire cooling rack to cool completely (at least 1 hour).
Making the Perfect Buttercream Frosting for Your Heart Cake
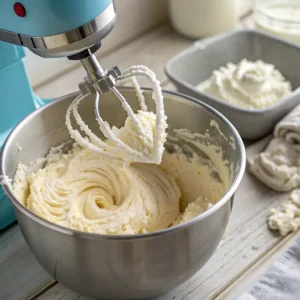
- Beat the butter: In a large bowl, beat the butter on medium-high speed until pale and creamy (about 3-4 minutes).
- Add powdered sugar gradually: Reduce the speed to low and add the powdered sugar one cup at a time, mixing well after each addition. This prevents a powdery mess and ensures smooth frosting.
- Add remaining ingredients: Add the heavy cream, vanilla extract, and salt. Then, increase speed to medium-high and beat for 3-4 minutes until light and fluffy.
- Adjust consistency if needed: If the frosting is too thick, add a little more cream, one teaspoon at a time. If it’s too thin, add more powdered sugar, 1/4 cup at a time.
- Color (optional): If you want colored frosting, divide it into portions and add gel food coloring a little at a time until you reach your desired shade.
Creating Your Heart Shaped Cake from Round Cake Layers
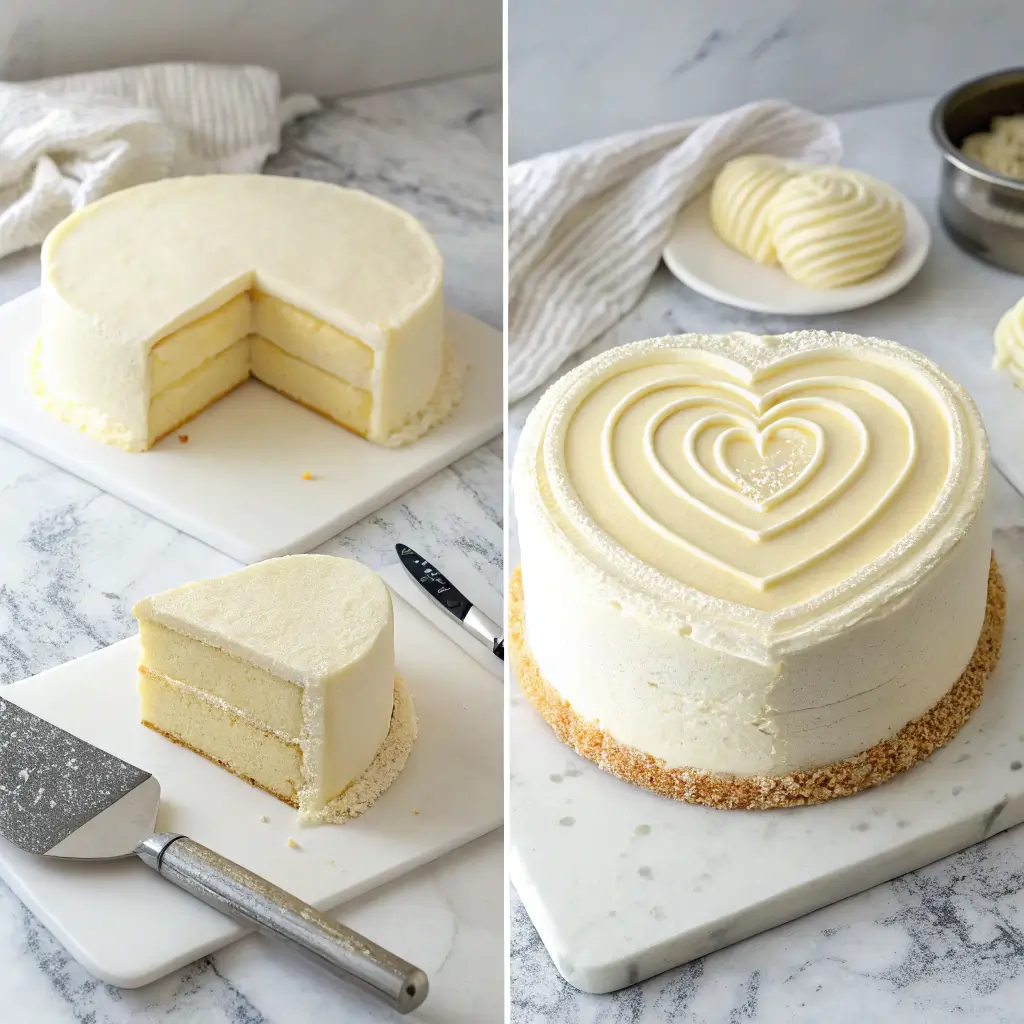
- Level the cakes: Use a serrated knife to remove any domed tops from your cooled cake layers, creating flat surfaces. This ensures stability when stacking.
- Create the heart shape: Place the first round cake layer on your cake board or serving plate. Position the second round cake layer beside it, overlapping slightly (about 1 inch) to form the top of the heart. Use a serrated knife to carve away excess cake where the layers meet, creating a smooth indent at the top of the heart.
- Cut the bottom point: To complete the heart shape, use your knife to cut a V-shape at the bottom of the combined circles. Save these cake scraps for cake pops or trifle!
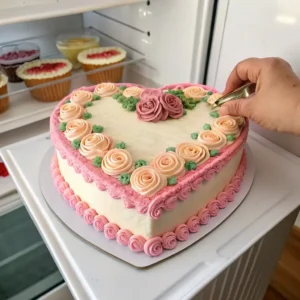
Frosting and Decorating Your Heart Shaped Cake with Vintage Piping Techniques
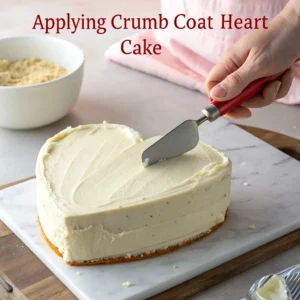
Applying the Crumb Coat and Final Layer of Frosting
- Apply filling: If using filling, spread a thin layer on the surface of the cake, leaving about 1/2 inch border around the edges to prevent spillage.
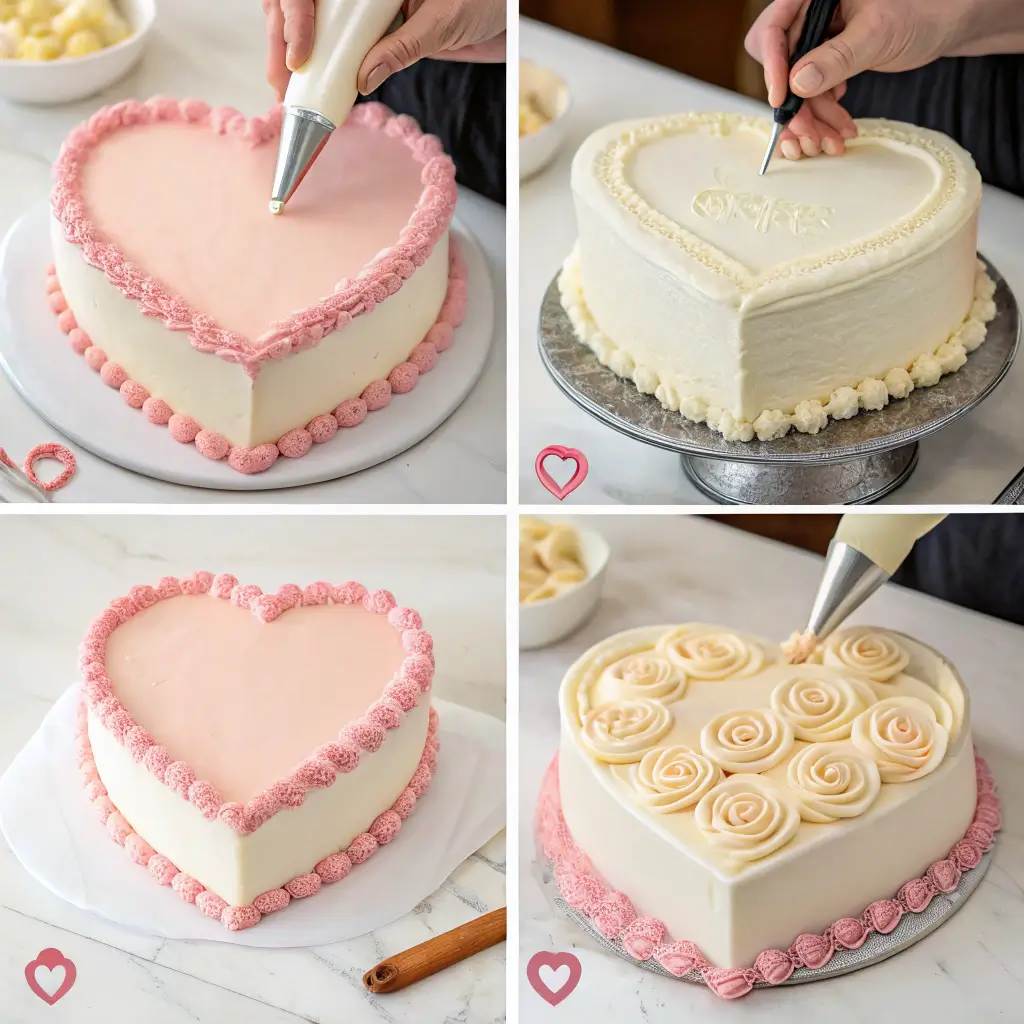
- Crumb coat: Apply a thin layer of buttercream all over the heart-shaped cake using an offset spatula. This seals in any loose crumbs. Subsequently, chill the cake for at least 20 minutes to set this base layer.
- Final coat: After chilling, apply a thicker, final layer of buttercream all over the cake and smooth the sides of the cake with a bench scraper or spatula. The frosted cake should have clean, even surfaces for your vintage piping work.
- Chill again: Let the frosting set by chilling the cake for another 20-30 minutes before adding decorative piping.
Vintage Piping Decoration Tutorial for Your Heart Cake
- Prepare piping bags: Fill piping bags fitted with your chosen tips. For classic vintage designs, a star tip works beautifully for shell borders and rosettes.
- Practice first: Before piping on your cake, practice your designs on a plate or parchment paper.
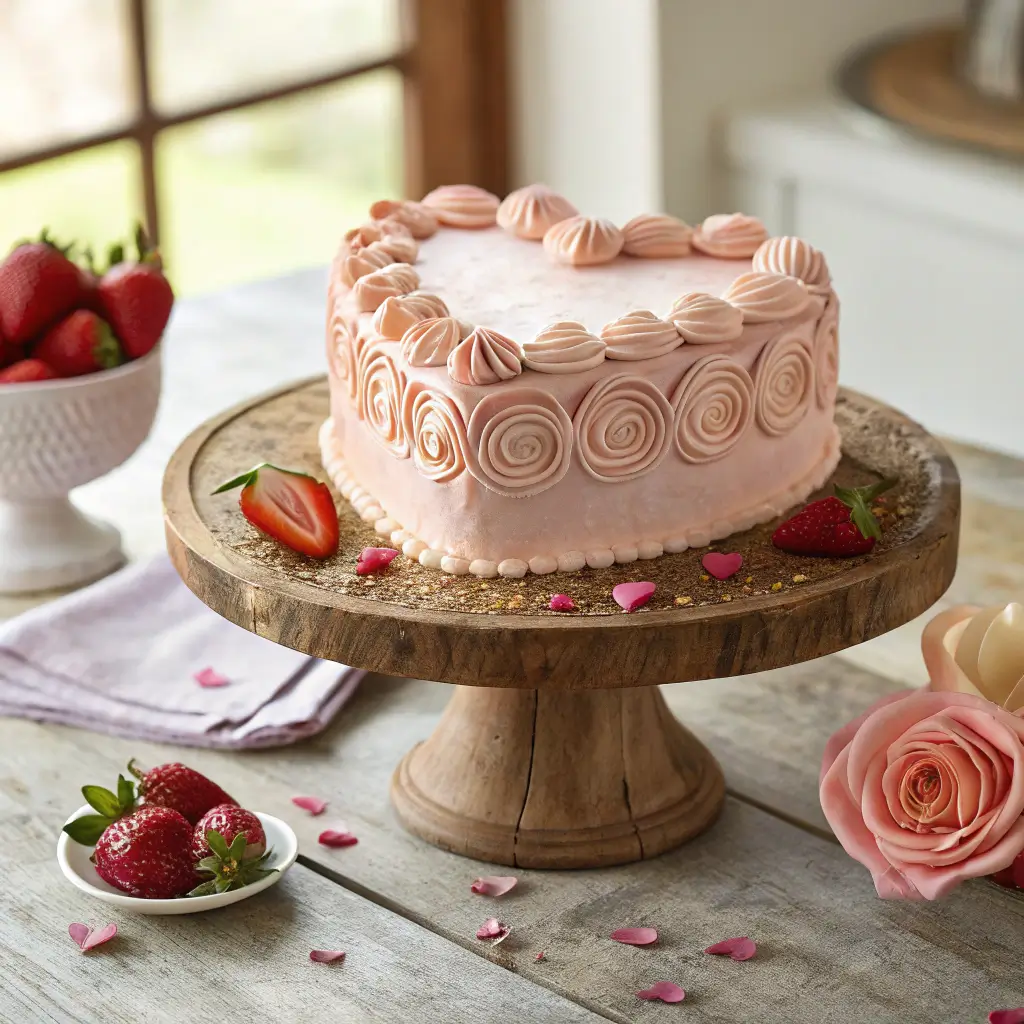
- Create a shell border: Pipe a shell border around the bottom edge of the cake by applying pressure to the piping bag, creating a small mound, then releasing pressure while pulling away. Repeat, connecting each shell to create a continuous border.
- Decorate the top of the heart: Create vintage-style decorations on the top of the cake using the same technique. You can pipe shells, rosettes, or other designs to highlight the heart shape.
- Add finishing touches: Consider adding small details like dots or smaller shells to fill any gaps and enhance the vintage appearance.
- Chill to set: Let the frosting set in the refrigerator for at least 20 minutes before serving to ensure your decorations hold their shape.
Not sure which vintage design to choose? Browse our collection of classic patterns in Heart Cake: Vintage Heart Shaped Cake for timeless inspiration.
Expert Tips for The Perfect Heart Shaped Layer Cake That Will Satisfy Everyone

Baking Tips:
- Room temperature ingredients: Make sure butter, eggs, and milk are at room temperature for the best texture and volume.
- Don’t overmix: Mix just until ingredients are combined to avoid a tough cake.
- Test for doneness: Use a toothpick inserted in the center to check if the cake is done. It should come out with a few moist crumbs, but no wet batter.
- Cool completely: Never try to frost a warm cake – it will melt your buttercream and create a mess.
Frosting Tips:
- Sift your powdered sugar: This ensures a smooth, lump-free buttercream.
- Stable consistency: The frosting should hold its shape but still be spreadable. If it’s too soft, chill it for 10-15 minutes.
- Clean edges: Use a bench scraper held at a 90-degree angle to the cake for professional-looking smooth sides.
- Fix mistakes: If you make a mistake while piping, simply scrape off that section and smooth it out before trying again.
Shaping Tips:
- Visual guide: Draw a heart shape on parchment paper first and place it on top of your assembled round cake layers as a cutting guide.
- Clean cuts: Use a sharp, serrated knife for clean cuts when shaping your heart.
- Save scraps: Don’t throw away cake scraps – they make delicious cake pops or trifle desserts!
Delicious Variations for Your Heart-Shaped Cake Recipe with Layer Flavor Options
Different Cake Flavors:
- Chocolate Heart Cake: Replace 1/2 cup of flour with unsweetened cocoa powder for a chocolate version.
- Red Velvet Heart: Add 2 tablespoons of cocoa powder and red food coloring to the batter for a Valentine’s Day-appropriate red velvet cake.
- Lemon Heart: Add 2 tablespoons of lemon zest and substitute some of the milk with lemon juice for a citrusy variation.
Frosting Alternatives:
- Cream Cheese Frosting: Substitute half the butter with cream cheese for a tangy flavor that pairs beautifully with the vanilla cake.
- Chocolate Buttercream: Add 1/2 cup of melted and cooled chocolate to the buttercream recipe for chocolate lovers.
- Strawberry Buttercream: Mix in 1/4 cup of strained strawberry puree for a naturally pink, fruity frosting.
Filling Ideas:
- Fruit Preserves: Spread a layer of raspberry, strawberry, or cherry preserves between cake layers.
- Chocolate Ganache: Use a rich chocolate ganache for an indulgent filling.
- Flavored Creams: Try white chocolate, coffee, or caramel-flavored cream fillings for something different.
How to Store Your Heart Shaped Birthday Cake or Special Occasion Dessert
Short-Term Storage:
- Room Temperature: Your cake can be stored at room temperature in a cake keeper or under a dome for 1-2 days if you live in a cool, dry climate.
- Refrigeration: For longer freshness, particularly in warm weather, store your cake in the refrigerator in an airtight container for up to 5 days. Let it come to room temperature for about 30 minutes before serving for the best flavor and texture.
Freezing Instructions:
- Whole Cake: To freeze the entire cake, place it uncovered in the freezer until solid (about 4 hours), then wrap it well in plastic wrap followed by aluminum foil. The cake will keep for up to 2 months.
- Cake Slices: Individual slices can be wrapped in plastic wrap and stored in airtight containers in the freezer for up to 2 months.
- Thawing: Thaw frozen cake in the refrigerator overnight, then bring to room temperature before serving.
According to Bon Appétit, allowing your cake to come to room temperature before serving enhances flavor and texture.
Frequently Asked Questions About Heart Shaped Cake Recipe and Vintage Piping Decorations
How do I make a heart-shaped cake?
You can make a heart shaped cakes without a special pan by using two round cake layers. Place them side by side with a slight overlap, then cut a V-shape at the bottom to form the point of the heart. This method is more versatile than buying a single-use heart-shaped cake pan.
Are heart cakes 2 or 3 layers?
Heart cakes can be either 2 or 3 layers depending on your preference. Our recipe uses 2 round cake layers arranged in a heart shaped cakes, but you could certainly bake a third layer and stack it on top for a taller cake if you prefer.
How much batter do I need for a heart-shaped pan?
If you’re using a dedicated heart-shaped pan rather than our method, a standard heart-shaped cake pan typically requires about the same amount of batter as an 8-inch round cake pan. For our two 8-inch round cake layers method, you’ll need approximately 6-7 cups of batter.
How to make a heart-shaped cake without a circle pan?
While our method uses round pans, you can also create a heart shaped cakes using a square pan and a round pan. Bake one cake in a square pan and one in a round pan of the same dimensions. Cut the round cake in half and position the halves on two adjacent sides of the square to create a heart.
How many people does a heart shaped cake feed?
A heart shaped cake made from two 8-inch round cakes will serve approximately 10-12 people with moderate slices. For smaller portions at a larger gathering, you could serve up to 16 people.
How do you cut a heart shaped cake equally?
To cut a heart shaped cake evenly, start by cutting straight down through the center top to bottom. Then make parallel cuts on either side of the center line. Finally, make horizontal cuts perpendicular to these first cuts to create equal portions.
How do you line a heart-shaped cake tin?
To line a heart-shaped cake tin, trace the bottom of the pan onto parchment paper, cut it out, and place it in the bottom of the greased pan. For the sides, cut strips of parchment that are taller than the pan’s height and press them around the inside edges.
What is the “hear me out” cake trend?
The “hear me out” cake trend refers to unconventional cake flavors or combinations that sound unusual but taste delicious. It became popular on social media where bakers would introduce an unusual cake idea with the phrase “hear me out” before explaining their creative concept.
Conclusion: Your Vintage Heart Shaped Cake Will Be the Star of Any Celebration
Creating a beautiful heart shaped cake with vintage piping is truly a labor of love, but the results are absolutely worth it. Not only will you have a stunning centerpiece for your special occasion, but you’ll also have the satisfaction of creating something truly personal and meaningful.
Whether you’re baking this cake for Valentine’s Day, an anniversary, a birthday, or just to show someone you care, the recipient will undoubtedly appreciate the time and effort you’ve put into making something so special. Furthermore, with the detailed instructions and tips provided in this recipe, even beginners can achieve professional-looking results.
I hope you enjoy making this heart shaped cake recipe! I’d love to hear how it turned out for you and see your beautiful creations. Please share your experiences and photos in the comments section below or tag us on social media using #HeartShapedCakeRecipe!
Happy baking!
Heart-Shaped Cake with Vintage Piping
Equipment
- 1 Electric Mixer
- 2 8-inch round cake pans
- 1 Cooling Rack
- 1 Serrated knife
- 1 Cake board
- 1 Offset Spatula
- 2 Piping bags
- 1 Star tip piping tip
- 1 Bench Scraper
- 1 Cake turntable optional
Ingredients
For the Vanilla Cake:
- 3 cups all-purpose flour
- 2 1/2 teaspoons baking powder
- 1/2 teaspoon salt
- 1 cup unsalted butter room temperature
- 2 cups granulated sugar
- 4 large eggs room temperature
- 2 teaspoons pure vanilla extract
- 1 cup whole milk room temperature
For the Buttercream Frosting:
- 1 1/2 cups unsalted butter room temperature
- 6 cups powdered sugar sifted
- 3 tablespoons heavy cream
- 2 teaspoons pure vanilla extract
- 1/4 teaspoon salt
- 1 bottle gel food coloring optional, pink or red
For the Filling Optional:
- 1 cup strawberry preserves OR chocolate ganache
Instructions
- Prepare the Cake Pans:Preheat your oven to 350°F (175°C). Grease two 8-inch round cake pans, line the bottoms with parchment paper, and lightly flour the sides.3 cups all-purpose flour
- Mix Dry Ingredients:In a medium bowl, whisk together the flour, baking powder, and salt. Set aside.3 cups all-purpose flour, 2 1/2 teaspoons baking powder, 1/2 teaspoon salt
- Cream Butter and Sugar:In a large bowl, beat the butter on medium speed until creamy (about 1 minute). Add the sugar and continue beating until light and fluffy (3-4 minutes)1 cup unsalted butter, 2 cups granulated sugar
- Add Eggs and Vanilla:Add eggs one at a time, beating well after each addition. Mix in the vanilla extract.4 large eggs, 2 teaspoons pure vanilla extract, 2 teaspoons pure vanilla extract
- Combine Wet and Dry Ingredients:Reduce mixer speed to low. Add one-third of the flour mixture, then half the milk, alternating until fully combined. Do not overmix.1 cup whole milk
- Bake the Cakes:Divide batter evenly between prepared pans, smooth the tops, and bake for 25-30 minutes until a toothpick inserted comes out clean.
- Cool the Cakes:Allow cakes to cool in pans for 10 minutes, then transfer to a wire rack to cool completely (about 1 hour).
- Prepare the Buttercream:Beat the butter on medium-high speed until pale and creamy (3-4 minutes). Gradually add powdered sugar, followed by cream, vanilla, and salt. Continue beating until light and fluffy.1 1/2 cups unsalted butter, 6 cups powdered sugar, 1/4 teaspoon salt
- Level and Form the Heart Shape:Trim any domed tops with a serrated knife. Position one cake as the base and the second cake (cut in half) to form the heart's curves. Carve a V-shape at the bottom.
- Add Filling (Optional):If desired, spread a thin layer of strawberry preserves or ganache between the cake layers.1 cup strawberry preserves OR chocolate ganache, 3 tablespoons heavy cream
- Apply Crumb Coat:Spread a thin layer of buttercream over the cake to trap crumbs. Chill for 20 minutes.
- Frost the Cake:Apply a thicker layer of buttercream and smooth with a bench scraper or offset spatula. Chill for another 20-30 minutes.
- Prepare for Piping:Fill piping bags fitted with star tips with the remaining buttercream.
- Decorate the Cake:Pipe a shell border around the cake's edges and add vintage-style rosettes and dots on top for an elegant finish.1 bottle gel food coloring
- Chill and Serve:Chill the finished cake for at least 20 minutes to set the frosting before serving.
Notes
- Ensure all ingredients are at room temperature for best results.
- Store the cake in an airtight container in the refrigerator for up to 5 days.
- For a chocolate variation, replace 1/2 cup of flour with unsweetened cocoa powder.
- The cake layers can be baked and frozen for up to 1 month. Thaw before decorating.
- Use gel food coloring for vibrant frosting without altering texture.